Stripped Antique Armoire Makeover
Find out how to get the stripped, raw wood look with this french antique armoire makeover!
If you know my story, you know that France holds a special place in my heart. And my brother recently gave me an antique armoire he acquired while living in Europe. Apparently, it’s actually Belgian, but I’ve seen many similar French armoires, and it has certainly had its fair share of wear and tear in its 200-ish year old life… but I just knew it could be beautiful again.
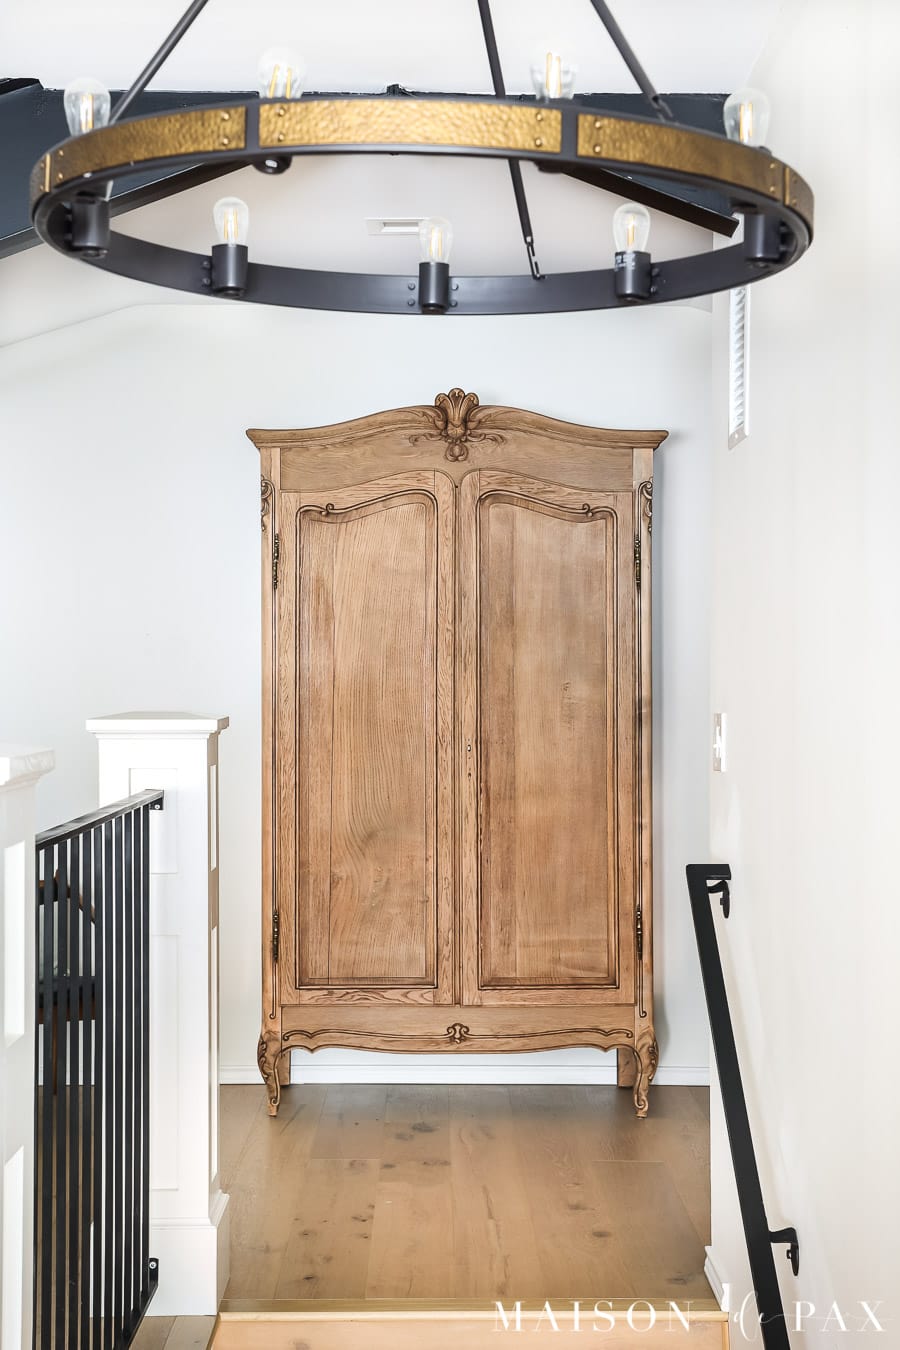
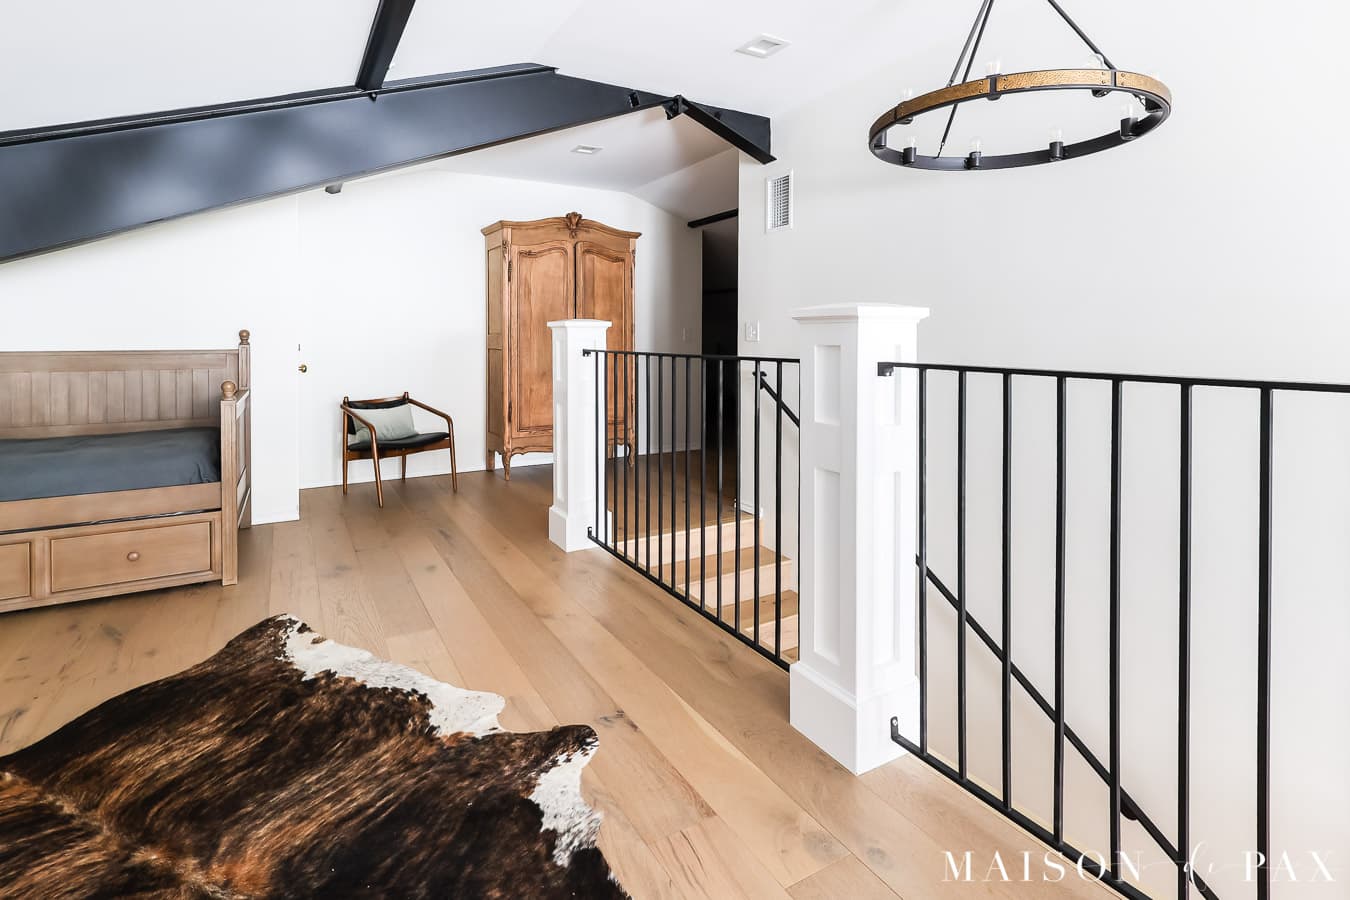
I had the pleasure of refinishing this oak armoire with my dad’s help, which made it extra special. We placed it just outside the bunk room at the ranch (which has no closet… and which also means I’m sharing a never-before-seen view of our upstairs here!). It’s perfect as extra storage and acts as a focal point for the landing at the top of the stairs.
I’m excited to show you exactly what we did with this furniture makeover so that you, too, could restore an antique armoire.
Antique armoire makeovers
There are basically endless options when it comes to restoring a piece like this to beauty. You could use chalk paint and clear wax to build patina, or layers of milk paint for an authentic aged finish. You could lacquer it for a beautiful, bold, modern look.
Alternatively, you could give it character with finishing touches such as gilding the decorative details. Or you could simply repair and refinish it the same wood finish as before. Ultimately, a piece with good bones has a huge variety of potential.
I, however, chose to go as simple as possible.
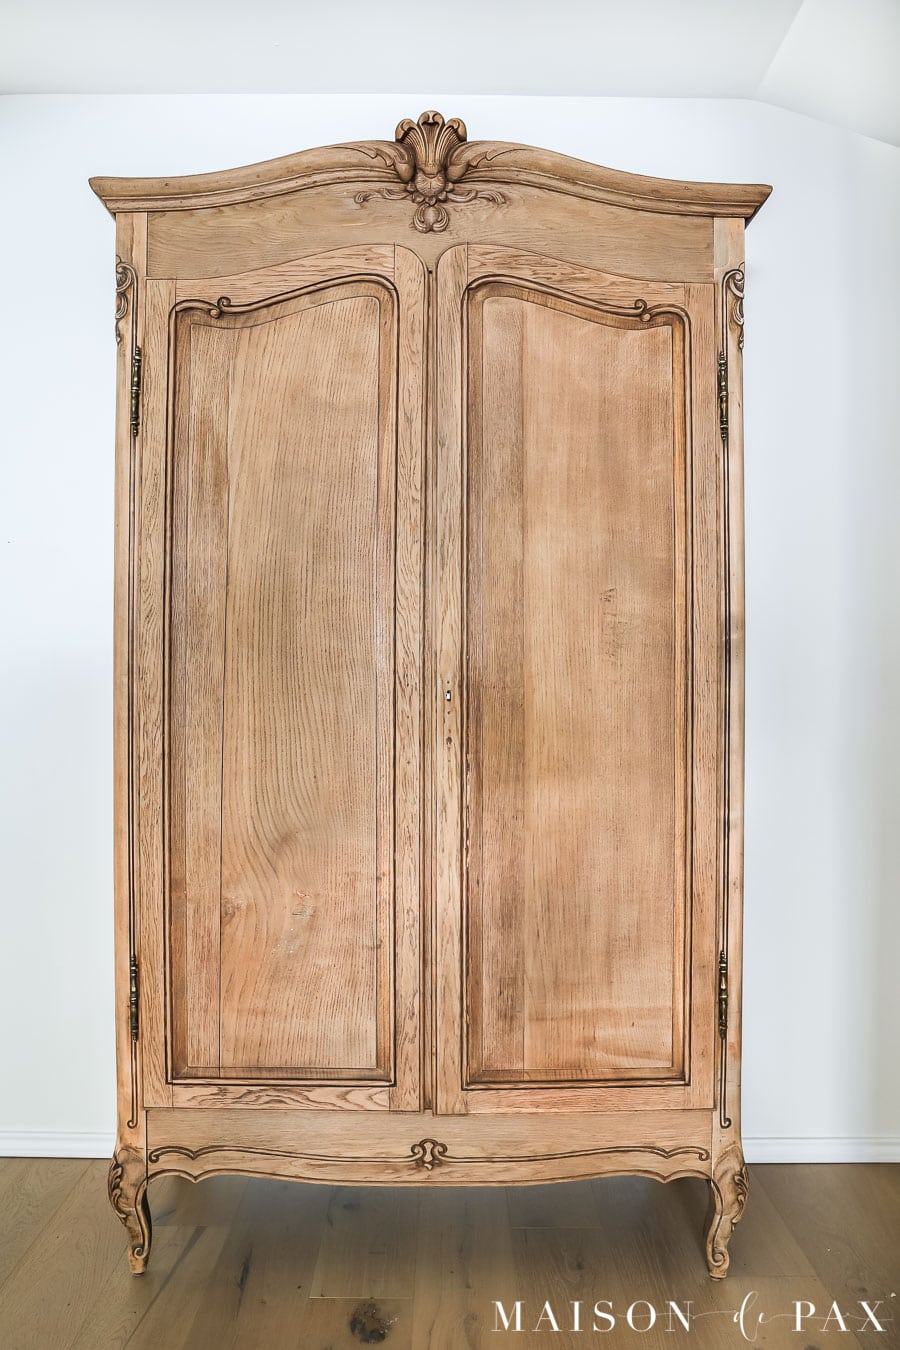
You’ve probably seen this natural, raw-wood look all over instagram and Pinterest. It’s a mix of trendy and classic – a way to merge the formality of antique furniture with the casual elegance of today’s modern lifestyle. And I am here for it!
Let me show you exactly how we refurbished this antique armoire, and then I’ll give you some more resources for refinishing your own antique piece of furniture with this natural wood look.
Stripping Antique Furniture
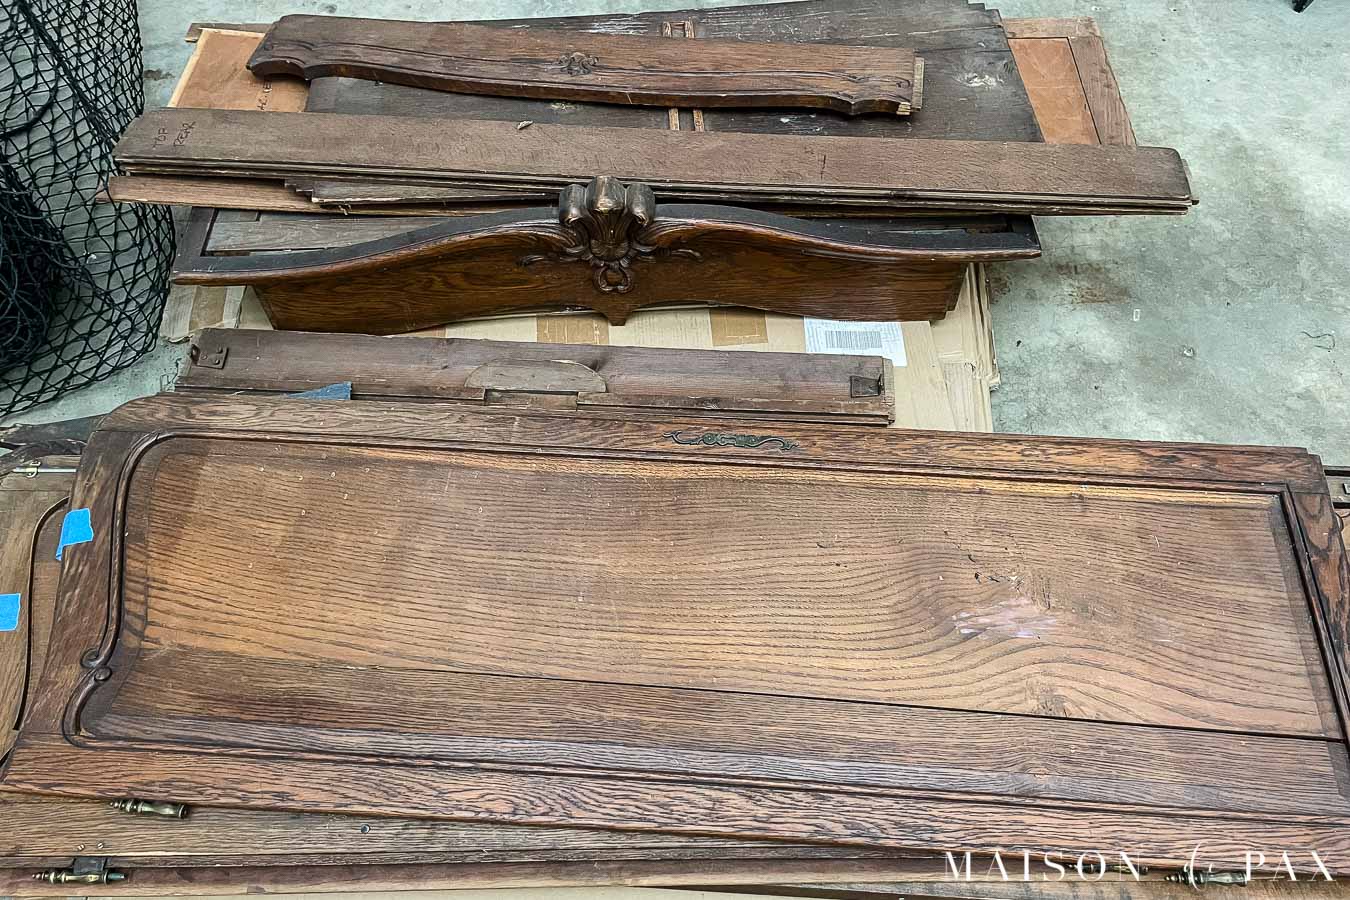
We started by stripping the old finish and stain from the wood. The armoire has actually sat disassembled in my garage since my brother gave it to me, so I don’t have an assembled “before” image, but you can see here the dark brown color and the splits that need repair.
This post contains affiliate links. Click here to read my full disclosure.
I often use chemical strippers (see here for a step-by-step process), but for this armoire, I needed something different. I actually used three methods, each of which had a different purpose:
- orbital sander and palm sander (for the main body and flat portions)
- hand sanding (for the grooves and parts of the trim work)
- oven cleaner (for the intricately carved pieces)
Stripping Furniture by Sanding
I decided to strip the main body simply by sanding. The wood was pretty dinged up, so sanding off the old finish served two purposes: it revealed the unstained wood and smoothed out many of the chips and imperfections.
We began with orbital sanders on the large, flat portions of the armoire. Using 60 or 80 grit paper, we simply removed the old finish and revealed the natural wood underneath. We used palm sanders to get into the corners and edges that the orbital sander could not reach.
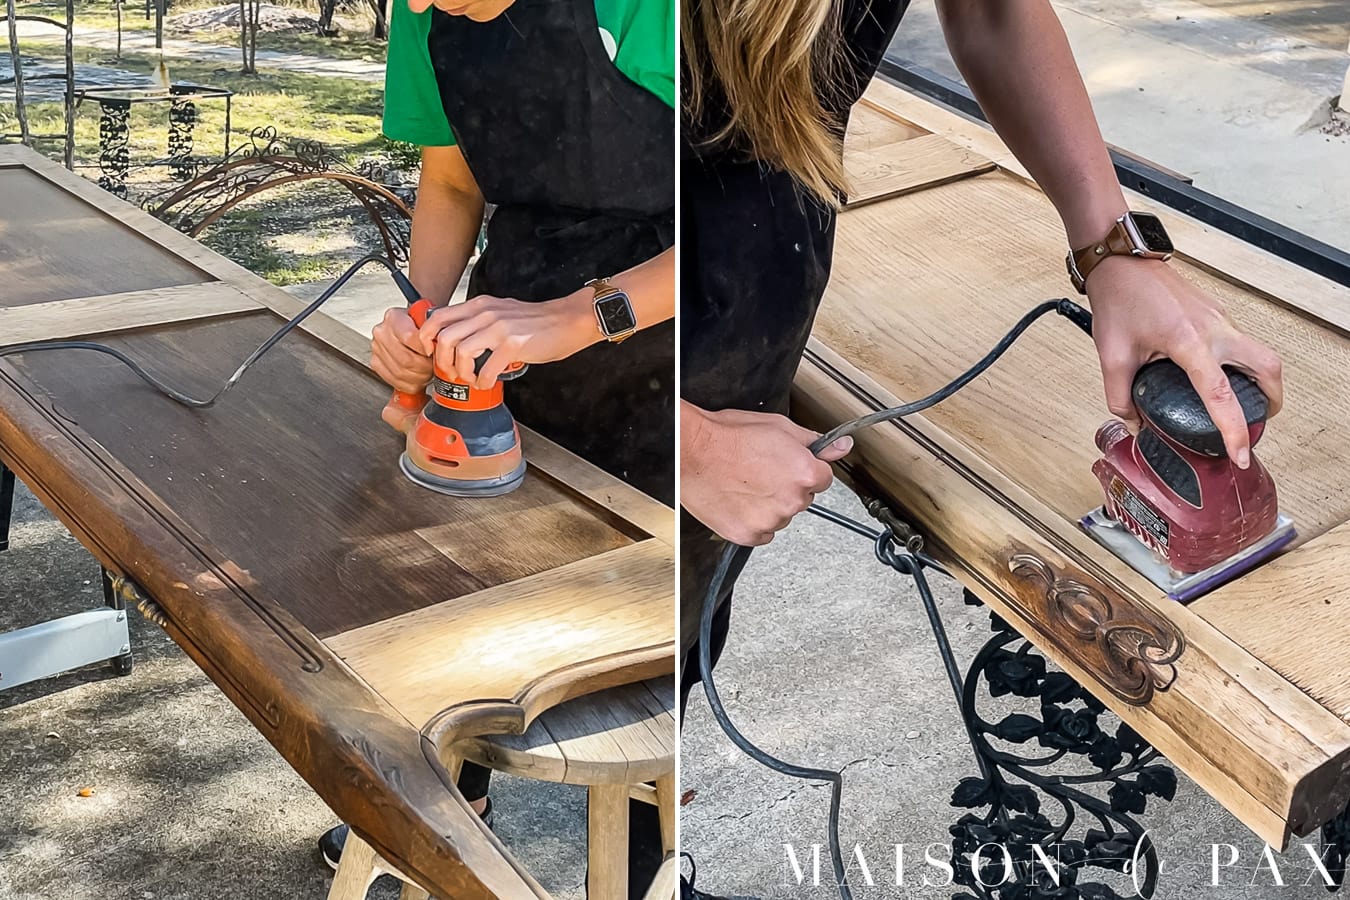
It was slow and messy work, but the stain didn’t go very deep, so it was satisfying and productive.
We finished off the detailed work by hand – wrapping the sandpaper around sanding sponges or small wood blocks and getting the last of the old finish off of the armoires sides, doors, and legs.
After stripping the old finish, we gave it a light sanding overall with 150 and then 220 to obtain a silky smooth finish.
Stripping Furniture with Oven Cleaner
Yep. You heard that right: oven cleaner. Oven cleaner is just another form of chemical stripper, but because it foams up and sticks to the surface so well, I find it especially useful on carving details and curves.
However note of warning: this is best used only on solid wood furniture, not veneer. That’s because you have to get the piece wet in this method, and veneers don’t do well with water.
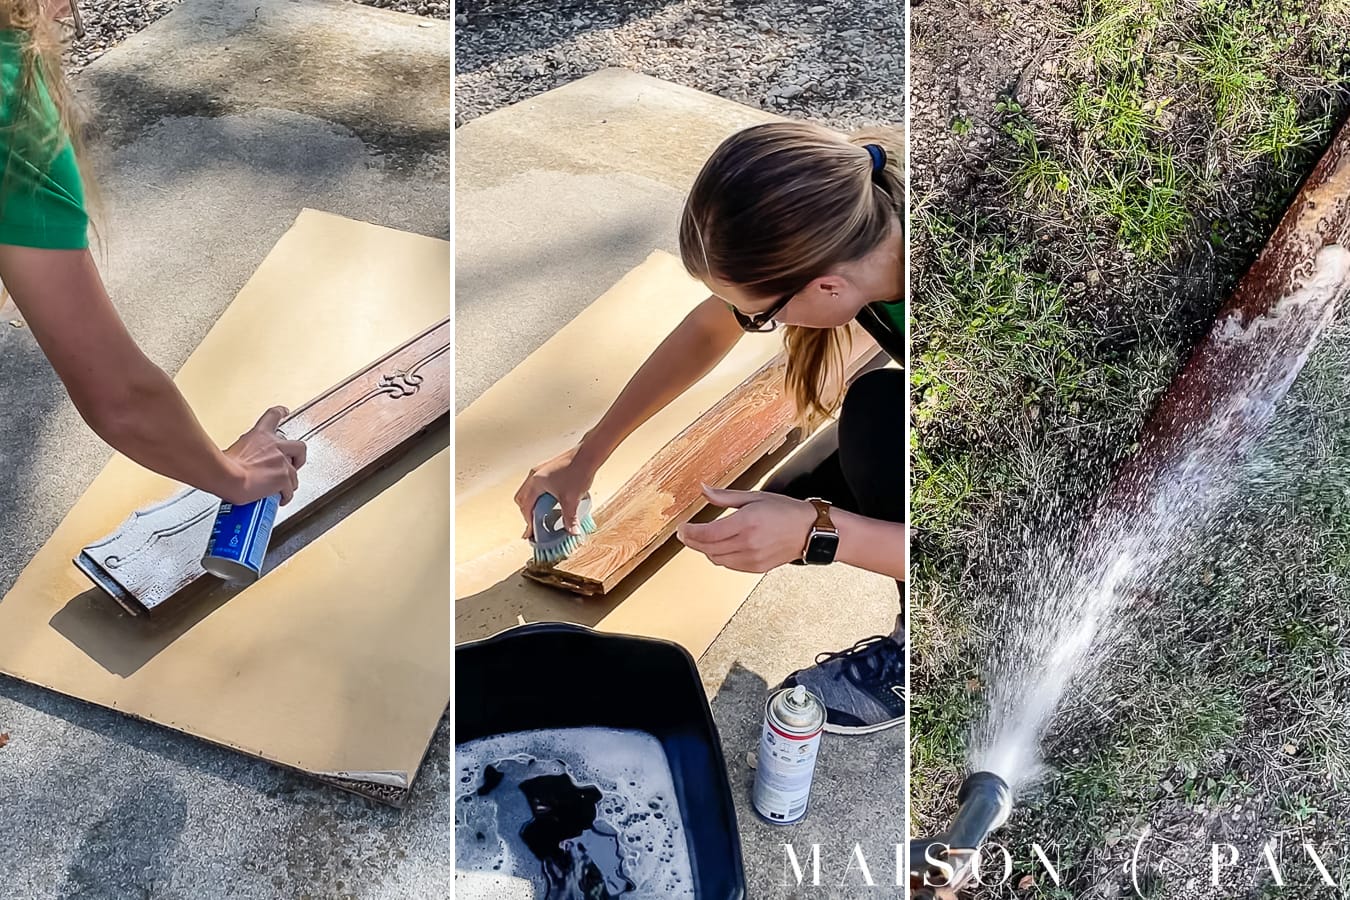
I chose to use oven cleaner on the bottom and top of the armoire because the decorative carvings and crown molding would have been difficult to strip by sanding. I’m planning a whole post soon about using oven cleaner to strip furniture, but here’s the quick version:
- spray on oven cleaner and let sit 20 minutes
- put a drop of dish soap in a little water and use a plastic scrub brush (like you would use for dishes) to scrub the piece
- spray off all cleaner, suds, and dissolving finish with a hose
- let dry
It was incredible how well it removed the old finish from these beautiful hand carved pieces. Here you can see the piece I stripped with the oven cleaner (on top) and the piece I sanded (underneath). I used this brand (because it was what my local grocery store carried… I haven’t tested it against other brands).
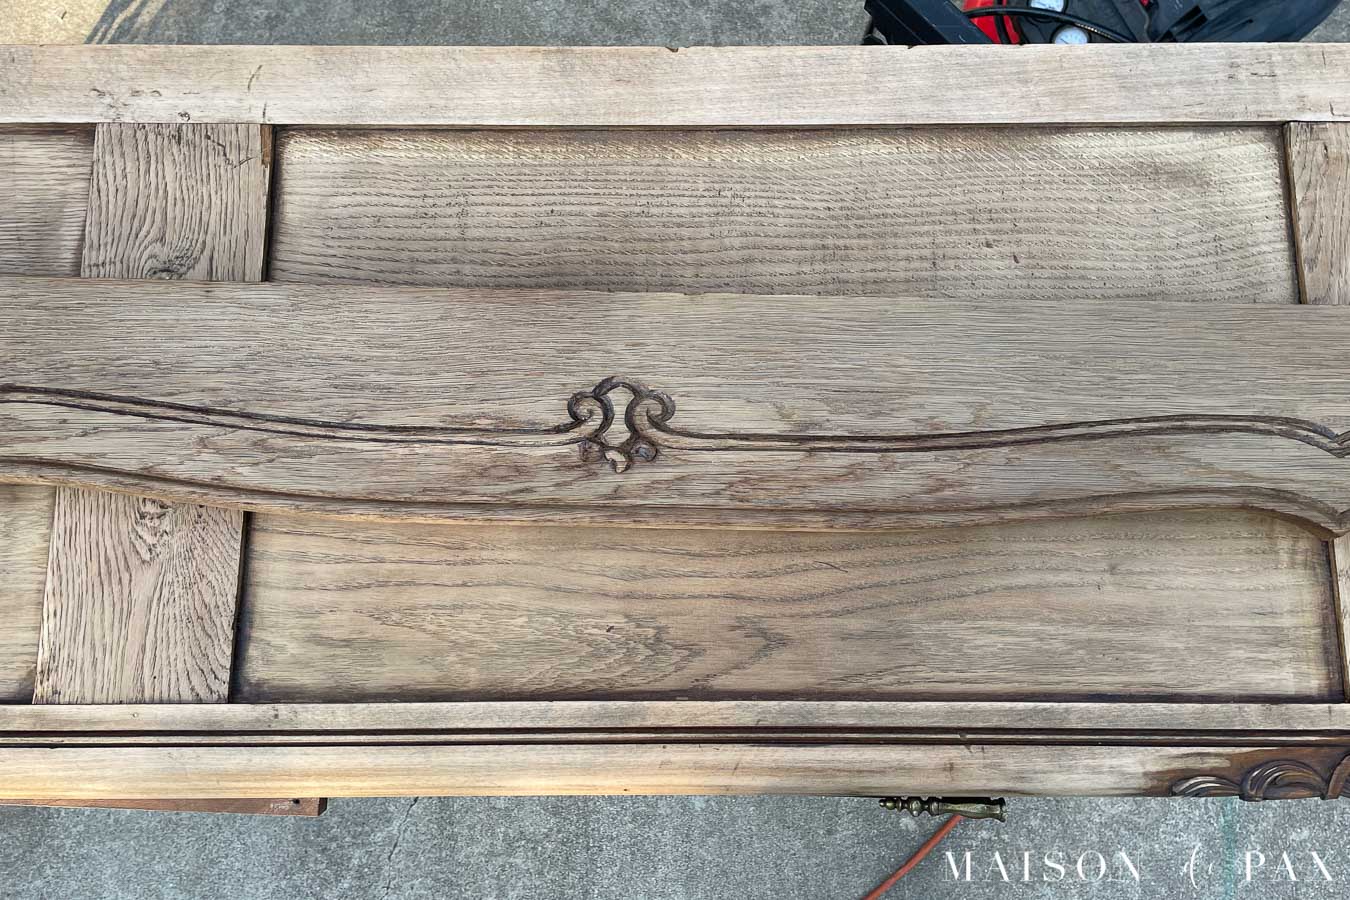
The pieces stripped with oven cleaner still needed a light sanding to smooth out the grain, since getting wet had raised it slightly, but it was easy compared to sanding to strip.
Finishing Antique Furniture
We then made a few repairs – regluing a split in the woodwork and securing the door panel back into its rails, but that’s all. Spoiler alert: we didn’t actually seal this piece. We left it the raw, natural, stripped, aged oak (and whatever wood the posts are made of).
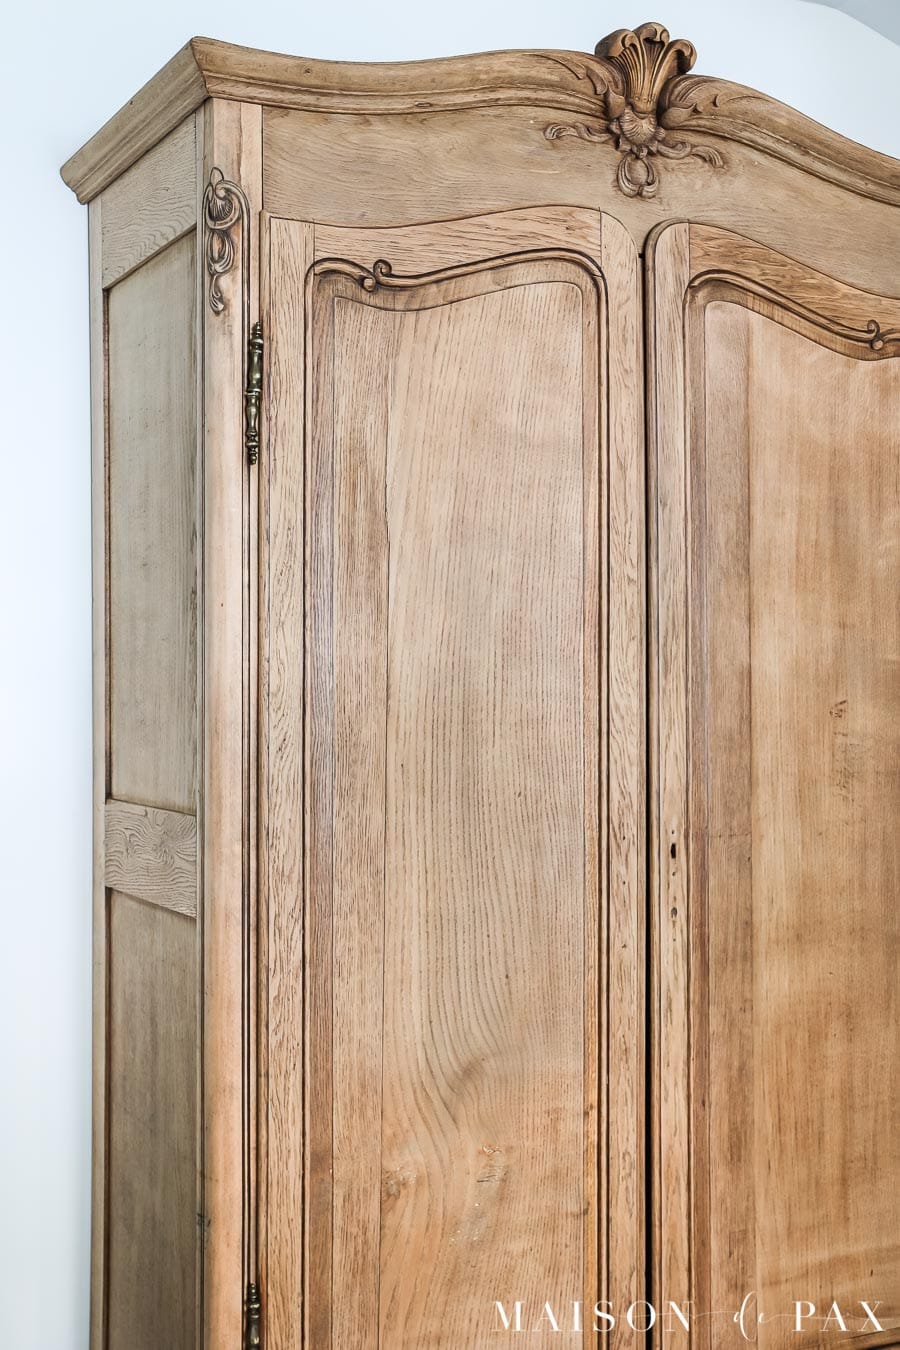
An armoire at the ranch house simply doesn’t receive enough traffic to warrant the effort of sealing the wood. Especially because oak tends to change color when sealed, and I really loved the way it looked when stripped. Read more about my thoughts on when to seal wood (or not) and how to maintain this raw wood look here.
So what did we do to this piece after stripping it? Just two things: cleaned it and assembled it.
Cleaning furniture after stripping is a bit of a process. I always blow off as much sanding dust as possible using my air compressor. A whisk broom can work here in a pinch if you don’t have a compressor.
Next, I wipe the furniture off with a clean, dry rag. Stripped wood will absorb water, so I try not to use a damp rag because I don’t want to raise the grain of the wood and undo all the hard work of sanding it smooth. I finish with a rag damp with alcohol. This will catch the last of the dust without raising the grain of the wood.
Assembling the armoire was something else. It all slides together and is then held in place with large bolts – no screws or nails. Some previous owner had written “top rear” on the wrong piece, so it took us a few tries to figure that out… but in the end we managed. Now the beautiful armoire is ready for linens, suitcases, etc.

Completing this small project with my dad was such a joy, and it just might be my new favorite furniture piece. I hope this little labor of love inspires you to breathe new life into an old piece! Get more furniture makeover ideas here.


This is absolutely stunning!
Thank you!
The armoire is absolute perfection to me! I’m really jealous, I’m sorry to admit that. I bought a very similar one on Facebook marketplace just as we went into a lockdown during the first wave of Covid. The seller lives just across the border in Quebec, and since the borders were closed, I couldn’t go get it. The seller said she would save it for me, and not to worry. Then she kept making excuses, and well, I never did get my beautiful old French Armoire. I’m very sad about that. Im hoping another one turns up sometime. ago.
How sweet and wonderful that you got to do this project with your dad. A labour of love in so many ways. Those memories will last you all your life. How I miss my father so.
Enjoy your beautiful armoire!
Tracey
Oh, and Rachel was my French Canadian grandmothers name, and my late mothers middle name. Rachel is a French name that means “innocence of a Lamb” 🙂
Love that, Tracey! Thanks for sharing!
Tracey! How heartbreaking! Hoping another one finds its way to you soon!
It looks fabulous 😍!!! Thank you for the simple and smart instructions! You’re truly an inspiration! It’s heartwarming that you and your dad worked together on this!!
Thank you, Kitty! My dad is definitely one of my favorite DIY partners.
Absolutely gorgeous transformation. With so much painted wood in our feeds, it was so refreshing to see the stunning raw wood look. Truly beautiful.
Thank you, Jamie! I’m glad this classic look is back “in”.
It is stunning! It makes my heart pitter patter.
Thank you, Renae! I’m fond of it too.
So incredibly beautiful!!!!
Thank you, Cheryl!
Hi,
Nice job 👍
Please let me know some detail😜;
Is this oven cleaner it doesn’t matter which one or you can also recommend one exceptionally?
Thx
Hi, this is the brand of oven cleaner I used. I hope this helps!
the link to the oven cleaner does not work? could you please advise which one it is? thanks
Hi Lu! You can try this affiliate link: https://amzn.to/3Vk9ZAt
What a beautiful transformation! I love the look of the raw wood with this piece — so pretty!
Thank you, Kim!
I would love to share this in my Seven on Saturday roundup this week!
Hi Kim,
Thanks! A single image with a link back to my site would be wonderful!
Love your makeover, Rachel. I needed to see a project like this because I have two Bergere chairs I want to strip to natural. Your armoire is gorgeous ~ what a nice brother to give it to you and how sweet your dad was to help you. Pinning to keep.
Thank you, Carol! Glad it could inspire you to refinish your furniture!
WOW! That piece is stunning!!! You did a remarkable job on it.
Have you thought about a clear wax protection? Do you think that
would change the color much?
Thank you! In my experience, clear wax darkens and brings out the orange, especially in oak. I have combatted that with this technique in the past, but I thought for this piece that just raw oak would be fine. It would be a good option if I felt we needed the protection, though!
This is gorgeous! What would you recommend for kitchen cabinets. Thinking I might want to give the oven cleaner spray a try on them and see how that works. Sanding inside makes such a mess of the WHOLE House!
You’d have difficulty ventilating your kitchen space for the cabinet bases. I’d try a more eco-friendly option for indoor use. Often you can sand off the finish on builder grade.
Perfect restoration! It got me a bit excited reading your journey of love put into this piece. I just purchased a 7 foot armoire for $70 from a consignment shop. I plan to place in my living room and use it for all my china crystal etc. I hope mine turns out as beautiful as yours.
Thank you, Cheryl! Sounds like you found a great piece to restore.
Any advice on where to look for an armoire like yours? I live in the Los Angeles Area.
Hi Lisa! Keep an eye on local groups like Facebook Marketplace!
I love this finished color so much! But it seems darker on the dissasembled sanded pieces than the finished product. Is there a reason for this?
Hi Lisa, it’s probably due to lighting! You should try a sample and see if you prefer the color in your finished piece.