Gorgeous Gray Crib Makeover
Am I the only one who sees the irony in the fact that this is my third recent post about baby things (following chalk painted mason jars and diaper cakes for a baby shower), and yet none of them are for my baby who is due in just one month? In fact, the only post I shared was my general plans for her nursery…
The truth? I haven’t shared much about baby girl or her room because I haven’t done much. We’re down to a month, and we don’t even have a name! This is so obviously our third child… She will be loved NO less than the others, but she may have to wear boys’ clothes for a while. 😉
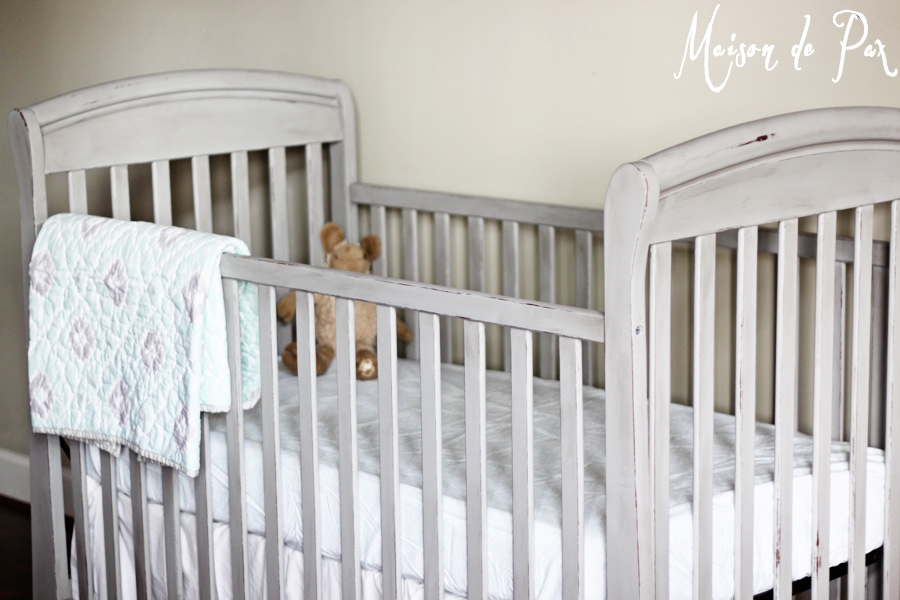
Anyway, enough jabbering. Here’s what you came to see: how to turn a regular, boring, brown crib into a stunning centerpiece for any nursery.

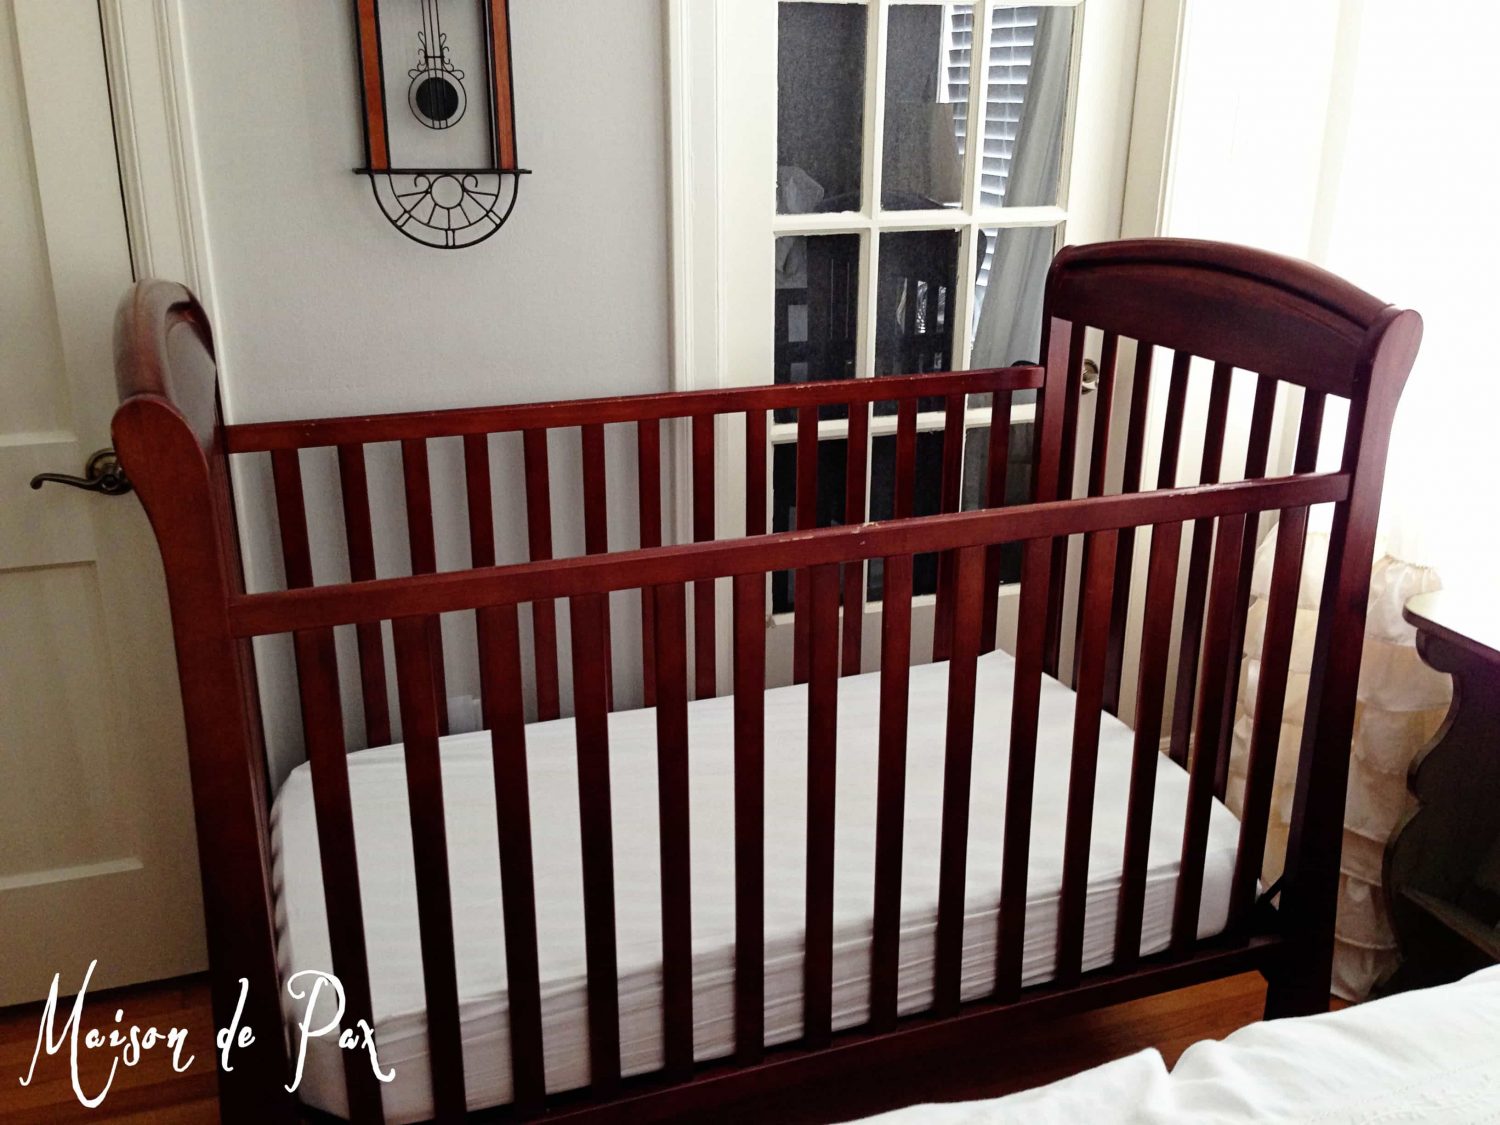
I found this crib on Craigslist just after Mr. Pax, Little Pax (who was 1 at the time), and I moved back from Paris. Though I really liked the shape, the finish was pretty beat up already. And let’s just say that after my two sons used it, the top rails were missing most of their original finish! And though it was a nice brown, it was a little flat for my taste. Here is the before (trust me, it was much worse than it looks in this picture!).
Since then, I was inspired by Restoration Hardware to makeover this vintage spindle crib I was given, and it is ready and waiting for my little girl (as soon as her brother gives it up, that is!). That left the brown crib available for my niece who is due in June… but I wasn’t about to give her the crib in its current state. I wanted something soft and gentle, but not too feminine, and I knew Country Chic Paint in Pebble Beach was perfect.
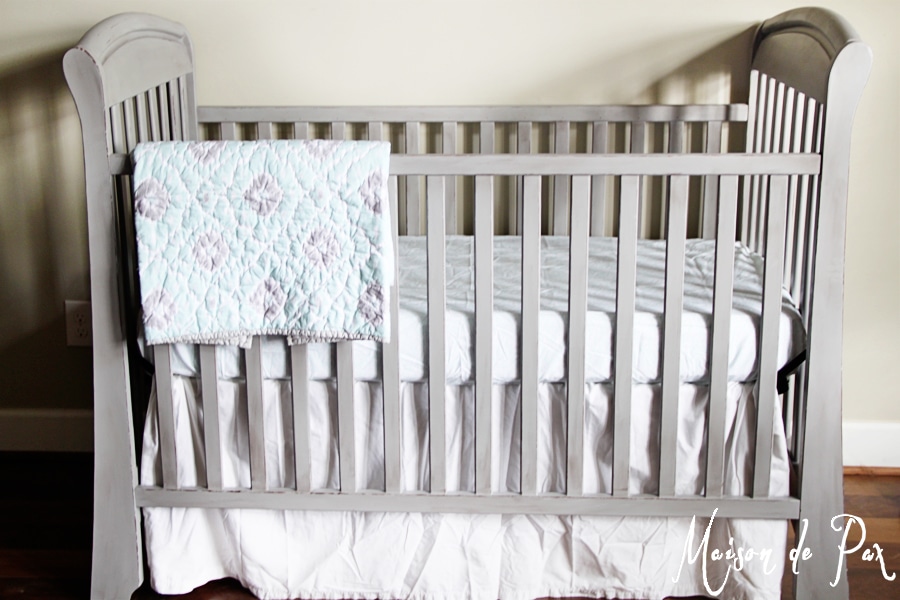
In fact, after I had decided on the color, I spotted this crib at Pottery Barn, and I knew I was on the right track. My niece is even getting Pottery Barn’s Claire bedding, and the combination was perfect. Don’t you think?
I started with a good cleaning. Thankfully, Country Chic’s chalk-based paint doesn’t need extensive sanding because sanding all those slats would have been a LOT of work!
Next came two coats of Pebble Beach (I’m obsessed with this color, by the way, it’s the perfectly balanced gray – not too cool and not too warm), painted with a simple 2″ synthetic brush.
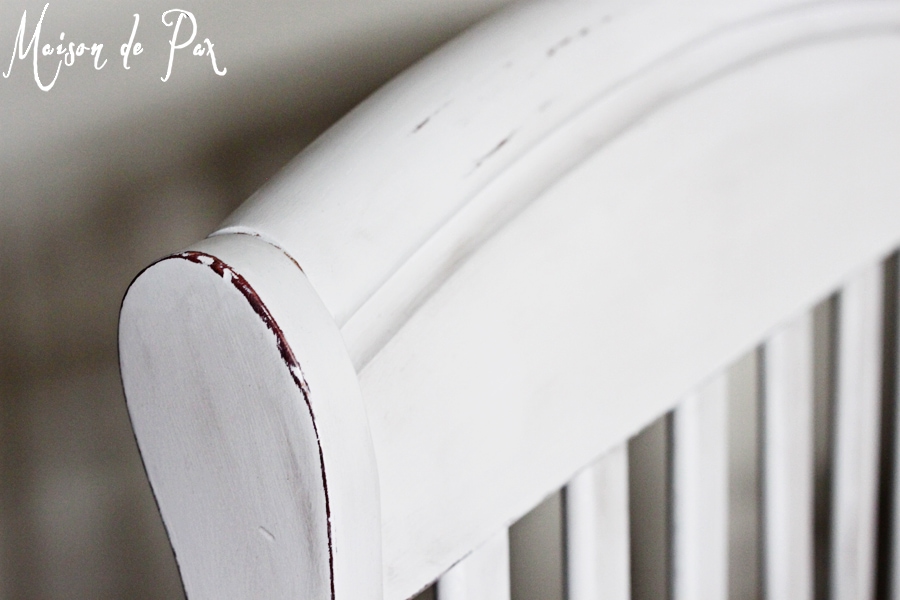
After a few days to dry, I took a combination of 60, 120, and 220 sandpaper to various parts of the crib, focusing mostly on the edges and other areas where normal wear and tear would naturally distress paint.

I wiped the whole crib down again (be sure to clean off all that sanding dust!) and then gave it a full coat of clear wax.

By the time I finished waxing the whole thing, I was ready to go back and wipe and buff the crib. I wanted a rather matte finish, so a good wipe down was enough this time.
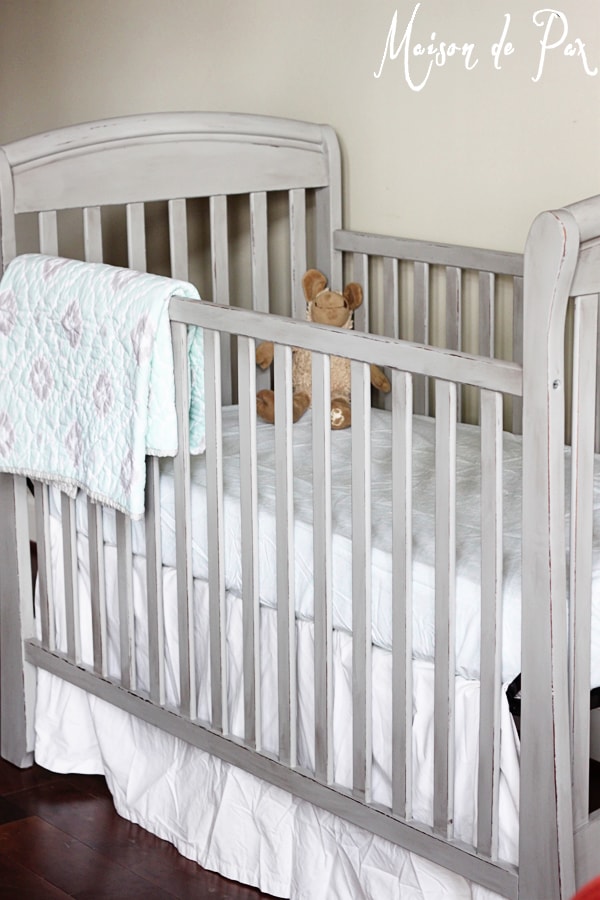
I then followed with some antiquing wax. This part is much more an art than a science, but I have discovered that I prefer brushing on the natural wax (with a big, round, natural-bristle brush). The antiquing wax, however, I prefer to apply with an old rag. It keeps me from getting brown brush strokes and allows me a little more freedom in smudging and reapplying, as needed. I concentrated the antiquing wax in the areas that would naturally grow darker over time – nooks, crannies, joints, etc.

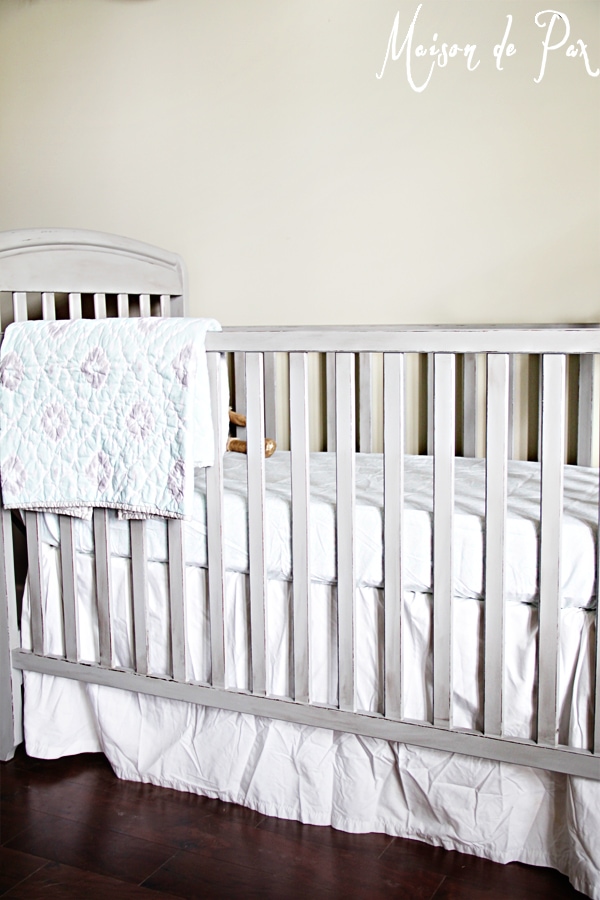
In the end, I admit that I was tempted to keep it for myself. Ha! I said it… confession time. Truly, I think the neutral gray is perfect, and the soft wax finish is gentle on the eyes and all-natural in case my niece decides she wants to taste it. 😉 I just hope she loves the crib as much as I do!
Disclaimer: As a part of the Country Chic Paint blogger squad, I do receive compensation in the form of goods and products from Country Chic Paint, but, as always, all opinions are 100% my own!
That crib turned out just beautiful! That colour is perfect for a little boy or girl too, so many “baby colours” coordinate with it!
Thank you so much, Heather! I’m slightly obsessed with the color… You’re exactly right that it works as such an excellent backdrop for almost any nursery scheme. So glad you like it! 🙂
The crib is so beautiful! What a wonderful color!
Thank you so much, Lisa! I’m having to restrain myself from painting everything this color. 😉
Just utterly gorgeous…!! Amazing job! I love the antique grey. And I can’t WAIT to see what you do with your own nursery. I’m sure it will be perfect! 🙂
Karen | a house full of sunshine
Thank you so much, Karen! I can’t tell you how much I appreciate that. 🙂 Hopefully I’ll get a chance to do something to the nursery soon!
Love the results! Perfect grey 😉
Thanks, Rayana! I couldn’t agree more. 🙂
It looks PERFECT Rachel!!! XO, Aimee
Oh thank you so much, Aimee!! Can’t tell you how much I appreciate that. 🙂 Take care!
This is just beautiful, Rachel! I’ve been contemplating painting our brown crib whenever our next baby comes along. But my biggest concern is whether or not the paint/wax would be OK for a baby to chew on. Do you know if all chalky paint brands and waxes are OK for cribs? Or just certain brands??
Thanks girl!
Thanks, Laura! I confess that I don’t know much about chalky paints in general. I do know that CCP is all natural, and the wax is beeswax, which certainly seems safer for my kid than latex or some of the other things they put on factory finishes. I would look into the ingredients of any other brands you consider before putting them on a crib, though; I completely understand your concern! So glad you like the makeover. 🙂
BEAUTIFUL makeover!!
Thank you SO much, Martina! So glad you like it. 🙂
You did a lovely job! Normally the Roadkill Rescue projects don’t fit with my style, but this crib redo certainly does. And I totally get the third child thing. My sister just had her third (the other two are 10 and 8 years old), so she crammed a crib into the master bedroom and the baby toys just live in the corner of their family room. Eventually they have to figure out a more suitable living situation, but for now it works. Off to read more of your blog!
Thank you so much for your sweet comment, Bri! Third child is definitely a more relaxed situation. 😉 And I’m so glad you like the crib! Hope you enjoy everything you find here!!
LOVE THE CRIB MAKE OVER IT TURNED OUT BEAUTIFUL, I WOULD LOVE TO FEATURE IT, IF THAT WOULD BE OK PLEASE LET ME KNOW
LAUREN
Of course! Thank you so much for the kind comment, Lauren, and for the honor of the feature! Take care. 🙂
i posted the feature and you can see it here,
thanks again,
lauren
west furniture revival
http://westfurniturerevival.blogspot.com/2014/05/revival-monday-152.html?showComment=1400395147244
Thanks, Lauren. I appreciate it!
For two coats, how many cans of Cottage Chic paint did you use? I’m painting our crib and using their paint, and I’m trying to decide how much I need!
How fun, Christina! I started with a quart, and I used about half. So you technically might be able to get by with a pint, but I think it would be risky. With a quart, you’ll have plenty of extra for any little complimentary projects for the room. 🙂 Have fun!
I love it! I’m actually wanting to do my baby’s crib like this too, but white and not grey. So did you use chalk paint first, then sanded, then paint the grey, and lastly sanded again ?
I’m so glad you like it! Actually, the gray paint is the chalk paint. If you want white, you can just use white chalk paint. You’ll want to clean it well, paint it with the white chalk paint, sand to distress where you want distressing, then wipe off all the dust before you wax. I hope this helps!
Do you have to put the wax on it in the end or can you just do the paint?
For a baby crib, you can use a clear poly acrylic sealer.
How Much paint did you use?
I’m afraid I don’t remember, but I believe it was less than a quart. Hope this helps!
Love the crib and wall color combination. I know this is a post from a long time ago but would you be able to recall what the name of the wall color is in the photos?
Hi Angelina! Actually, I do! It’s Agreeable Gray by Sherwin Williams. You can see some of my other favorite paint colors here: https://www.maisondepax.com/paint-color-home-tour-nature-inspired-neutrals/