For some of you, those who are brave with paint and brushes and haphazardly throwing them together, this post may seem tedious… but for those who are rule followers, paint-by-number sorts of folks, I hope the following emboldens you to try your hand at some creative “antique” finishes.
Normally, I would recommend scouring thrift stores or the trash until you discover a fabulous wooden frame that is cheap (or free!) and is awaiting your rescue and refurbishment. Or, you can get impatient like me (and motivated by a guest coming to stay… since this will eventually go in my guest room) and go to Hobby Lobby to catch a 50% off sale. Either way, start with your frame:
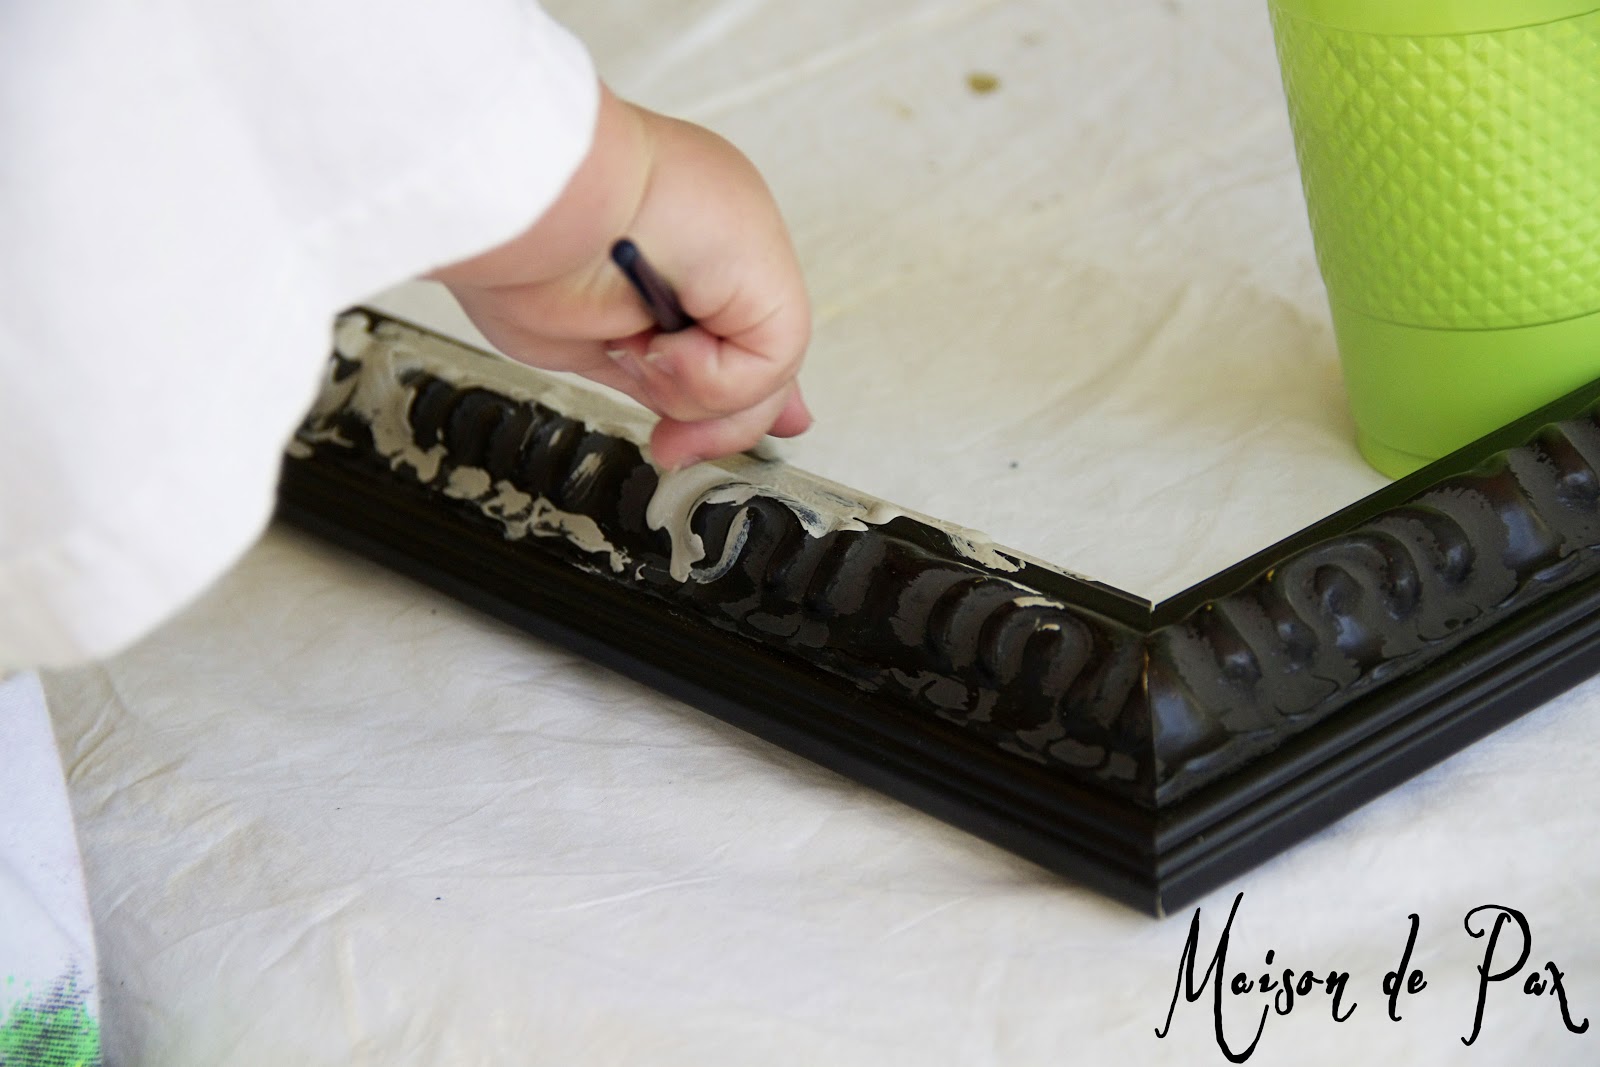
And yes, include your toddler in the experience. Why not? The beauty of “antique” finishes is that they are far from perfect. You want layers. chips. dirt. smudges… all things a toddler excels at. For this, I used homemade chalk paint. My recipe? Glad you asked:
Sherwin Williams paint sample in Dovetail (yes, a true sample, much cheaper than a real quart)
a few shakes of plaster of Paris (in the red and white milk-carton looking container at Lowe’s)
dixie cup and disposable spoon… stir well
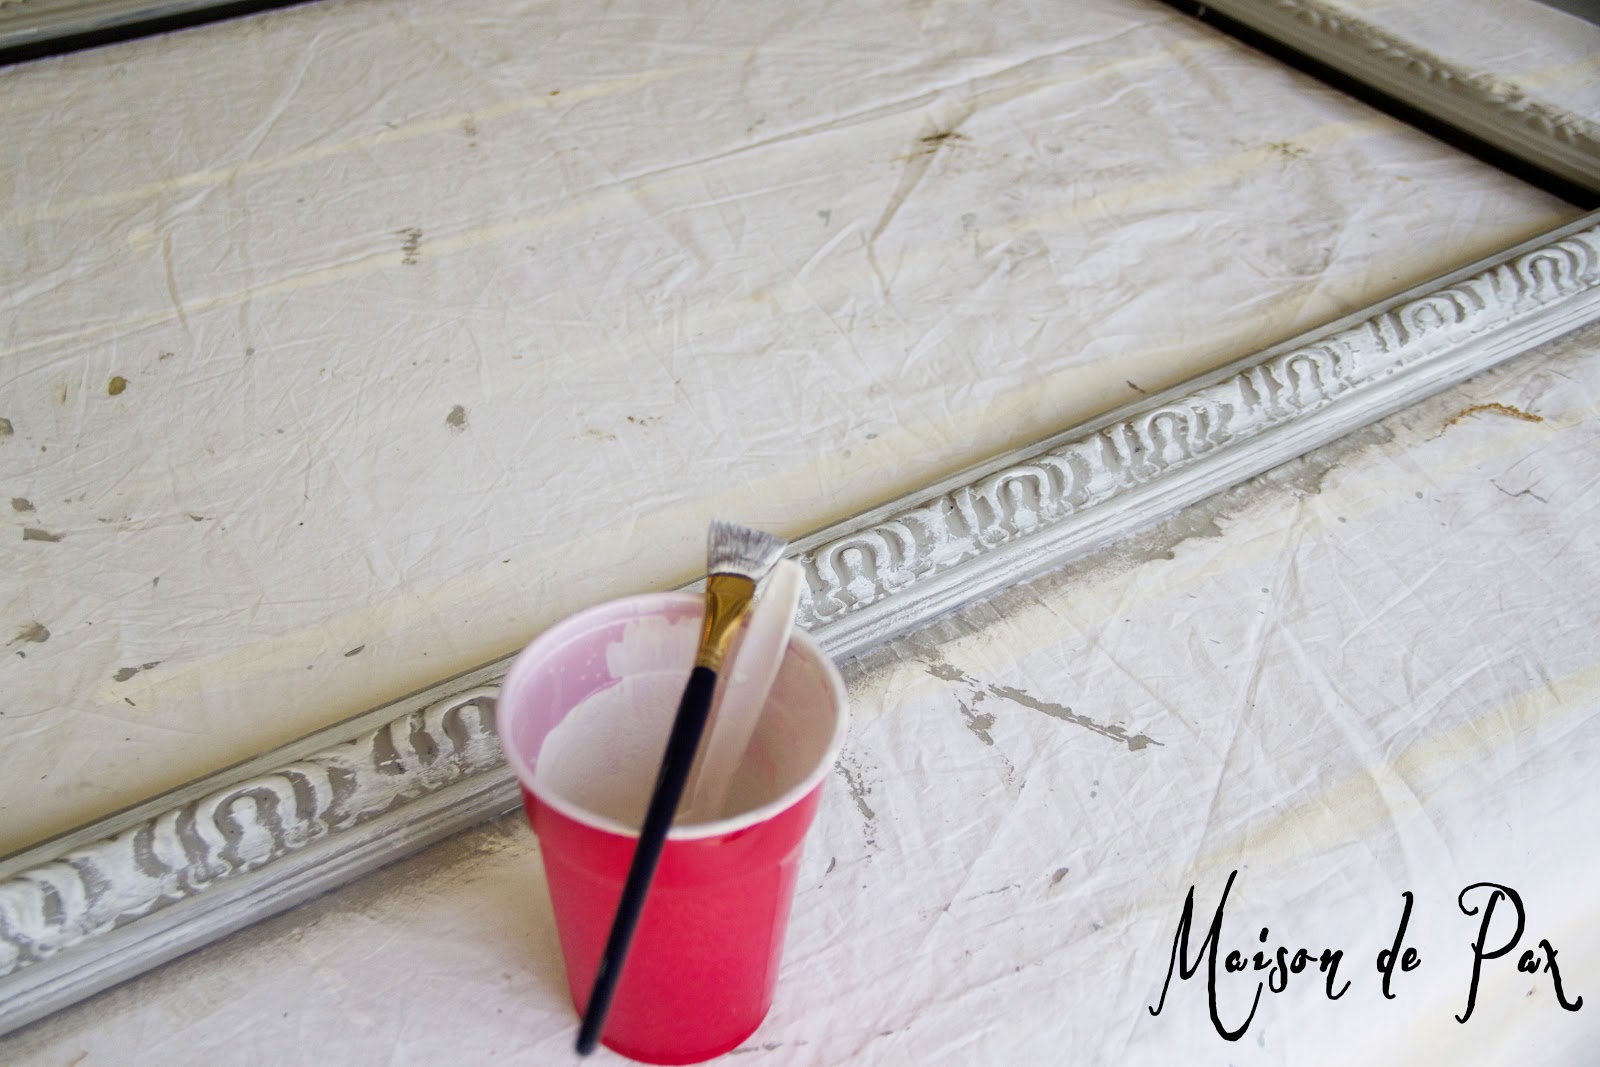
I believe in disposable things whenever possible. With one exception: I prefer to use an old sheet as a drop cloth because it absorbs the drips and keeps me from brushing up against them and spreading paint unknowingly. Anyway, I really do eyeball the chalk paint, but I’m guessing it’s around 2-3T plaster of Paris per 1/2c of paint. We slapped that on, careful to avoid drips, but not careful to get perfect coverage – a little of the black peeking through will add to our “antique” look:
Let it dry (a glorious advantage to chalk paint is that it dries in mere minutes). Let toddler help with second coat, still careful to avoid drips but not too precise in your coverage:
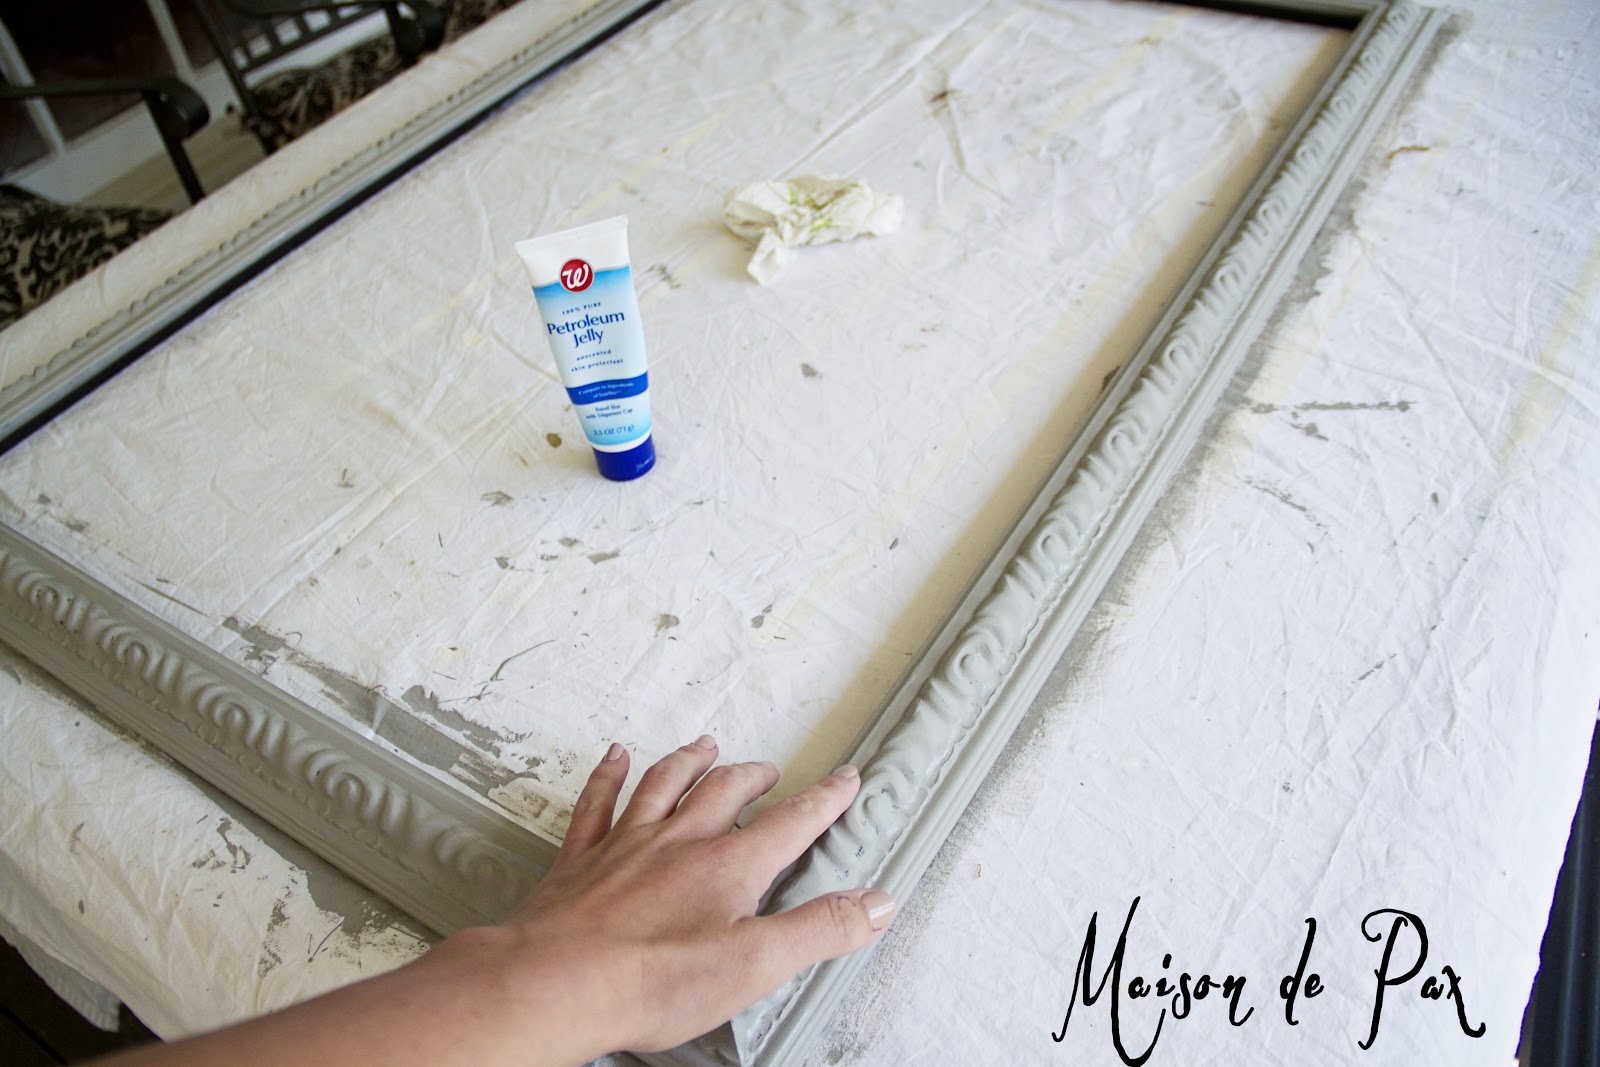
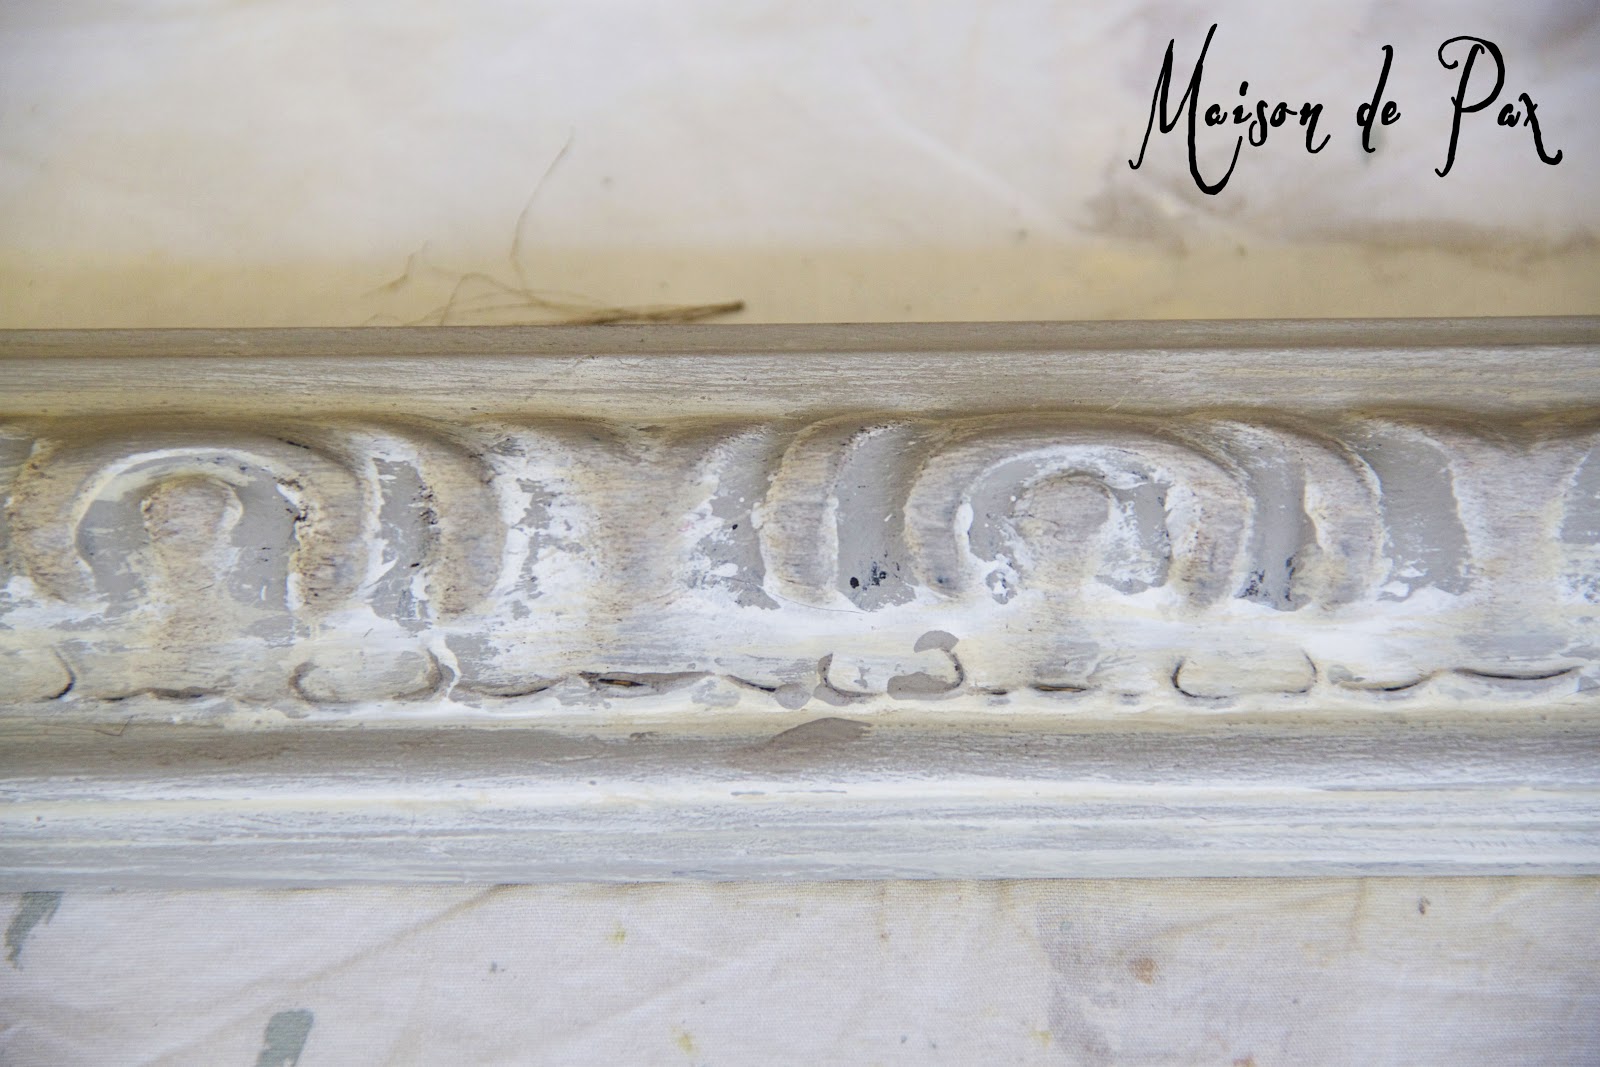
Next, if you want to ensure the bottom layer to show significantly, you can use a little vaseline. I just rubbed it on to the smooth parts where I didn’t want the next layer to stick (I didn’t bother with the crevices because I knew I could simply not paint them on the next coat):
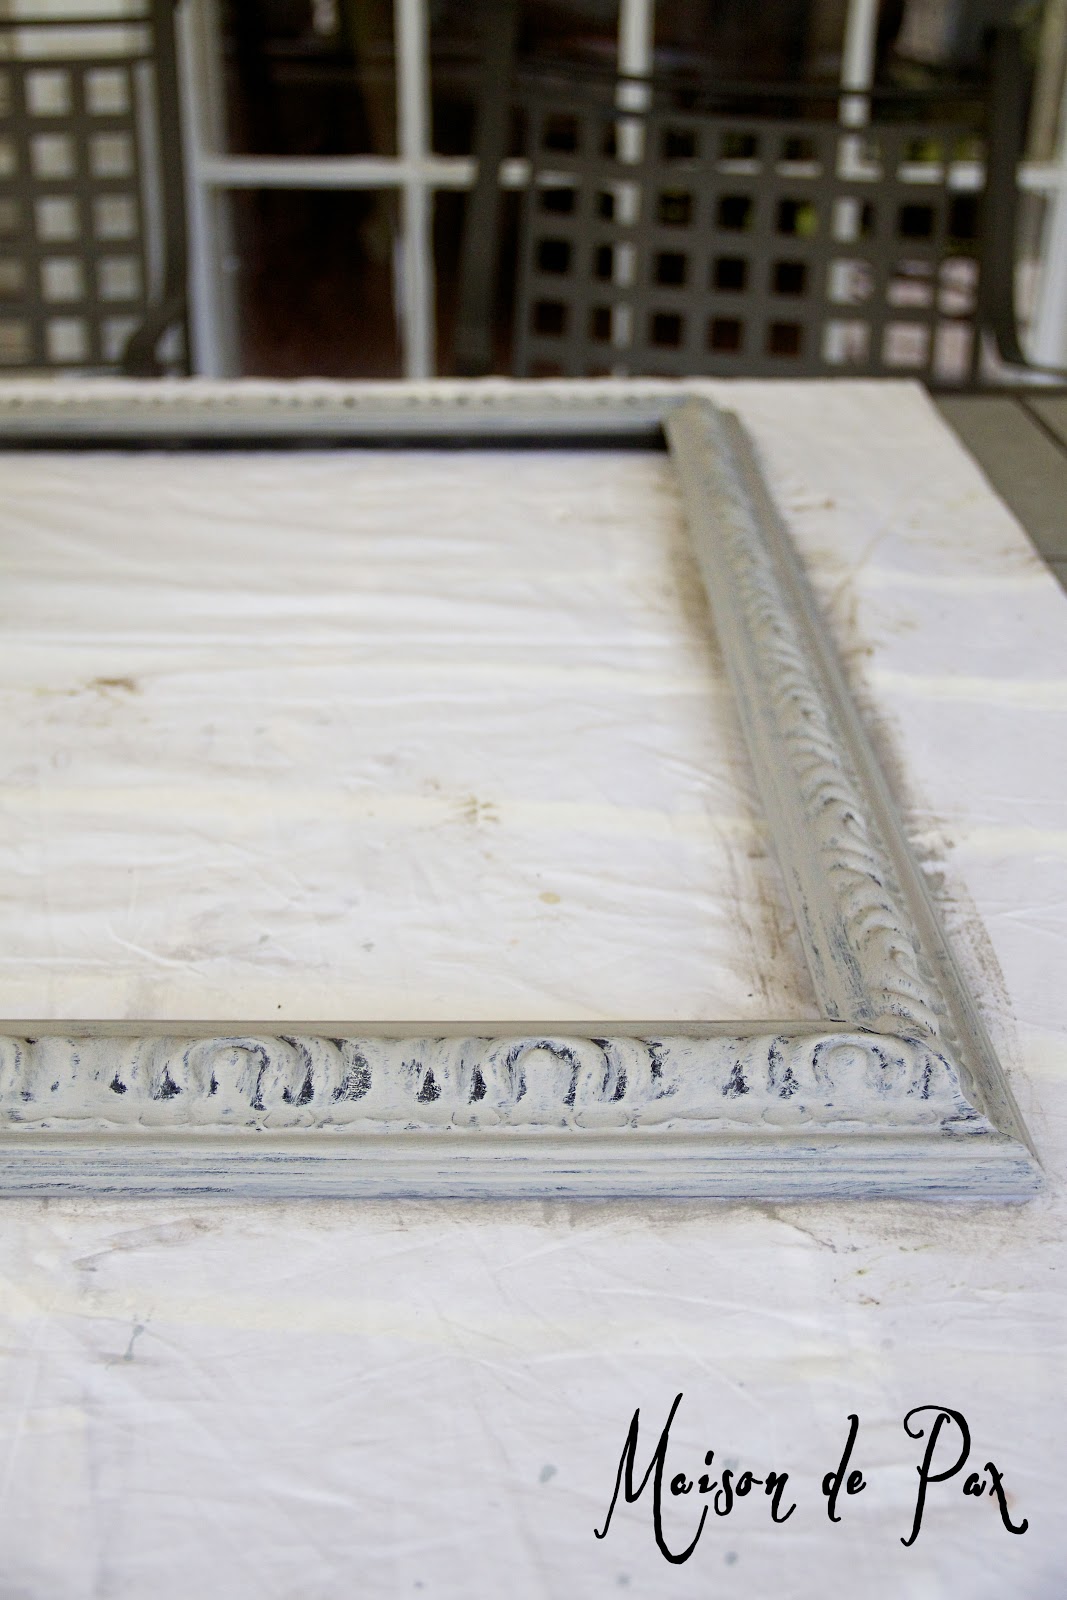
I then used some white chalk paint I had mixed up a few weeks ago (and stored in a dixie cup with a plastic bag held on via rubberband – classy, I know) and a small craft brush. Note that I purposefully did not cover very well. I just tried to avoid major brush-stroke look:
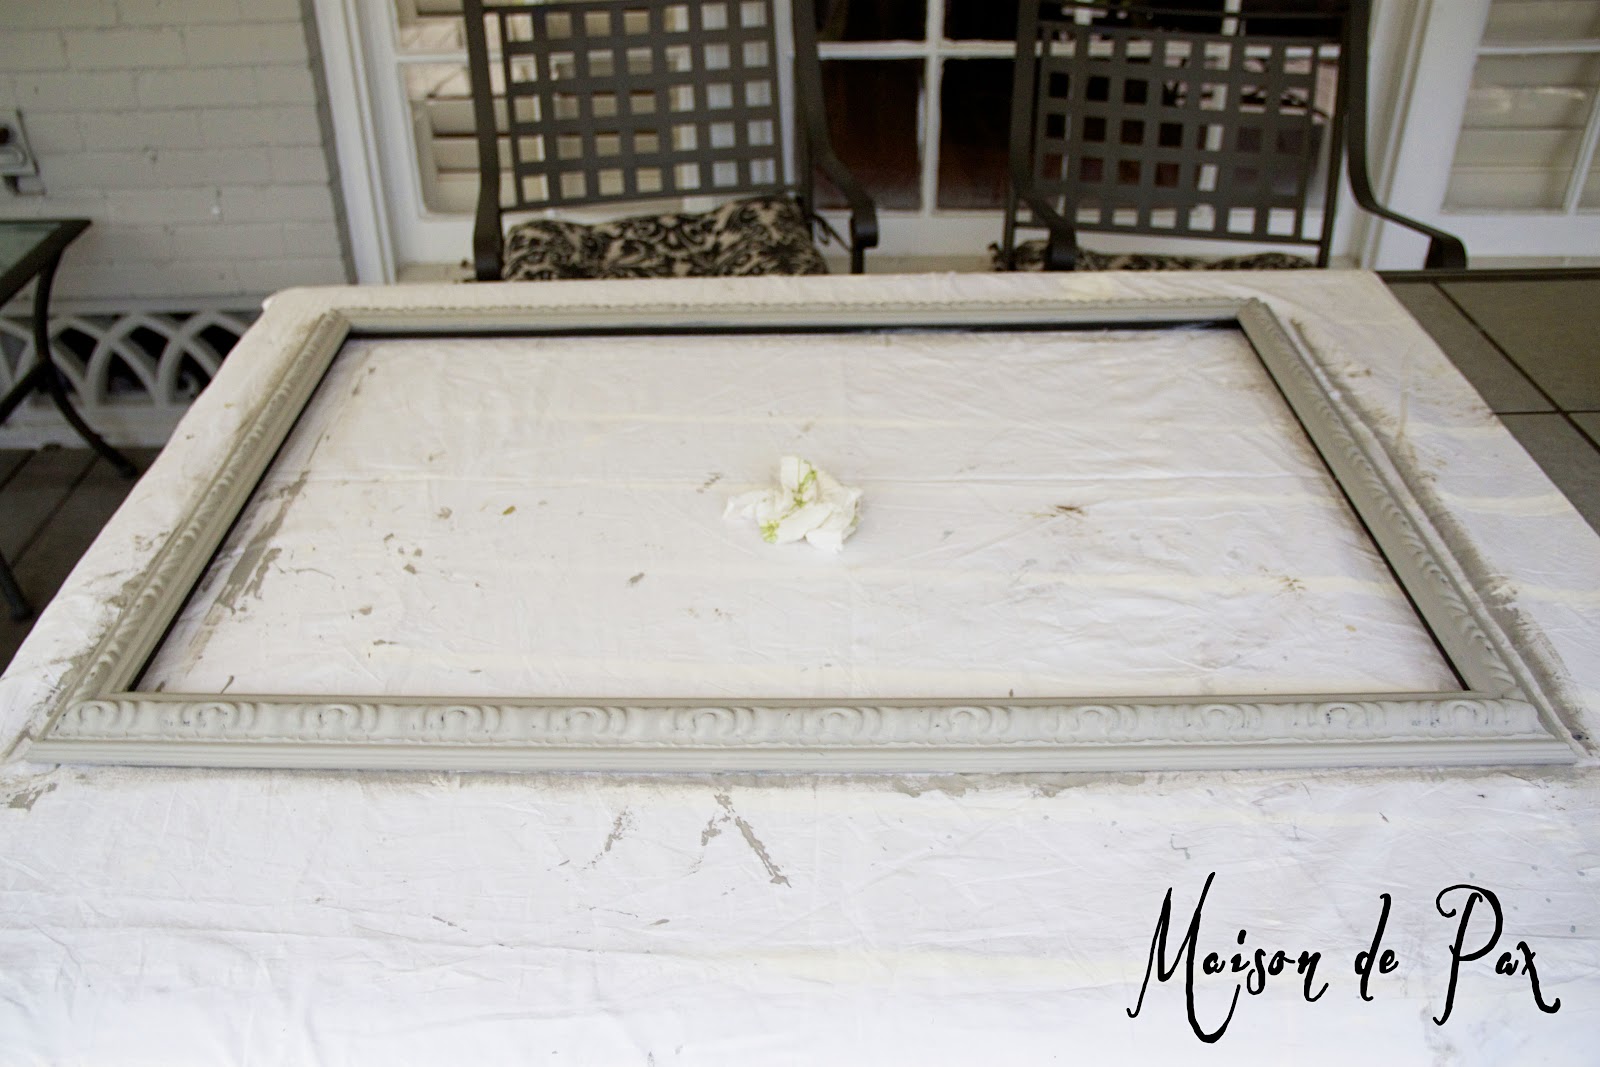
I rather liked the frame at that point, but when I held it up in the guest room to check, I was disappointed to find that the white was too white. I have warm antique white (much yellower) molding in there, and the frame was too cool. So, to warm it up a bit, I grabbed another dixie cup, a shot of Annie Sloan’s Chalk Paint in cream (the only jar I have of the real stuff – a gift from someone – because I’m cheap!) and watered it down a bit. I then brushed a very light coat of that glaze over the whole thing:
Once dry, I gave it a good rub down with a VERY slightly damp washcloth. I wanted to make sure all the vaseline was removed and smooth out the top two coats a bit, but I did NOT want to distress the main coat any more than it already was. I dirtied it up a bit with Miss Mustard Seed’s antiquing wax (though a little real dirt, shoe polish, stain, or anything else would accomplish the same… remember, you want it to look old!), and this was where I stopped. I could have kept going. Forever. Really. Once you get started, it’s tough to stop.
I finished it off with a coat of Johnson’s Paste Wax. Why? One disadvantage to chalk paint (the advantages are numerous: great coverage, quick drying, easy to distress) is that it really needs a finish coat. It looks, well, chalky and is easy to scratch off until you put something over it. Polyurethane works, as do many other things, but I find wax the easiest to apply. I prefer soft waxes (like Miss Mustard Seed or Annie Sloan), but they’re expensive and I’ve run out. Paste wax is a little smelly at first (it goes away), and not quite as smooth in its application, but it makes a fine finish, especially for something like a frame. I’ll buy more expensive wax when I next refinish a big piece of furniture. Anyway, forgive my tangent… Here is the final result:
I actually painted the other frame pictured years ago… with a combination of latex and craft paint. not waxed. Point is, your options are endless… but if you are a person who needs a formula to follow, I hope that the above empowers you. I love how it turned out!
Come back later to see where it’s goingto live in my guest room. And tell me, do you have any great tips or tutorials for antique paint finishes?
Thanks!! I love the way it adds another dimension so that the paint doesn’t just look like I used sandpaper to scratch it off. 🙂 Thanks for stopping by!
I love it. Sounds so easy but looks elegant.
I have a handful of old frames & just recieved 4 pics I took & had stretched on canvas, May just have to try it.
Thanks for all the great info
Looks great! I have an old frame to paint…Will definitely use some of your tips! Thank you for sharing at the Give Me The Goods Link Party! http://www.dimplesandpigtales.blogspot.com
It is beautiful!You really did an amazing job with this frame. I have so many of them put away! Thank you for the tutorial. I have a new weekly link party which is live now and I would love if you stop by and link up this wonderful post! Hope to see you there! http://mariaelenasdecor.blogspot.com/ Hugs Maria
Love the effect you got with the paint on the frame. I think it is wonderful. I am a new follower via the Linky Party. Look forward to seeing more of your post. 🙂
You did a remarkable job! (Oh, and of course your awesome toddler assistant!)
I love how you made it cheap n easy – two things a must for most of us.
I just started painting recently, have always been too afraid, though spent the money and had all the high end stuff to do so……first allowed my youngest, who is so good at painting and crafty things do some furniture….and recently did my first mirror. I am pleased, not delighted, but pleased enough with it.
I shall continue to learn and try – and your tutorial is most helpful, thanks bunches.
Good for you, Michele. I’m so glad you liked the tutorial. I, too, have had a learning curve… I probably started painting furniture 10 years ago (for myself, that is; my parents had me painting cabinets and such when I was a kid!). The best thing about painting furniture and accessories is that it never gets boring. There are always a million more ways to try! 🙂
Hi Rachel, you sound like me. I make my own chalk paint the same way. I say add a bit of Plaster of Paris. Never measure either. I have used the Vaseline and found it quite fun. I have been using A.S. wax but don’t think it finishes furniture well enough. I bought some minwax to try on a childs table set I recently painted. Don’t think A.S’s would hold up to the grandies. Love how your frame turned out. Toddler did good. Mom didn’t do too bad either. lol! Thanks for sharing with SYC. hugs, Jann
I love the “eyeball” method. 😉 I hope the minwax works for you! Nothing like toddlers to force us to bring our A-game, right? Thanks so much for stopping by!
Love your technique ! One of my techniques I use is steel wool. First paint, (any will work) let dry. Depending on how dark you want your piece pick your stain.(I use Minwax). Dip the steel wool in stain and start scrubbing. You can leave on as much stain or rub off. My chair turned out perfect in my book! Just like your frames!
Smiles, Alice
Pingback: 8 Beautiful Home Decor Features….from Project Inspired #8 Linky Party! - Setting for Four
I know I’m late to the party but girl,I LOVE YOUR SITE!! Been here a few hours just lost IN BEING FOUND! Your whole vibe is what I wanna be when I grow up!!! Trying to figure out what to do on my 1st set of walls, inside & out, that are all mine. I’m so intimidated by color but the 1st article I read you mentioned SW Swiss Coffee and then I knew I waa in a good place. Balling on a budget and your DIYs are actually pretty high end AND SO DO ABLE for even me. Ty for being here when most needed!!👊
One question…my home is a refurbished cabin on lake with a green steel roof. I do love the Swiss Coffee but I was leaning towards trim for that…. What would you do? I’m game for whatever but its inherited from my family and its here on family land that we’ve had since my family came from Scotland in 1700s. Its only me & my dogs & it will be my home (no family visits or get togethers except the usual. I guess I’m saying I want to honor my heritage with Scottish flair but not sure which way to go or start. If you have time, I would so appreciate a tip. I’m sure time isn’t something you have AT ALL. (I’m sticking with this site for sure either way!!)


Oh that’s beautiful! I love that way you incorporated vaseline! I would have never thought of that!
Thanks!! I love the way it adds another dimension so that the paint doesn’t just look like I used sandpaper to scratch it off. 🙂 Thanks for stopping by!
I love it. Sounds so easy but looks elegant.
I have a handful of old frames & just recieved 4 pics I took & had stretched on canvas, May just have to try it.
Thanks for all the great info
So glad it was helpful, Deborah!
You’re so welcome! So glad you like it. 🙂
Looks great! I have an old frame to paint…Will definitely use some of your tips! Thank you for sharing at the Give Me The Goods Link Party!
http://www.dimplesandpigtales.blogspot.com
Thanks!! Come back any time! 🙂
That looks great and you sure make it sound easy! I need to use your method and do a mirror frame. Pronto!
You’ll have to let me know when you do, Stacey. I can’t wait to see the results!
What a lovely finish and such a pretty frame! Thank you so much for linking up to Project Inspire{d} ~ have a fabulous week.
Hugs,
Mary Beth
Oh such a pretty frame. I love it. I have a couple black ones I was thinking of painting and now I am going to do so. I am a new follower.
Lisa
http://wvcountryroads.blogspot.com/
Thanks, Lisa! You’ll have to show me when you finish. 🙂 Take care!
This is gorgeous! And I love how you styled it 😉
Jamie @ somuchbetterwithage.com
Thanks, Jamie!!
I have just as much fun paint things as you do. The more layers, the more fun it is, right. Found you at Mod Vintage Life.
Traci
Thanks, Traci! I agree… I’m always looking for more ways to add layers and dimension. I appreciate your stopping by!
It is beautiful!You really did an amazing job with this frame. I have so many of them put away! Thank you for the tutorial. I have a new weekly link party which is live now and I would love if you stop by and link up this wonderful post! Hope to see you there! http://mariaelenasdecor.blogspot.com/
Hugs
Maria
Thanks, Maria! I’ll head over there right now. 🙂
Love this and have done it myself. Yours turned out fabulous. Thank you for sharing your tutorial. Happy Creating.
Hugs, Celestina Marie Design
Thank you so much, Celestina. It’s so fun, isn’t it?!?!
Love the effect you got with the paint on the frame. I think it is wonderful. I am a new follower via the Linky Party. Look forward to seeing more of your post. 🙂
I’m SO glad you stopped by, Diane! And welcome to the family. 🙂
Rachel
lookin’ good! Nice blog too!
Thank you, Joyce! Please come back or considering following Maison de Pax – I’m so glad you stopped by!
thanks for the info. love the frames.
Of course! Thanks for the sweet comment. 🙂
You did a remarkable job! (Oh, and of course your awesome toddler assistant!)
I love how you made it cheap n easy – two things a must for most of us.
I just started painting recently, have always been too afraid, though spent the money and had all the high end stuff to do so……first allowed my youngest, who is so good at painting and crafty things do some furniture….and recently did my first mirror. I am pleased, not delighted, but pleased enough with it.
I shall continue to learn and try – and your tutorial is most helpful, thanks bunches.
Have a great day!
Good for you, Michele. I’m so glad you liked the tutorial. I, too, have had a learning curve… I probably started painting furniture 10 years ago (for myself, that is; my parents had me painting cabinets and such when I was a kid!). The best thing about painting furniture and accessories is that it never gets boring. There are always a million more ways to try! 🙂
Thank you for sharing it.
Of course! Thank you for stopping by. 🙂
Hi Rachel, you sound like me. I make my own chalk paint the same way. I say add a bit of Plaster of Paris. Never measure either. I have used the Vaseline and found it quite fun. I have been using A.S. wax but don’t think it finishes furniture well enough. I bought some minwax to try on a childs table set I recently painted. Don’t think A.S’s would hold up to the grandies. Love how your frame turned out. Toddler did good. Mom didn’t do too bad either. lol! Thanks for sharing with SYC.
hugs,
Jann
I love the “eyeball” method. 😉 I hope the minwax works for you! Nothing like toddlers to force us to bring our A-game, right? Thanks so much for stopping by!
Beautiful! I would love to give this a try. I’ll be pinning so I can refer back to it when I have time to do some painting!
Thanks, Laurie! I would love to see whatever you create when you get around to it. 🙂
it turned out great! I’d love if you’d link up to The DIY’ers. http://homecomingmn.blogspot.com/2013/04/the-diyers-and-more-curtains.html
Thanks so much, Kayla! Heading over there right now. 🙂
Love your technique ! One of my techniques I use is steel wool. First paint, (any will work) let dry. Depending on how dark you want your piece pick your stain.(I use Minwax). Dip the steel wool in stain and start scrubbing. You can leave on as much stain or rub off. My chair turned out perfect in my book! Just like your frames!
Smiles, Alice
Thanks, Alice! Steel wool is such fabulous stuff… I’ve never used it for distressing, though; I’ll have to try it! Thanks for the tip! 🙂
I know I’m late to the party but girl,I LOVE YOUR SITE!! Been here a few hours just lost IN BEING FOUND! Your whole vibe is what I wanna be when I grow up!!! Trying to figure out what to do on my 1st set of walls, inside & out, that are all mine. I’m so intimidated by color but the 1st article I read you mentioned SW Swiss Coffee and then I knew I waa in a good place. Balling on a budget and your DIYs are actually pretty high end AND SO DO ABLE for even me. Ty for being here when most needed!!👊
One question…my home is a refurbished cabin on lake with a green steel roof. I do love the Swiss Coffee but I was leaning towards trim for that…. What would you do? I’m game for whatever but its inherited from my family and its here on family land that we’ve had since my family came from Scotland in 1700s. Its only me & my dogs & it will be my home (no family visits or get togethers except the usual. I guess I’m saying I want to honor my heritage with Scottish flair but not sure which way to go or start. If you have time, I would so appreciate a tip. I’m sure time isn’t something you have AT ALL. (I’m sticking with this site for sure either way!!)