Industrial Rustic Master Bath Retreat
Thank you to Lowe’s for sponsoring this post. As always, thoughts and opinions are my own.
5 bloggers.
48 hours.
2 barn doors.
1 eight-month pregnant lady.
20 chandelier crystals.
And plenty of Tex-Mex food.
All that plus a lot of sweat (and a few tears) equals one glorious master bath retreat.

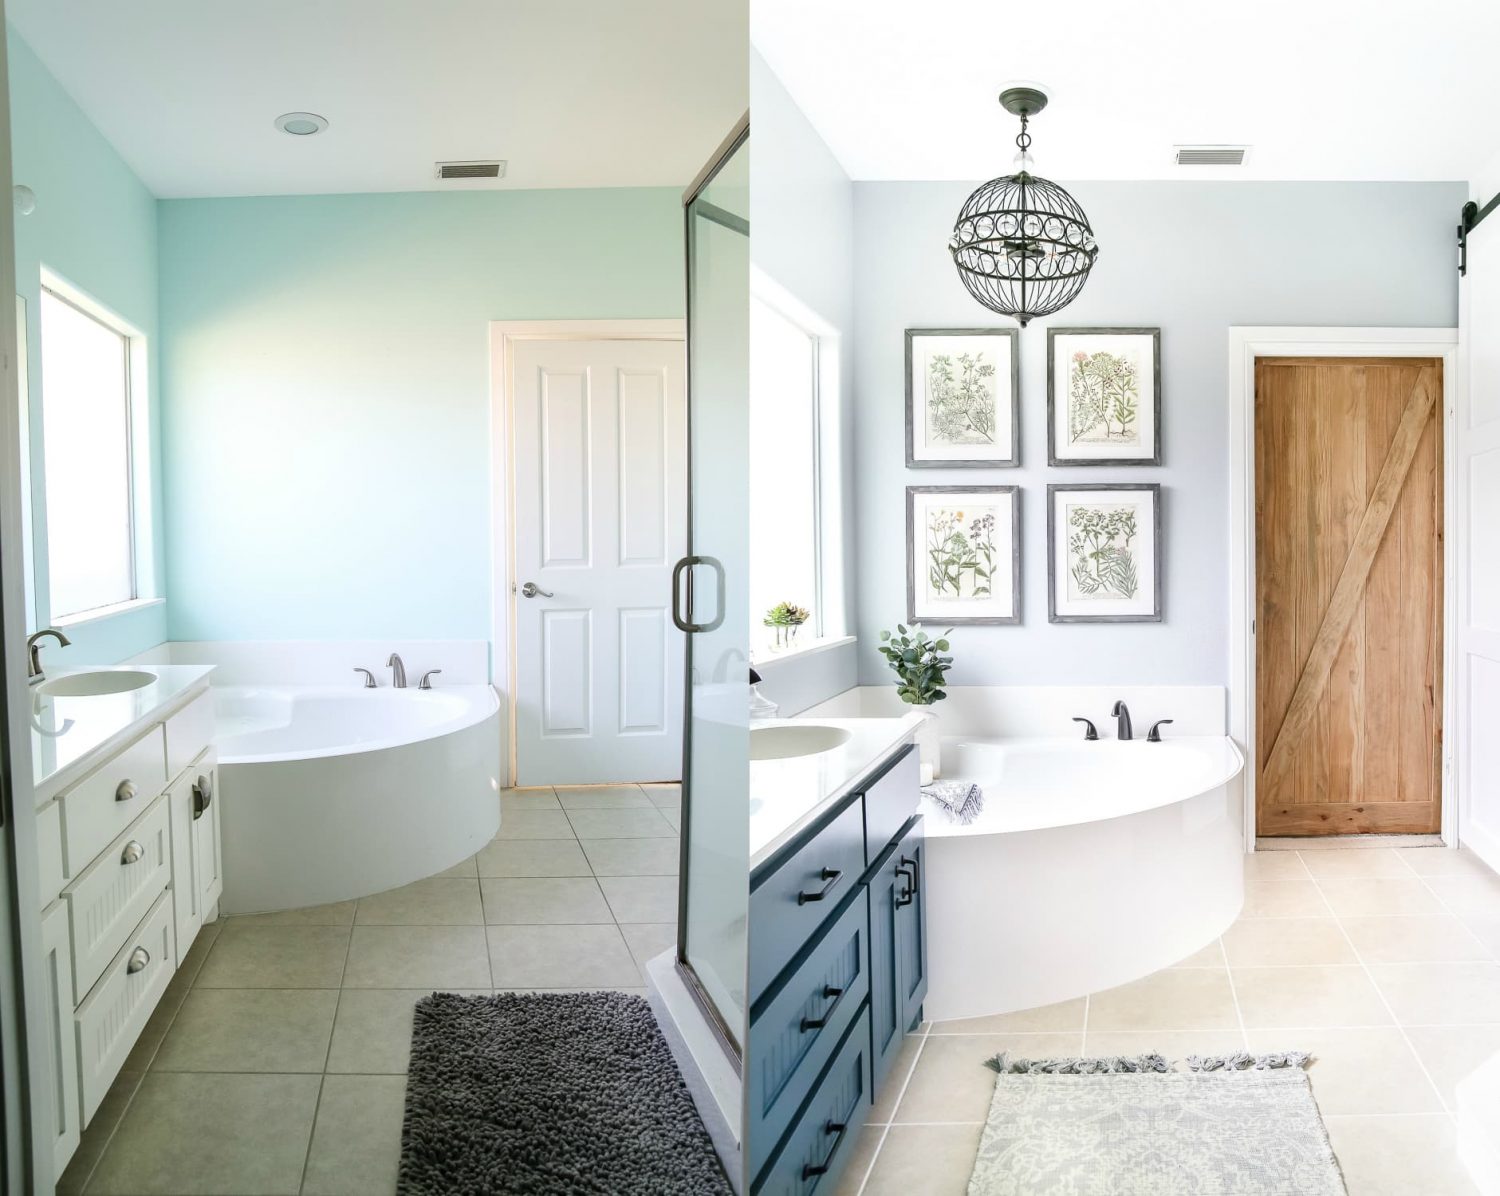
But let me start from the beginning. Earlier this year, Lauren of Bless’er House put out the call for applications for a makeover sponsored by Lowe’s. While there were so many spaces submitted with so much potential, we landed on a sweet young couple’s builder-grade master bath that had some good bones.
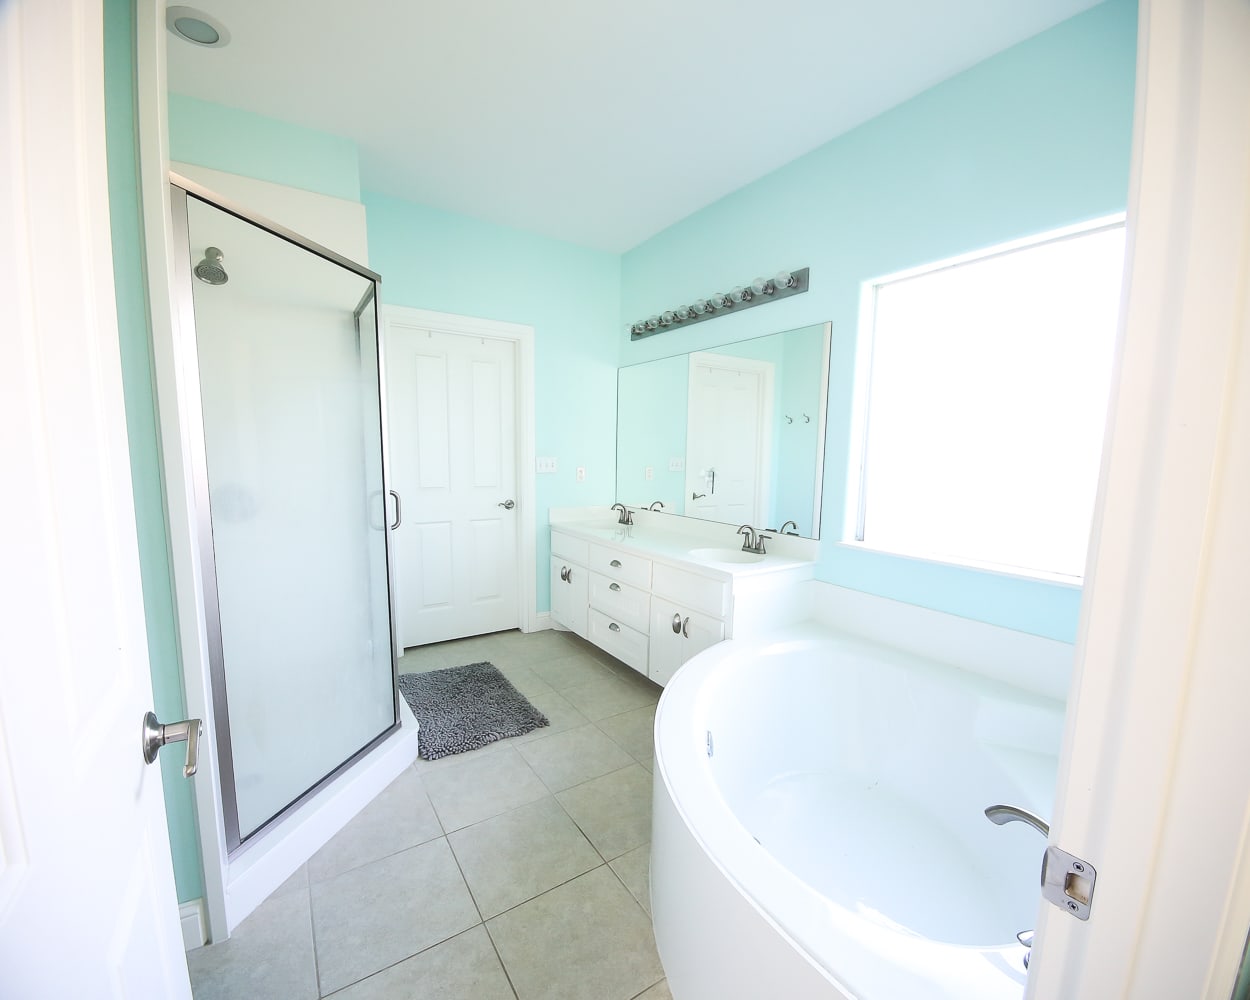
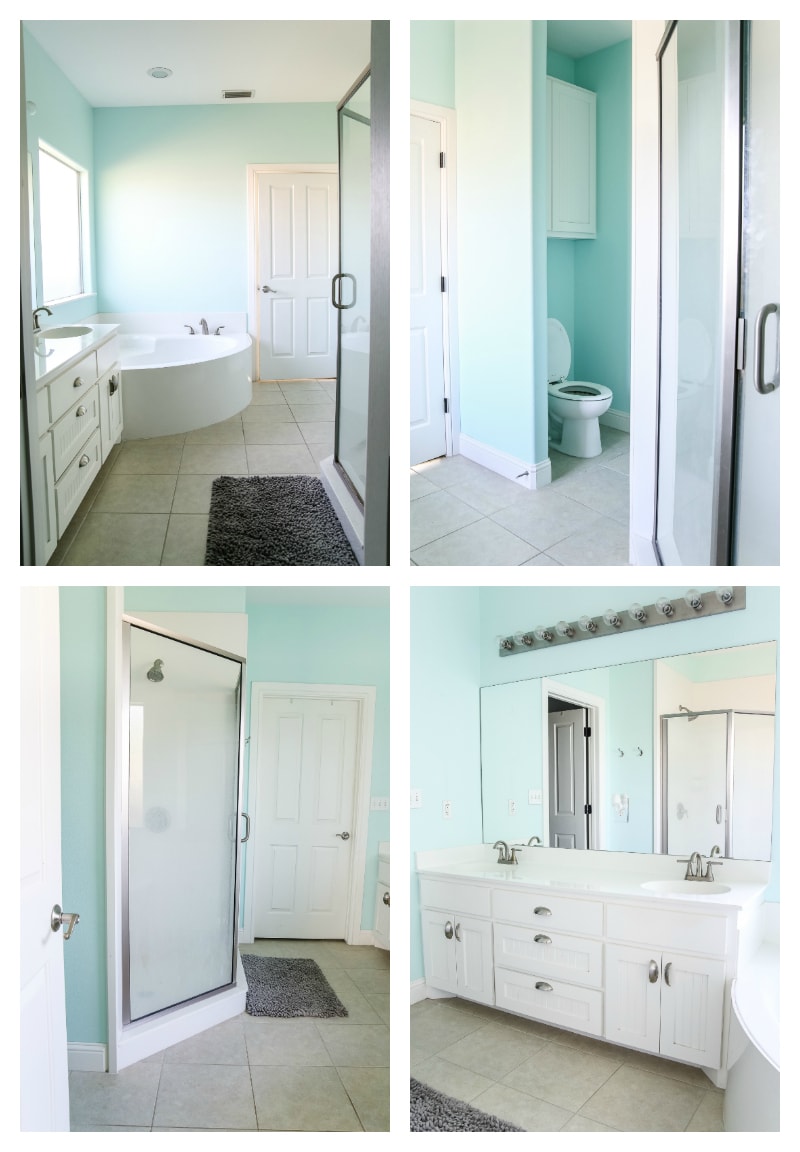
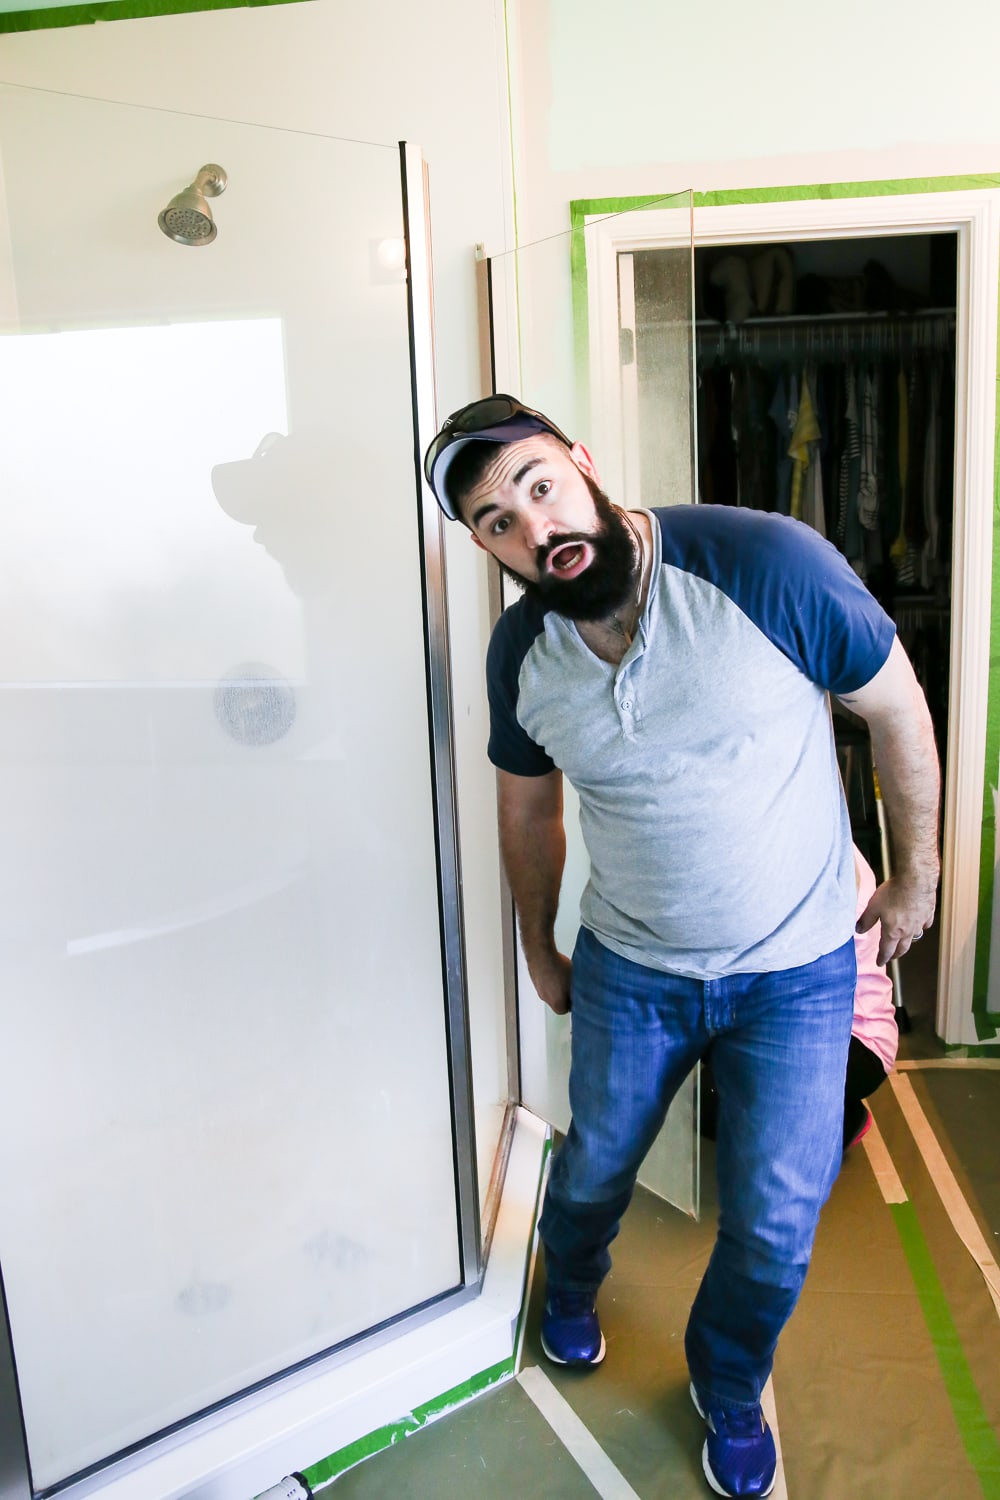
The homeowners are so lovely, but their 10-year-old builder grade home was lacking the character they wanted. Plus, the 10 years since it had been built also meant it was time to replace a few things, like a rusted shower door and some outdated fixtures.
So five bloggers (and one hubby) converged upon a little town in Texas ready to tackle the makeover. Lauren and her husband Robert headed the team, with Lauren’s gorgeous design guiding our makeover and Robert’s manual labor and plumbing skills carrying us along. Oh, and Robert definitely provided some essential comic relief. 😉
Nina of Nina Hendrick Designs, Jenna of Rain on a Tin Roof, and April of House by Hoff painted, replaced light fixtures, reframed mirrors, and more.
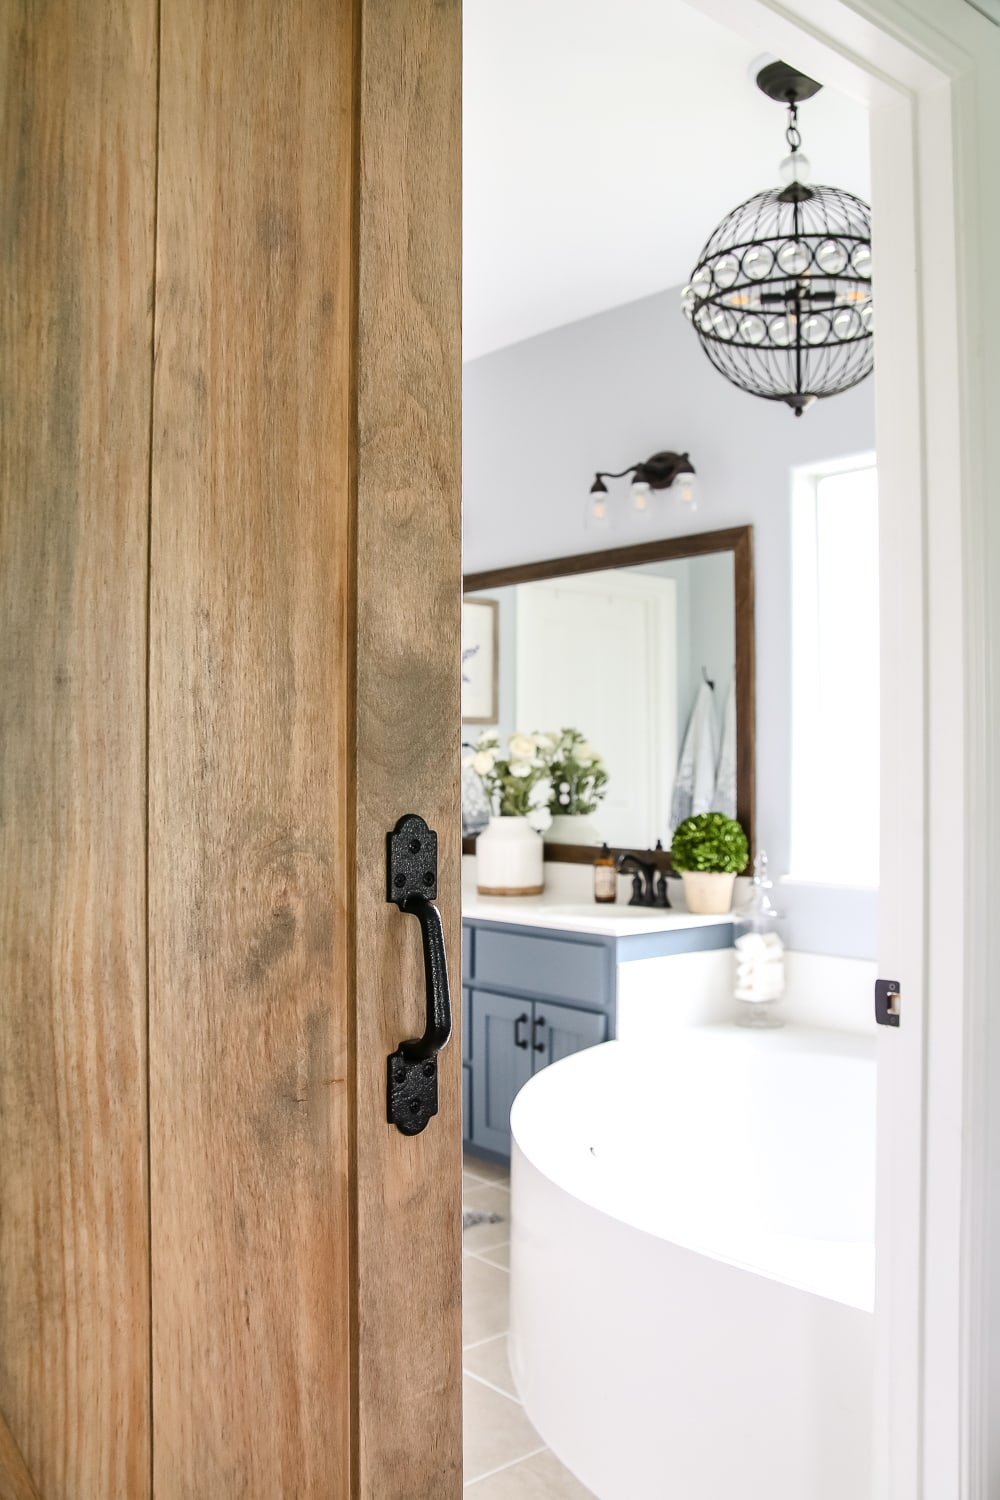
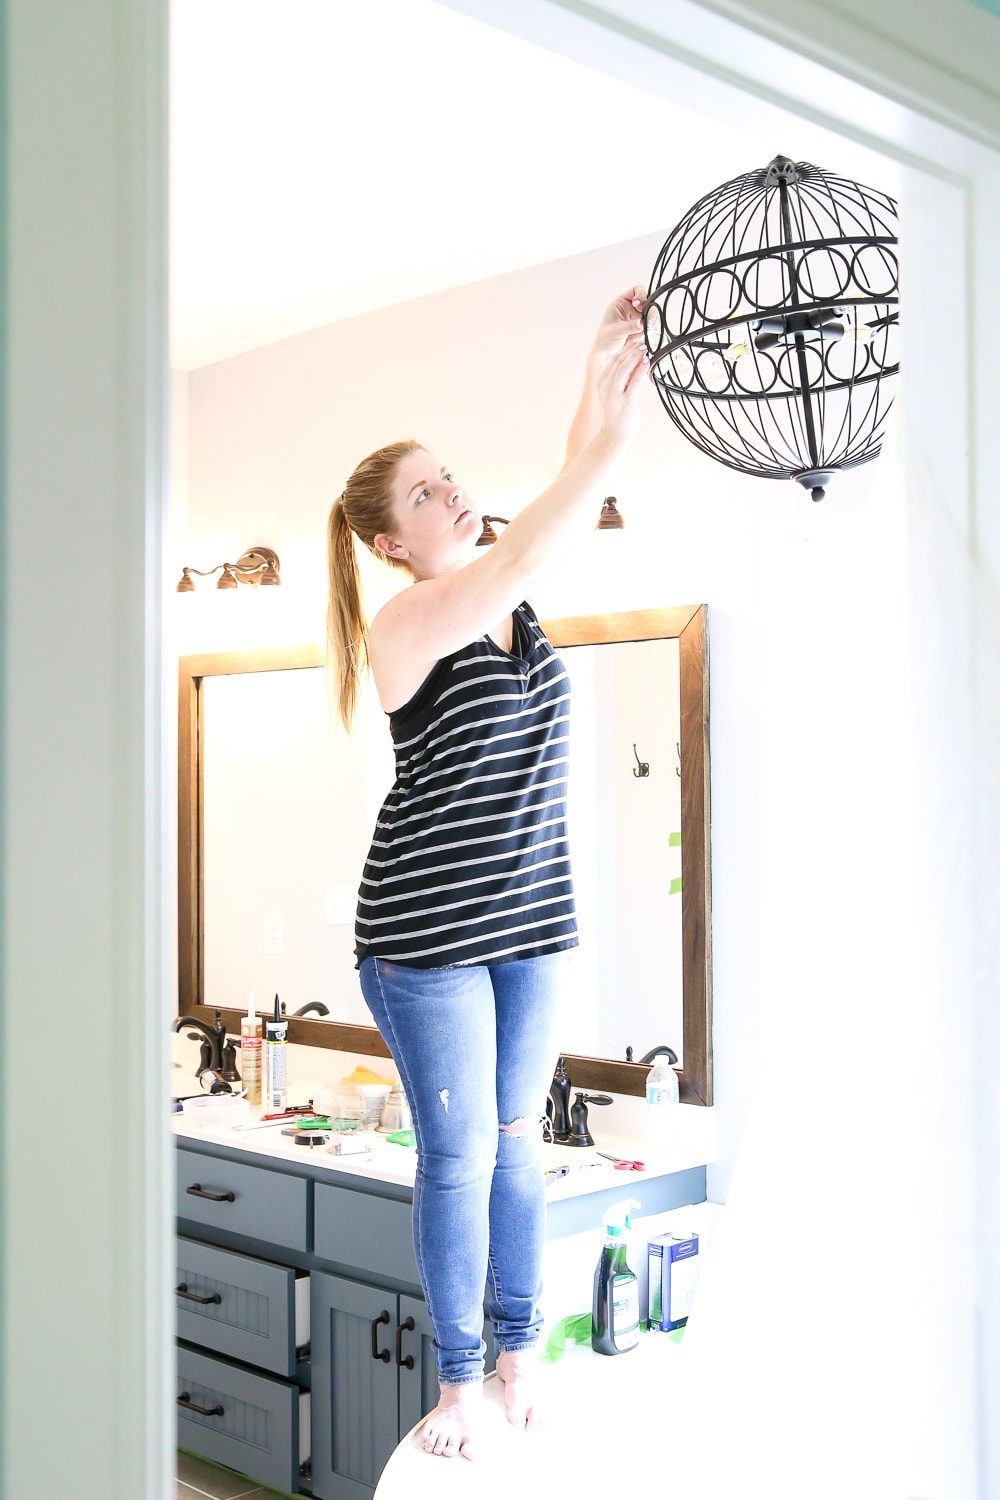
And yours truly (who was 8 months pregnant at the time) built an 8 foot barn door and assembled two barn door tracks. Felt a bit like Superwoman, I gotta admit.

We six are not professional contractors, so we certainly did not rip out the old bathroom and start over, but sometimes all a space needs is some cosmetic changes to bring it to life… And with paint, creativity, and a few easy building projects, this bathroom graduated to an elegant retreat in no time.
Well, ok, in exactly 48 hours. Give or take. 😉

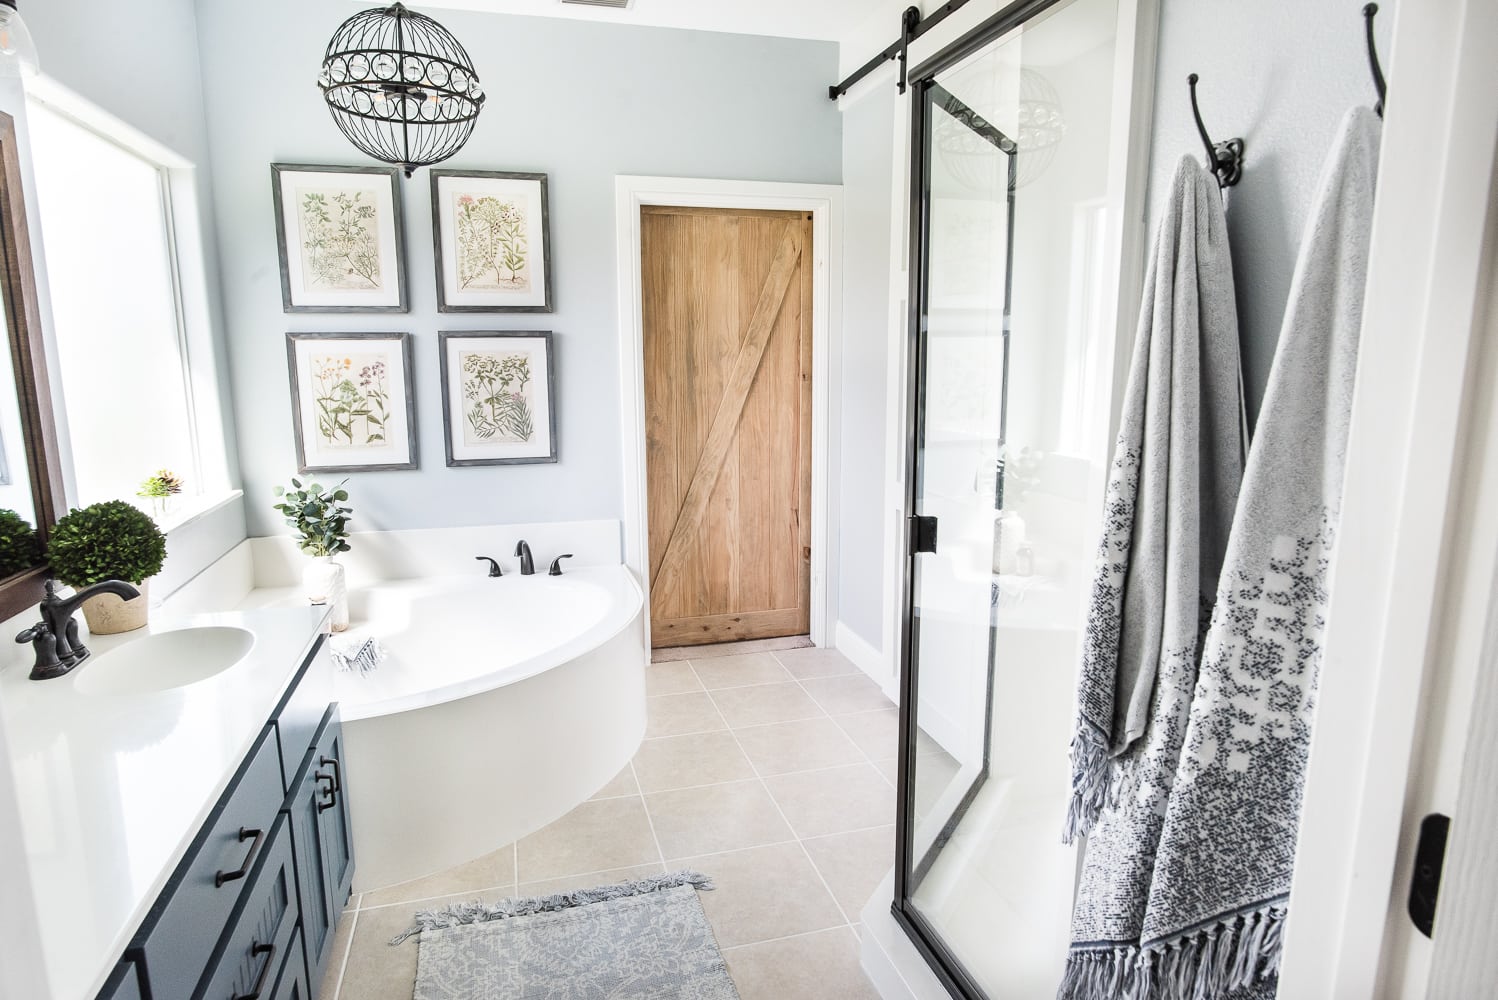
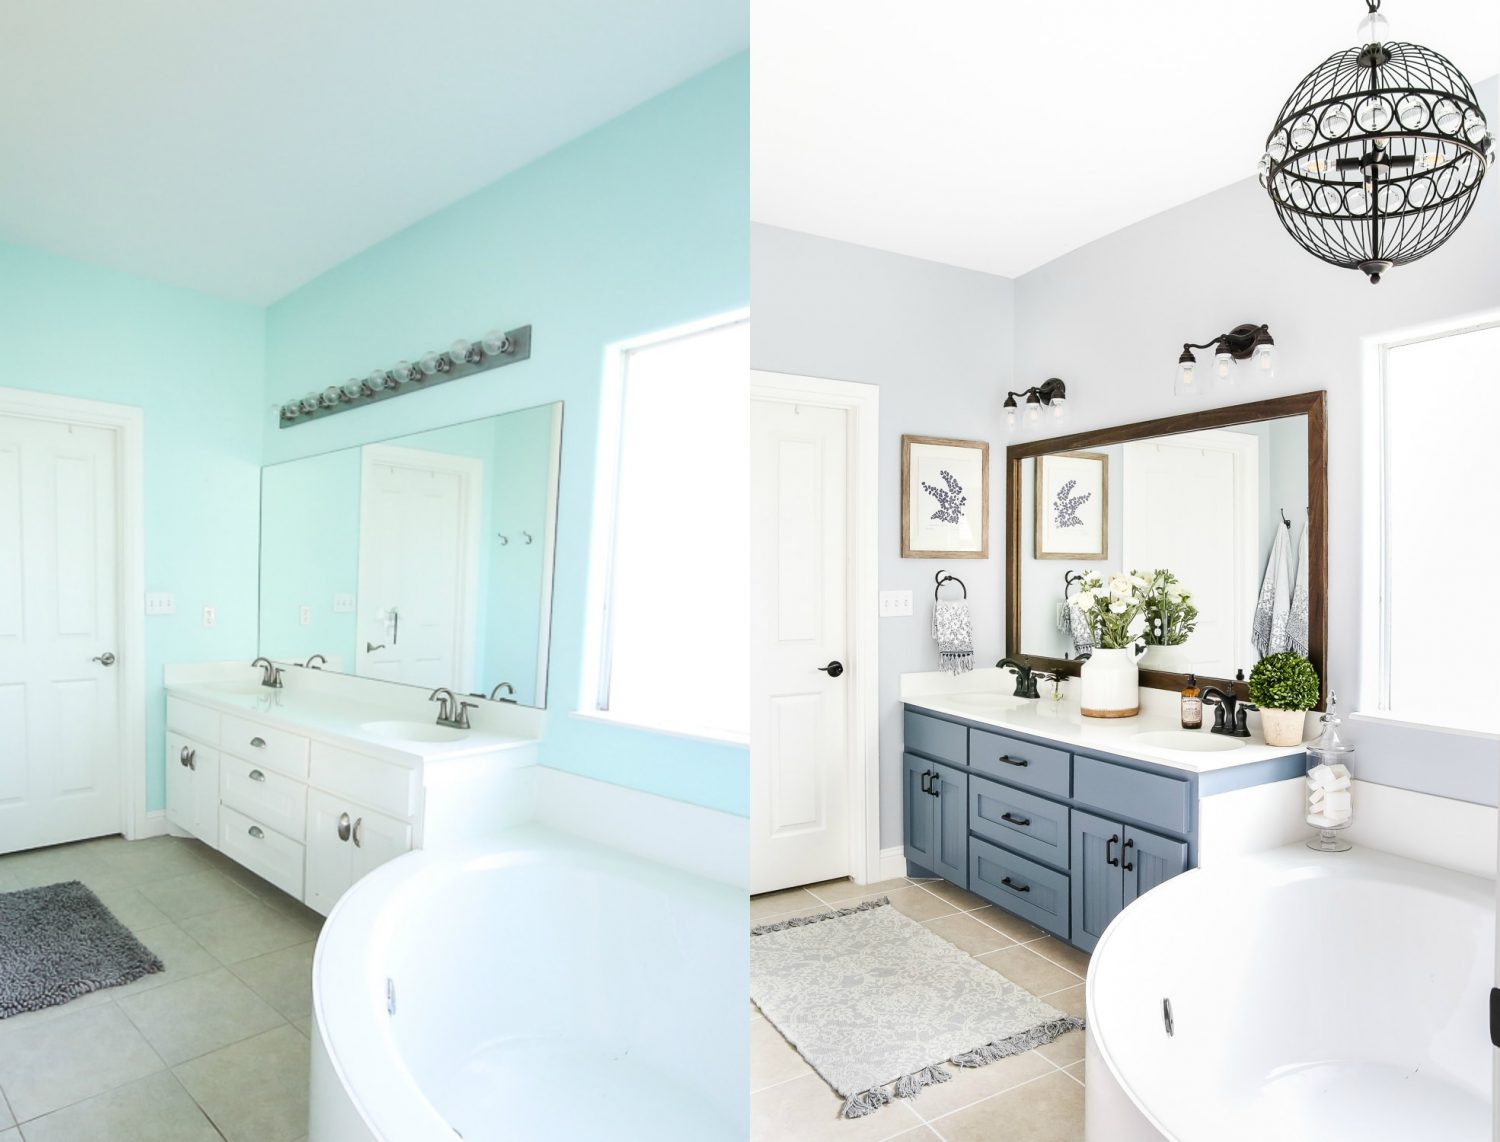
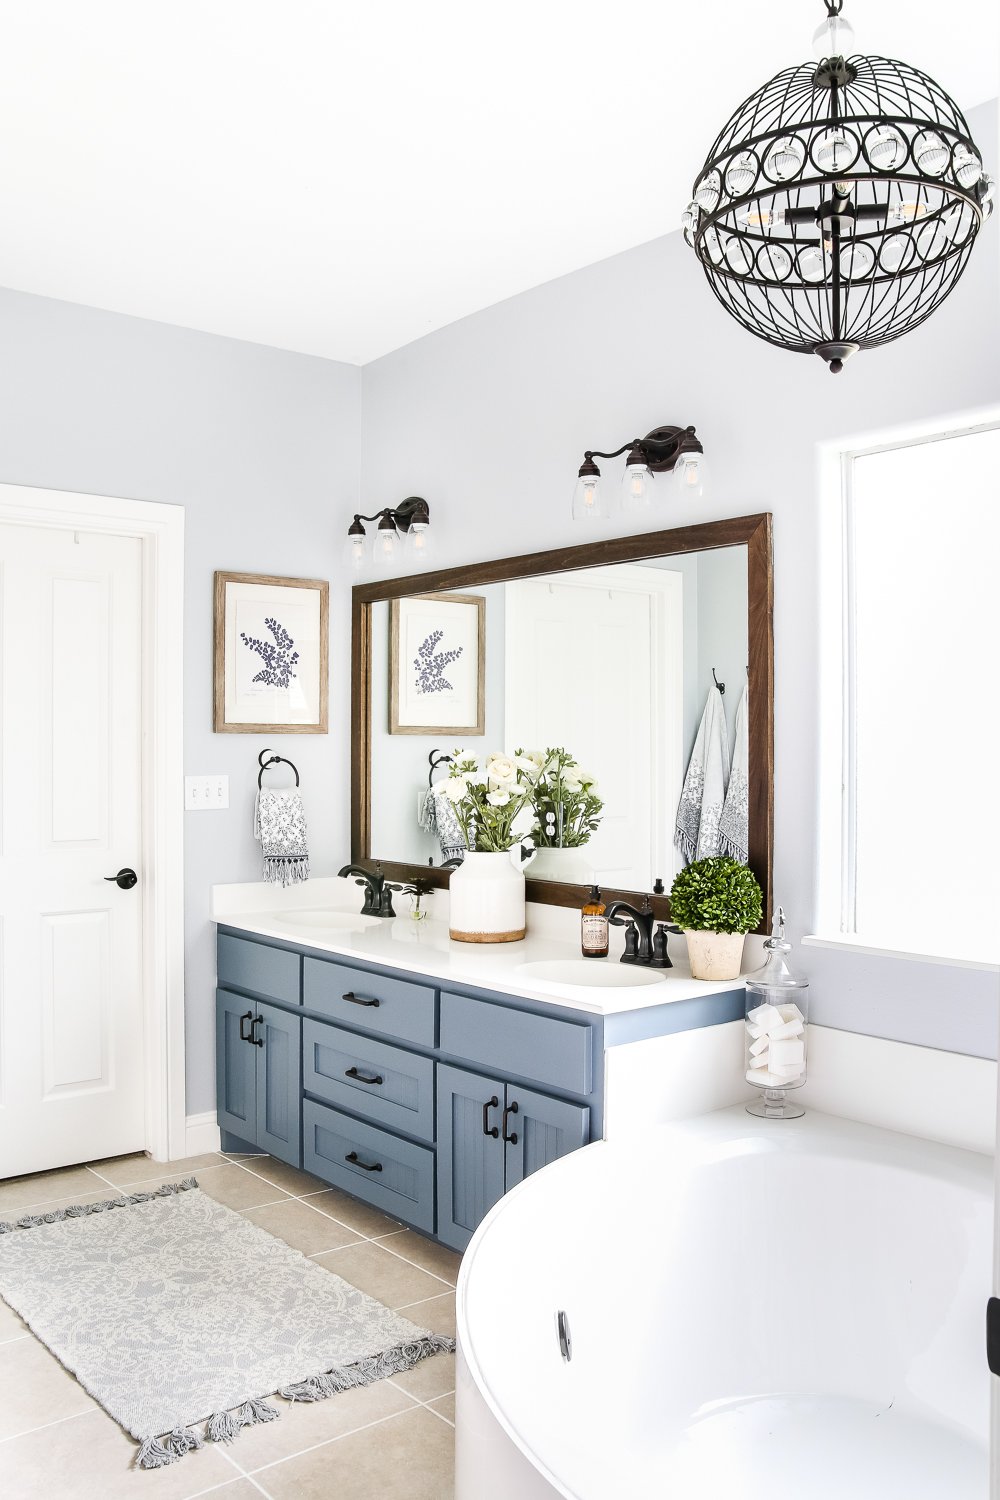
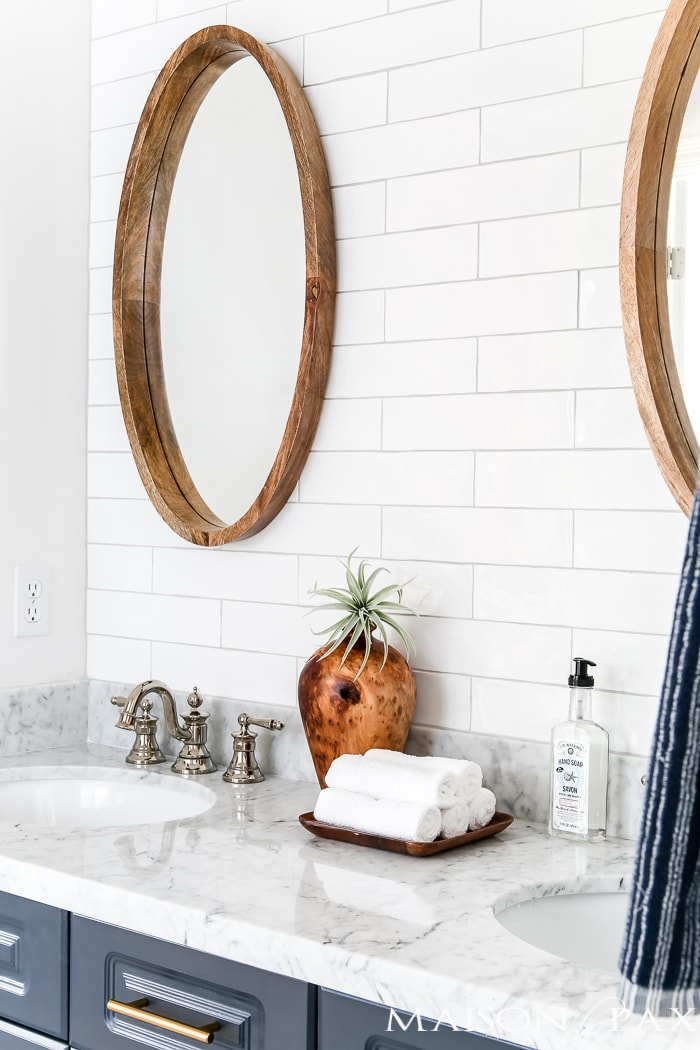
I will list all the sources at the bottom of the post, but here’s a rundown of what we did to the space. We painted the walls Sherwin Williams Gray Screen to give it a soothing atmosphere.
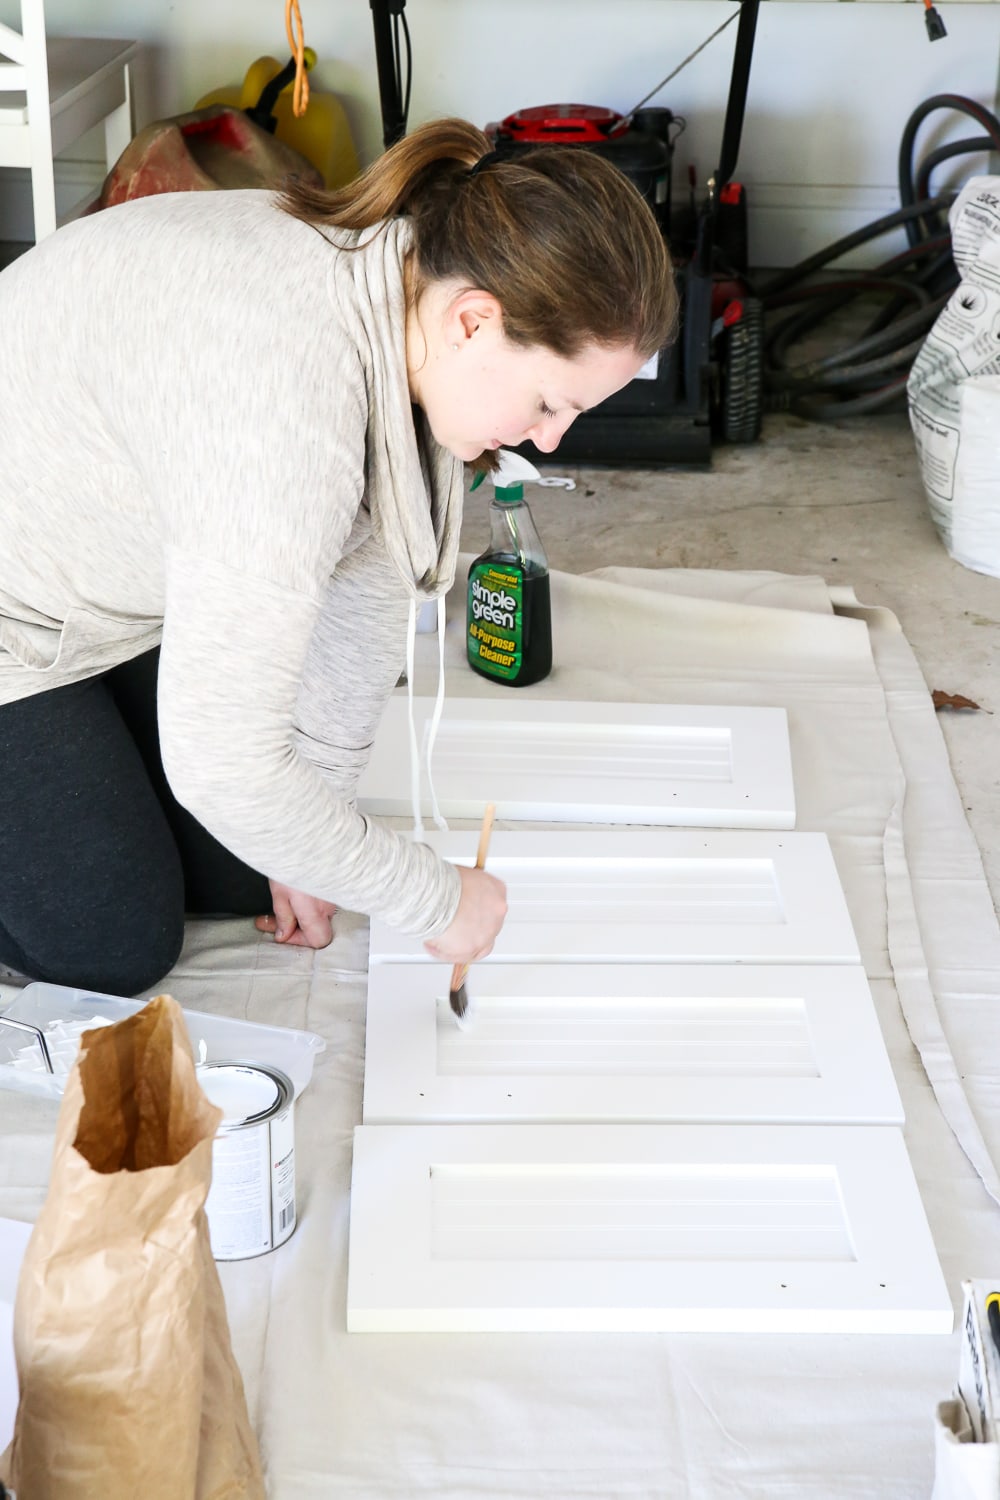
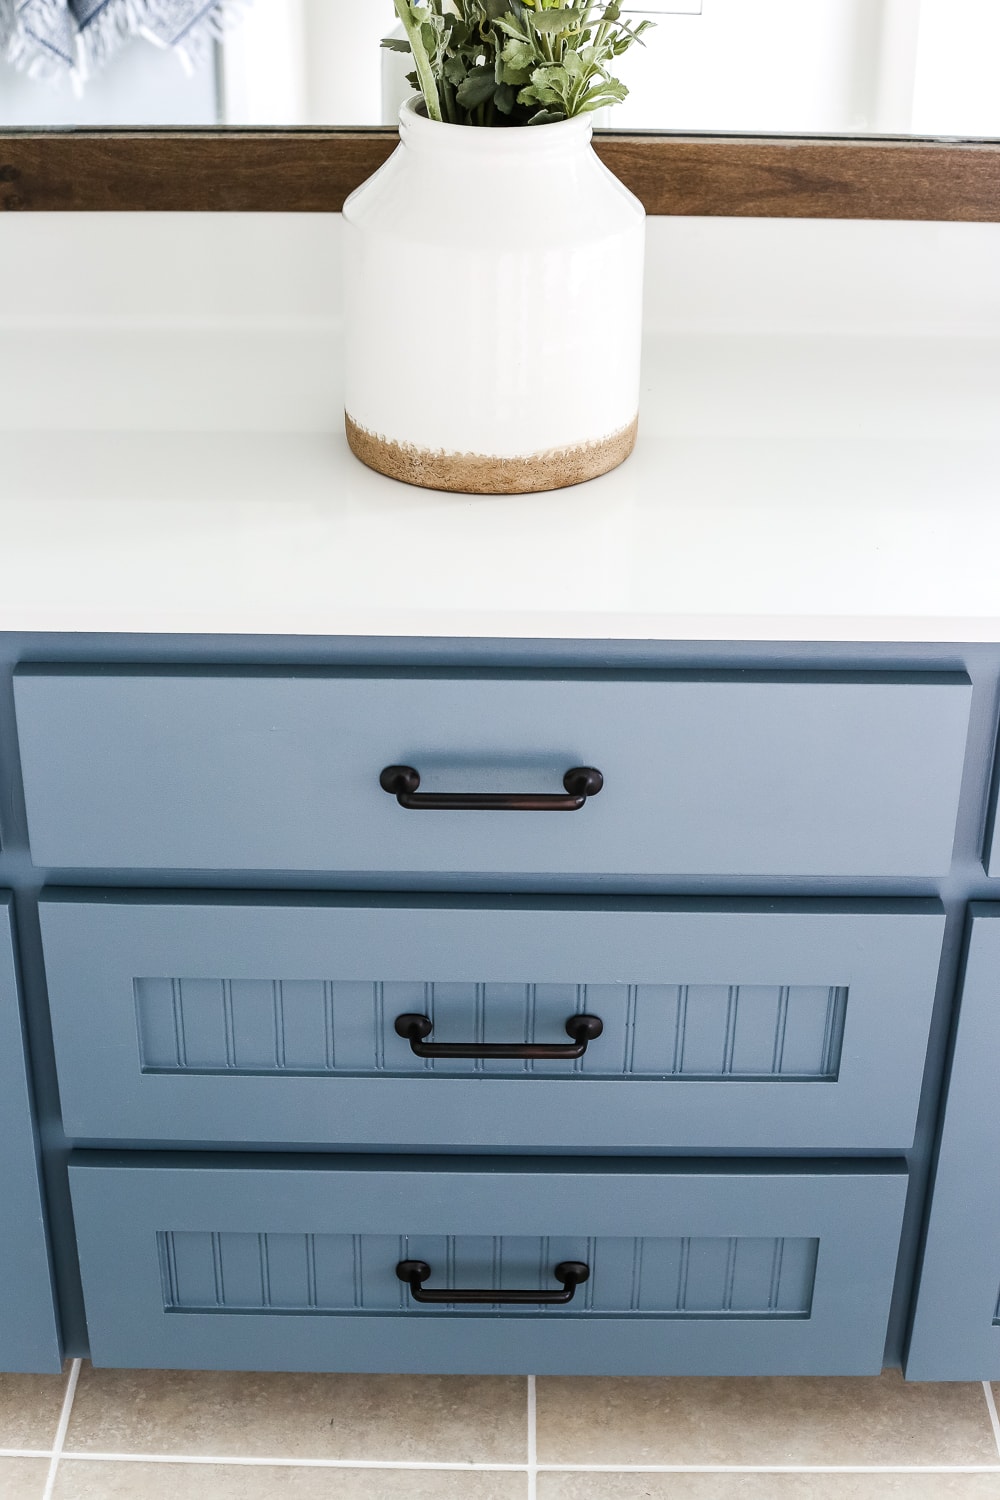
We painted the vanity Sherwin Williams Slate Tile to add some color and give it more of a furniture-piece look.
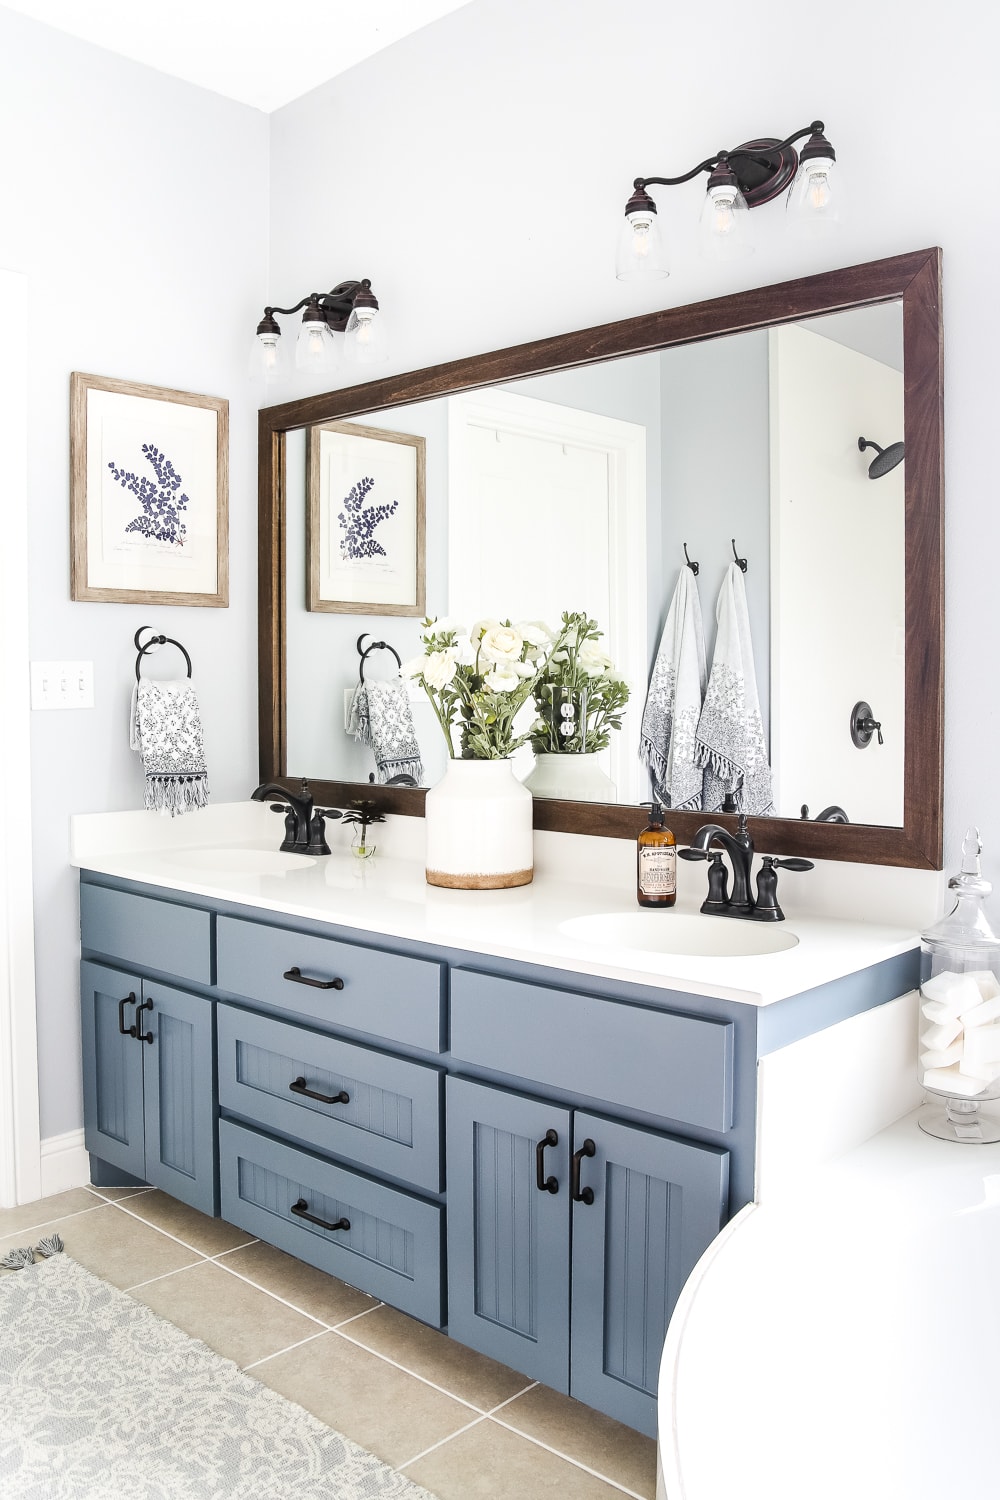
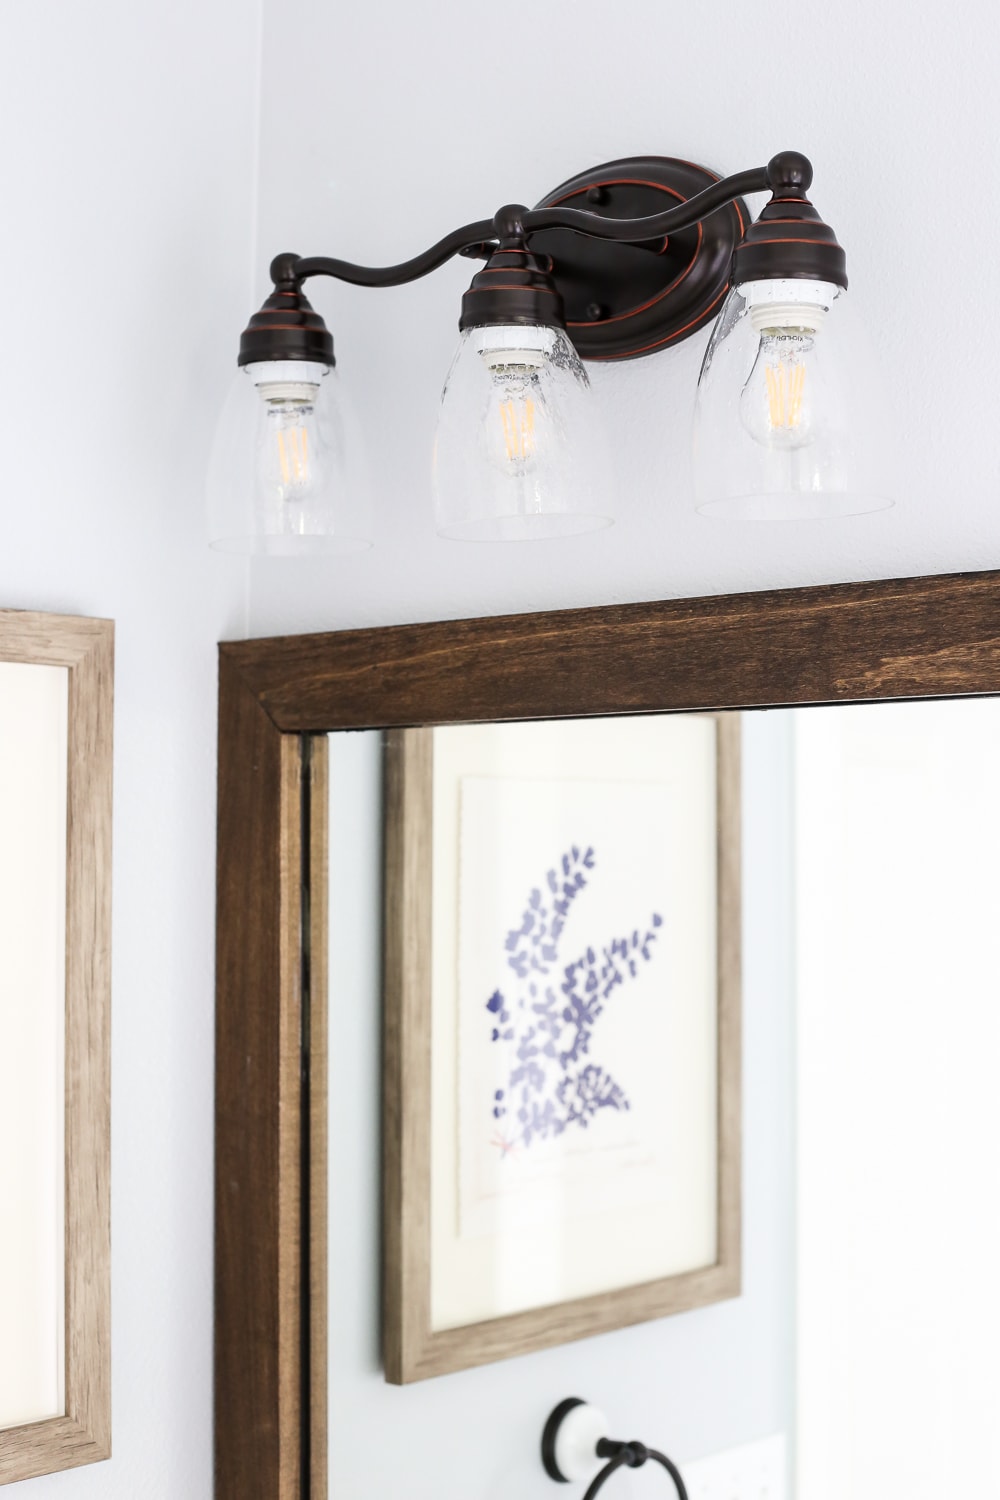
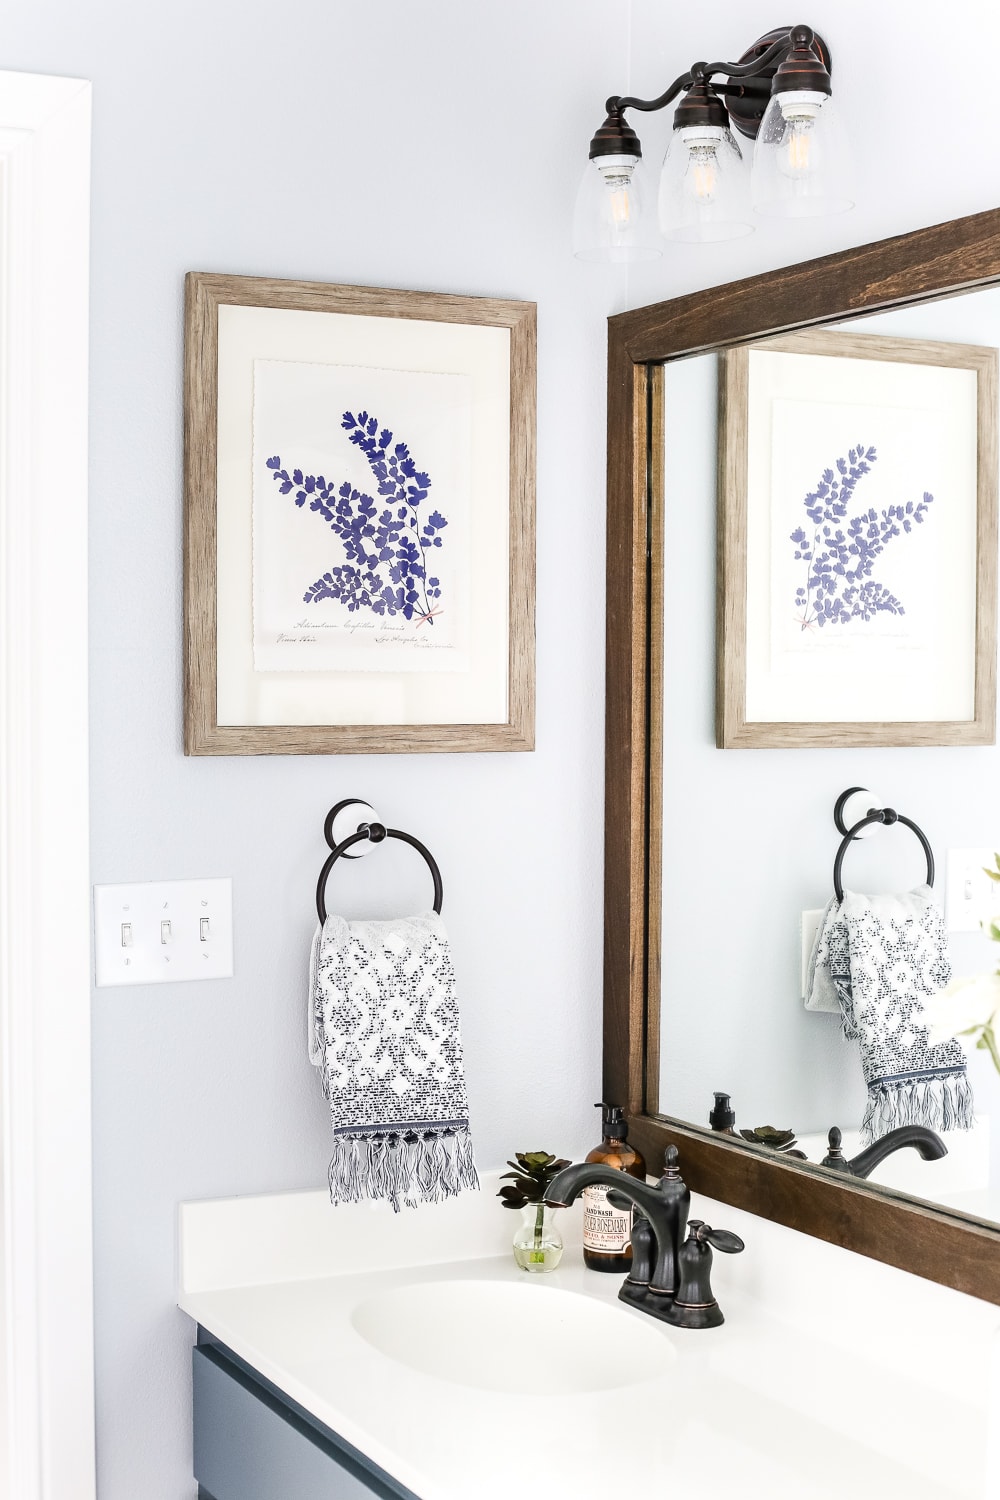
We replaced the outdated lighting above the vanity with the Portfolio Weathered Bronze 3-Light Bar…
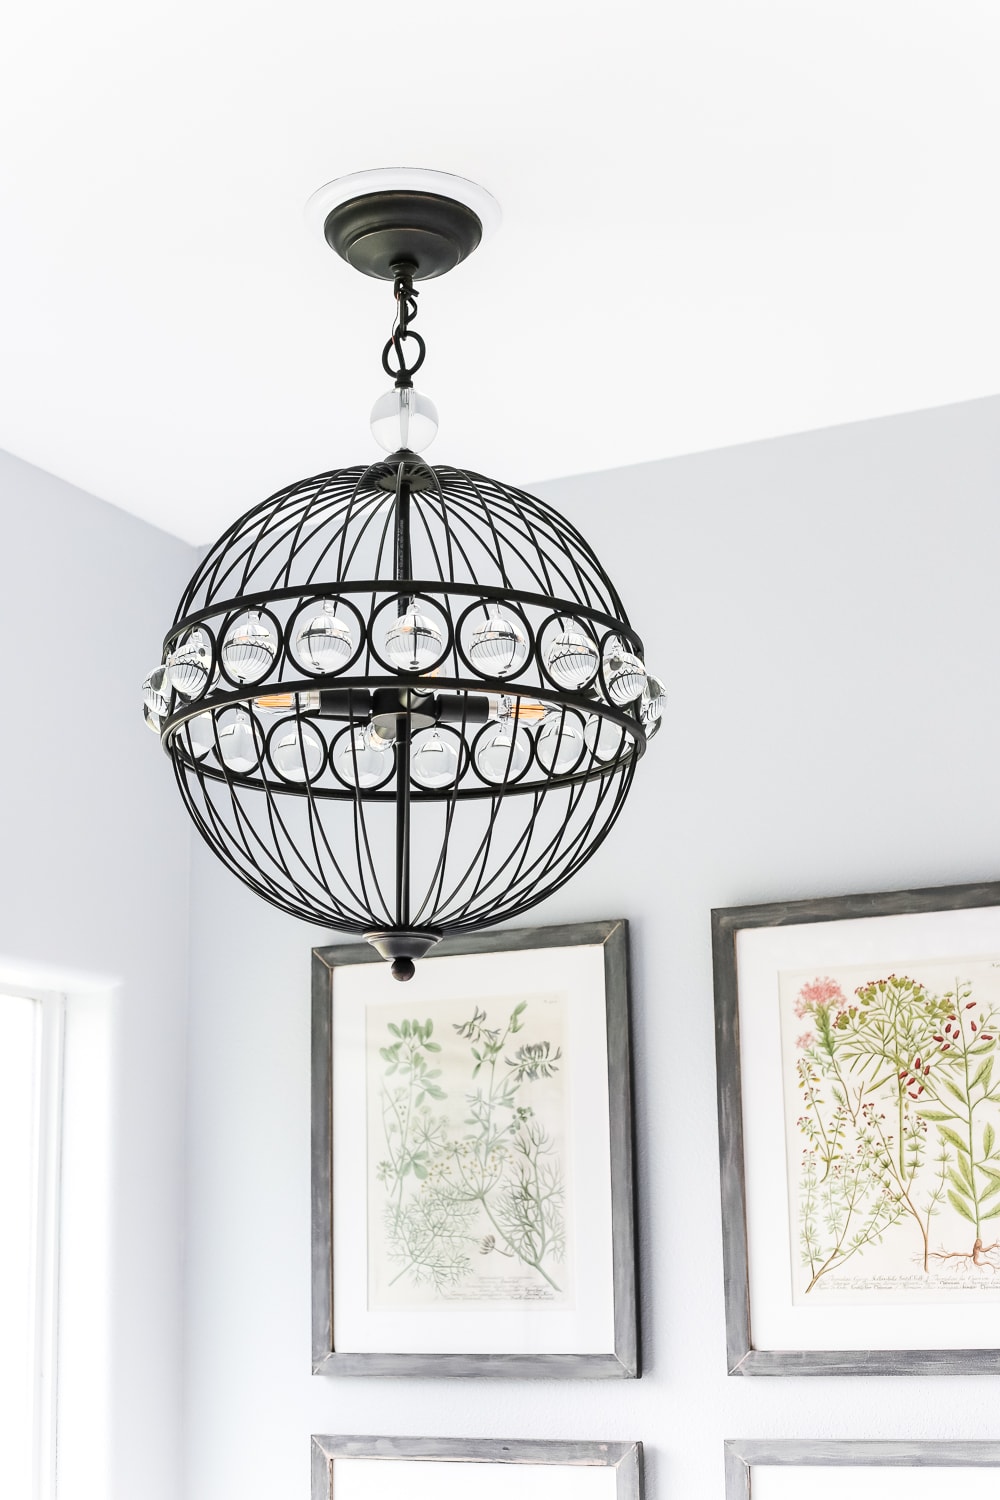
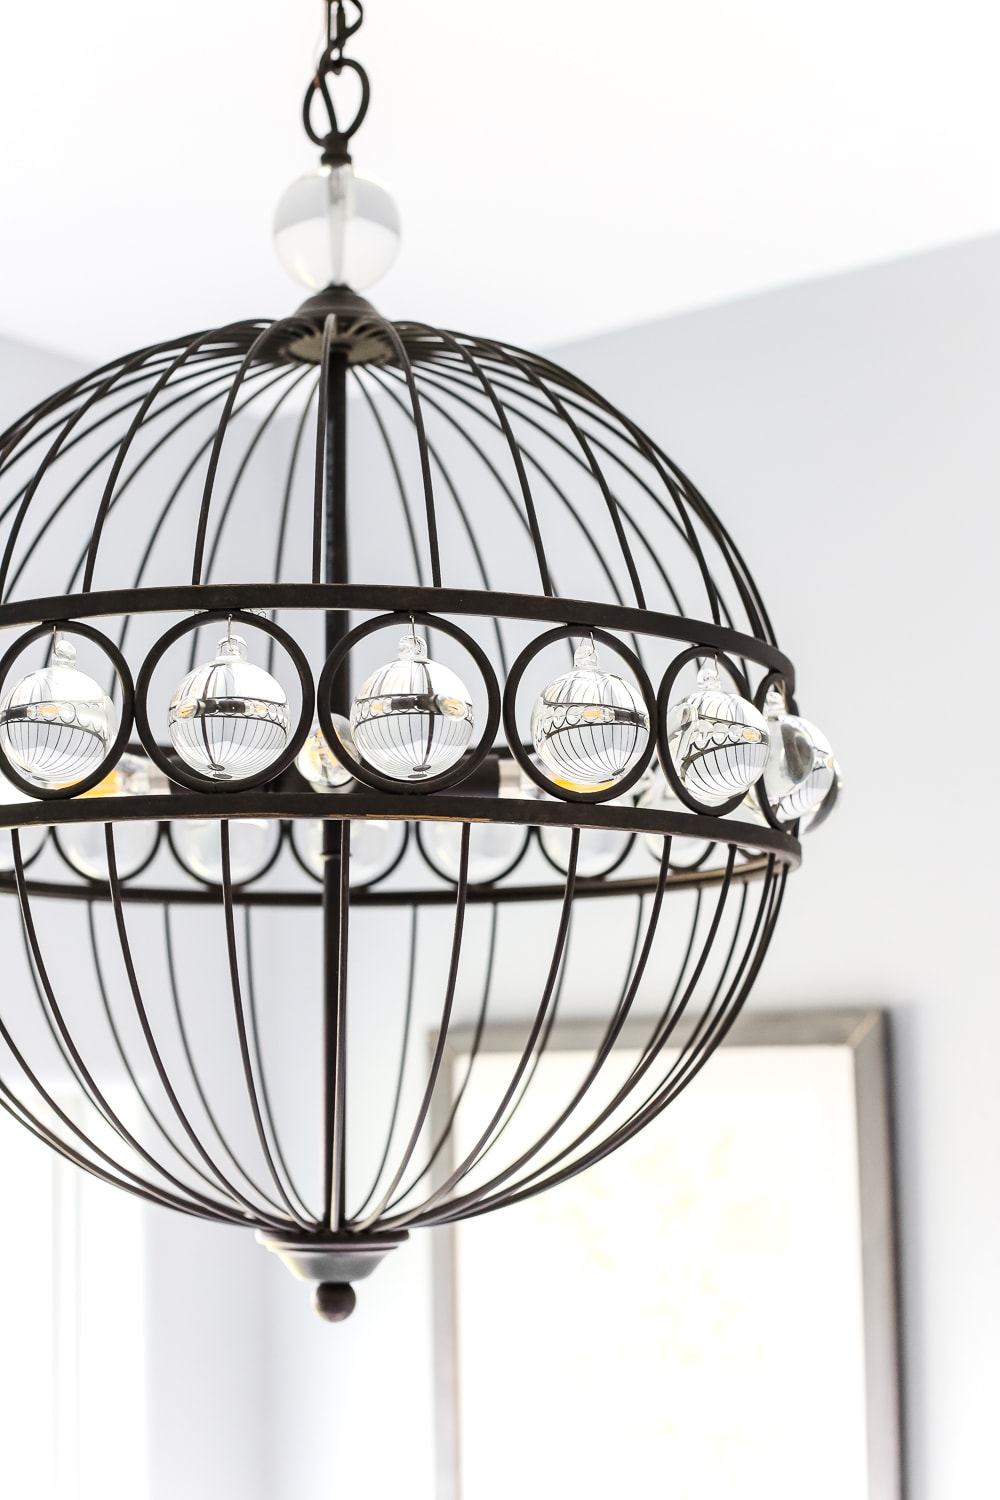
And hung the Quoizel Unison Imperial Bronze chandelier above the tub. An elegant yet industrial touch – just the merging of masculine and feminine perfect for a master bath.
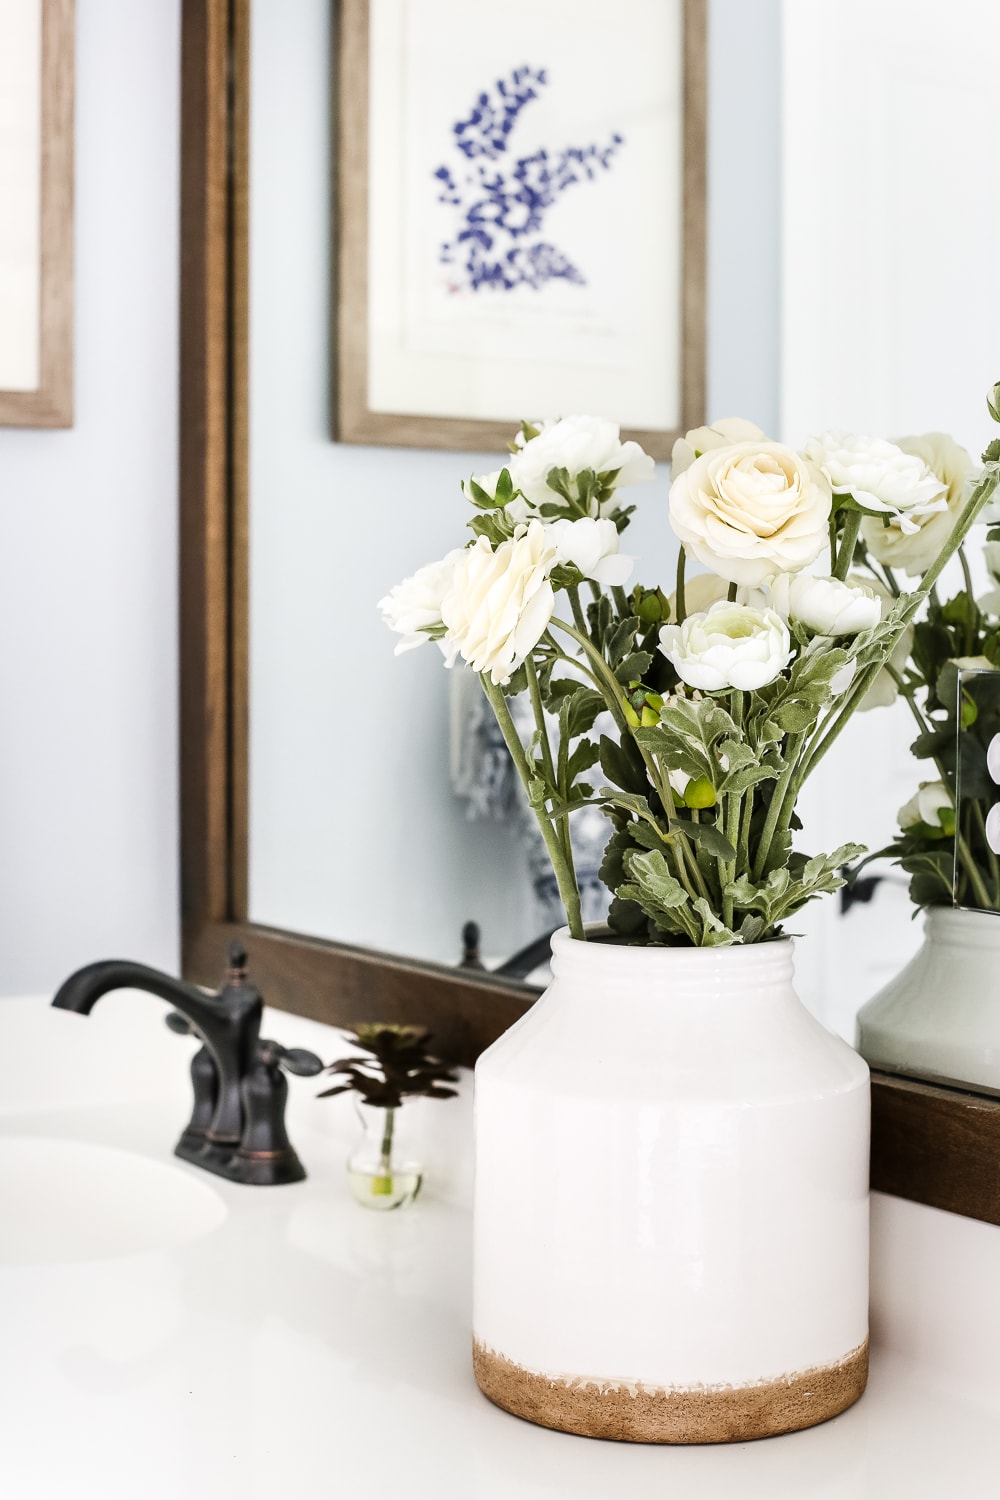
We framed the mirror above the vanity with simple pine boards that we stained using Rustoleum Dark Walnut. A touch of stained wood brings that rustic element and texture to space.
We replaced the vanity hardware with Rusticware 5-in Oil Rubbed Bronze pulls to match the subtle industrial look.
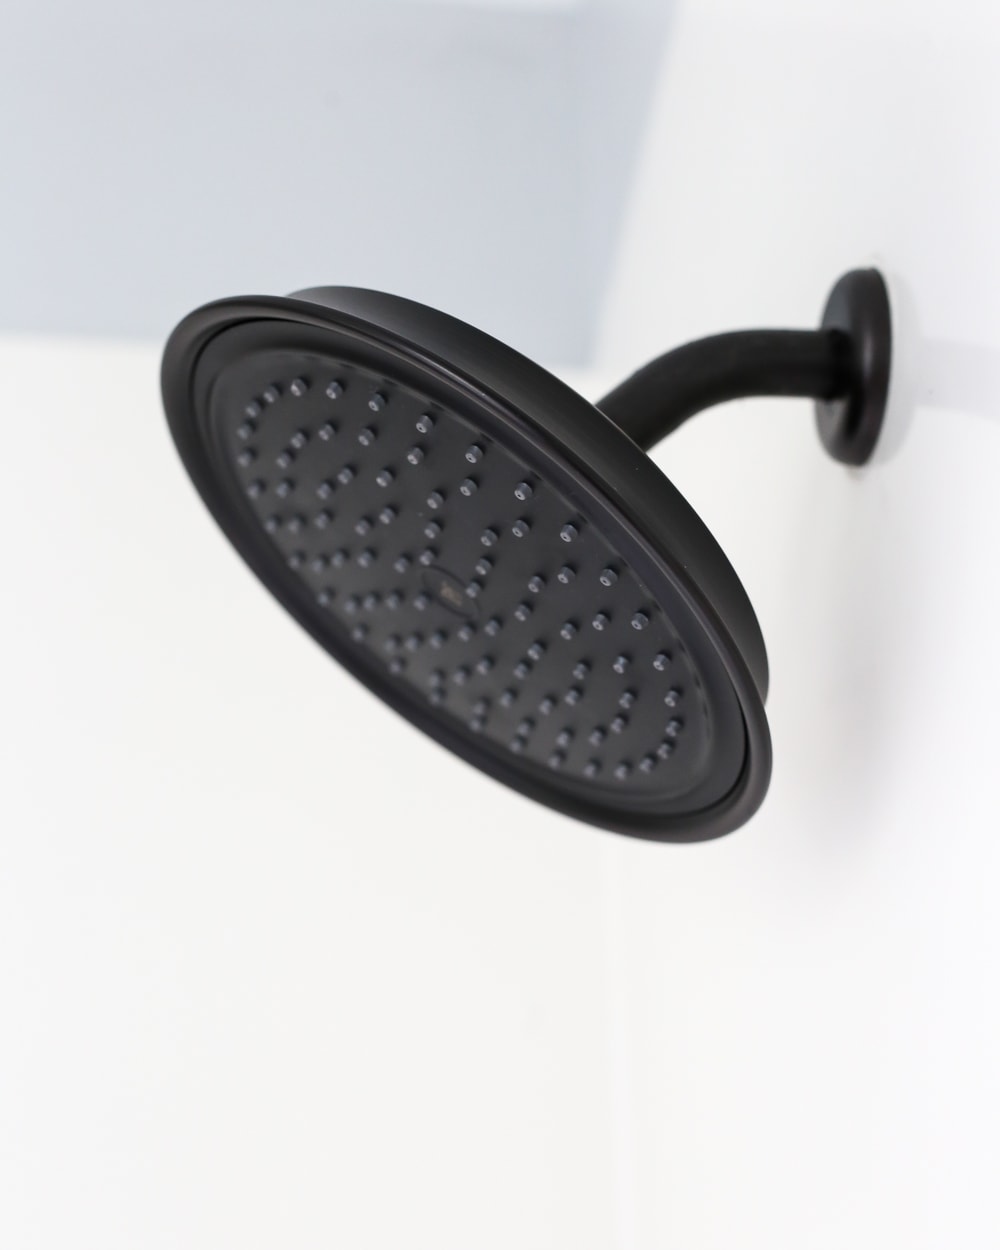
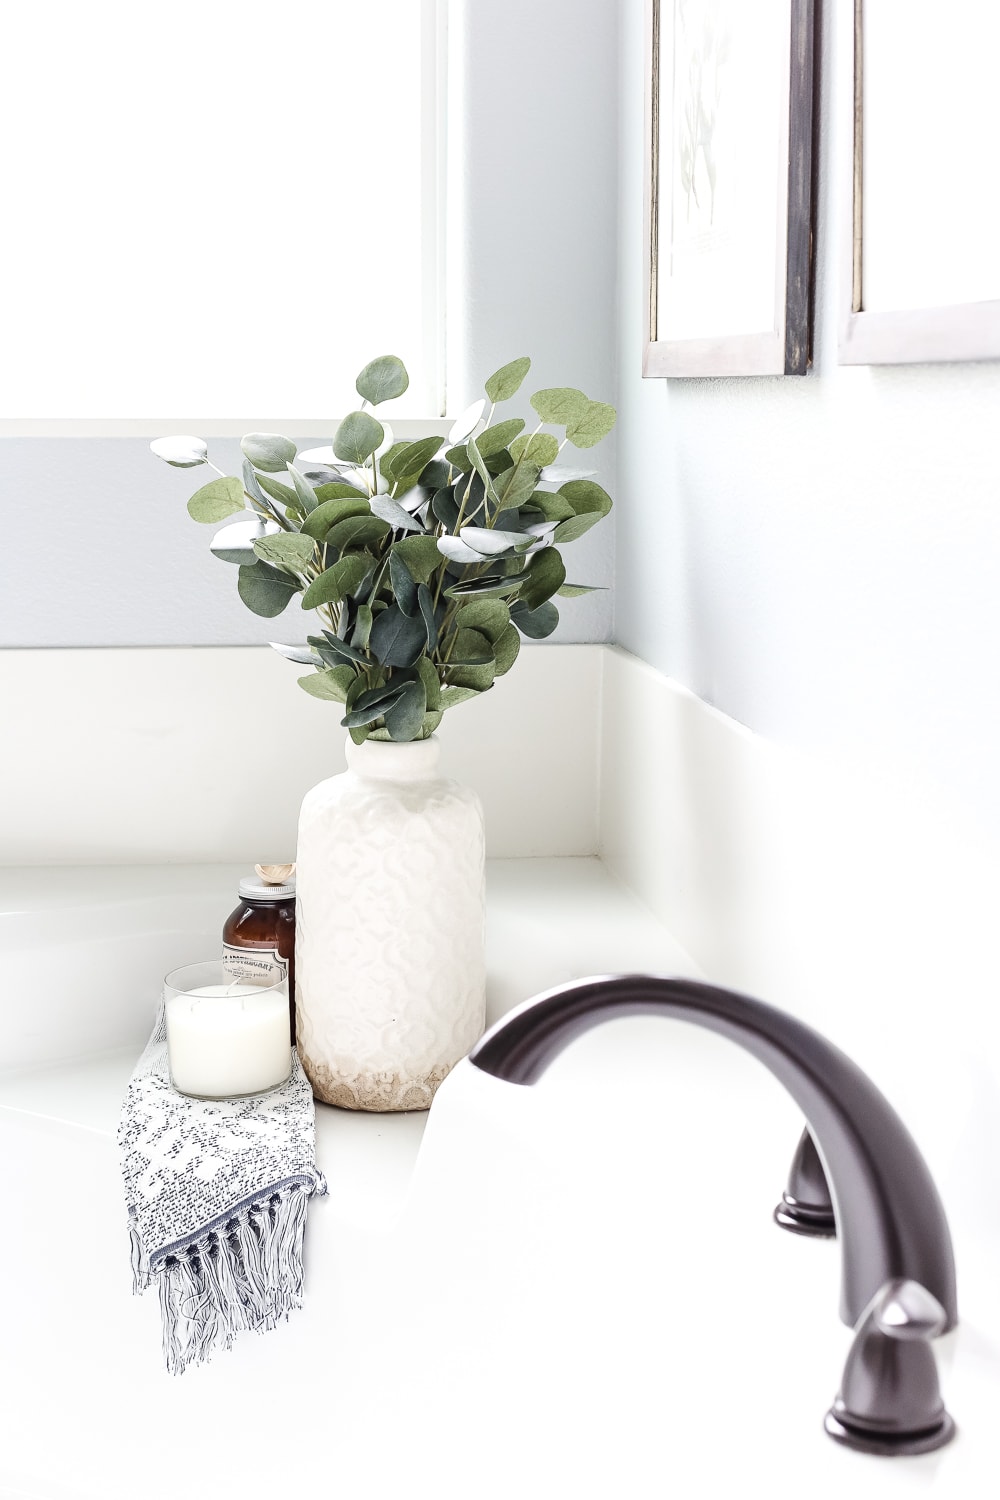
And we swapped out faucets throughout the bathroom for the same effect, using the Pfister Arlington Tuscan Bronze faucet on the sinks and the Pfister Tuscan Bronze rain shower head.
We freshened up the floors by painting the grout with Valspar Duramax in the color Du Jour.
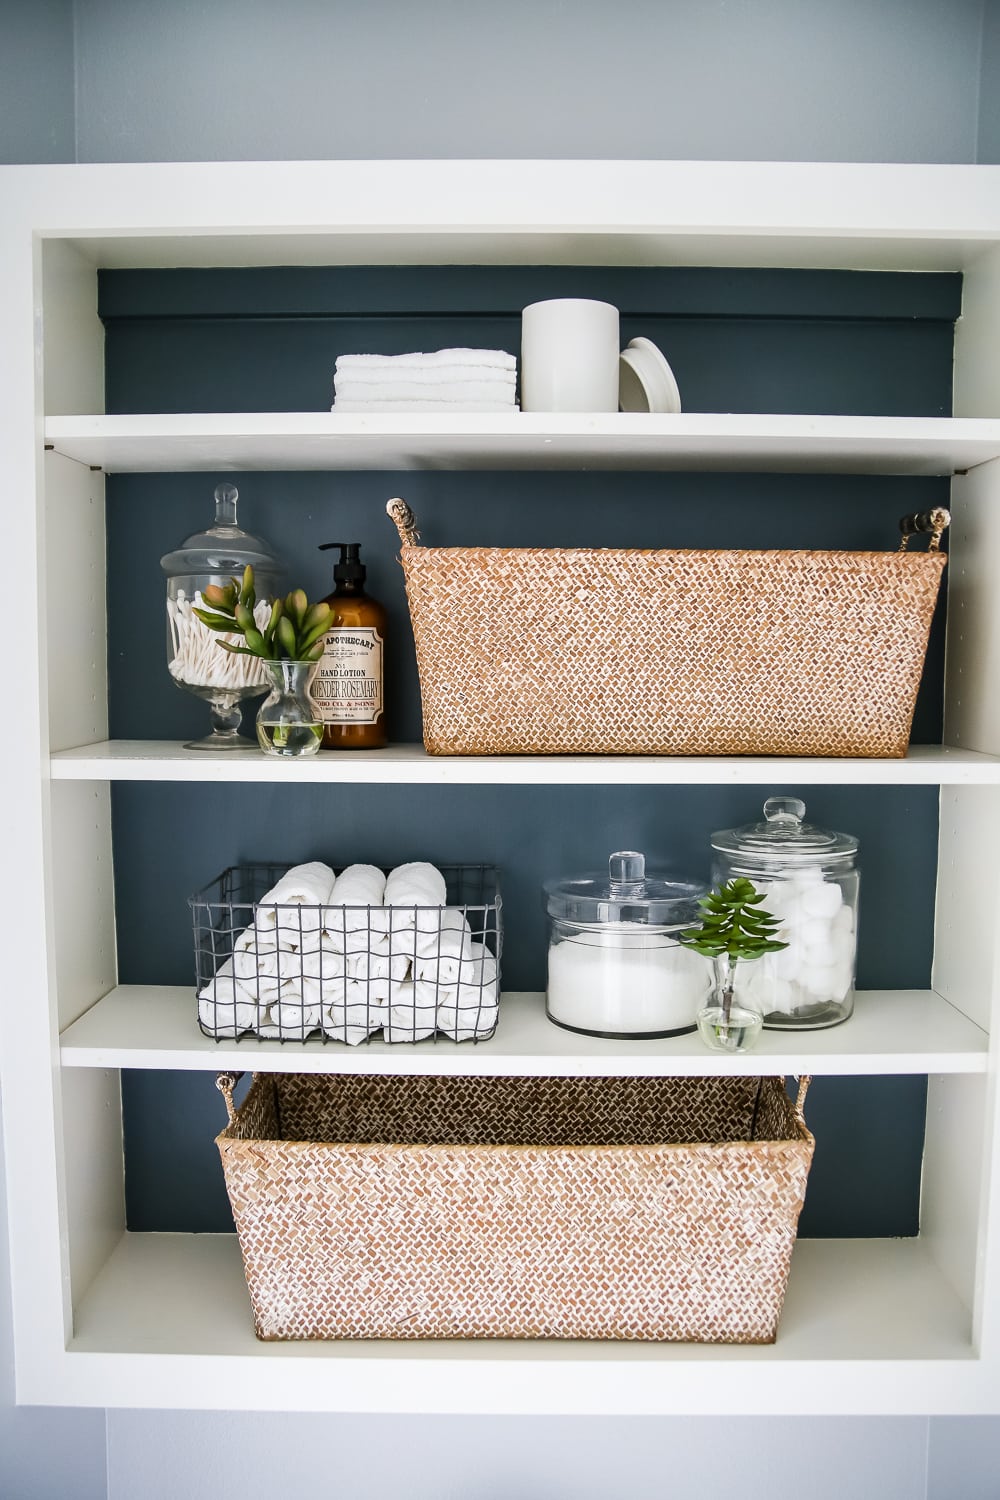
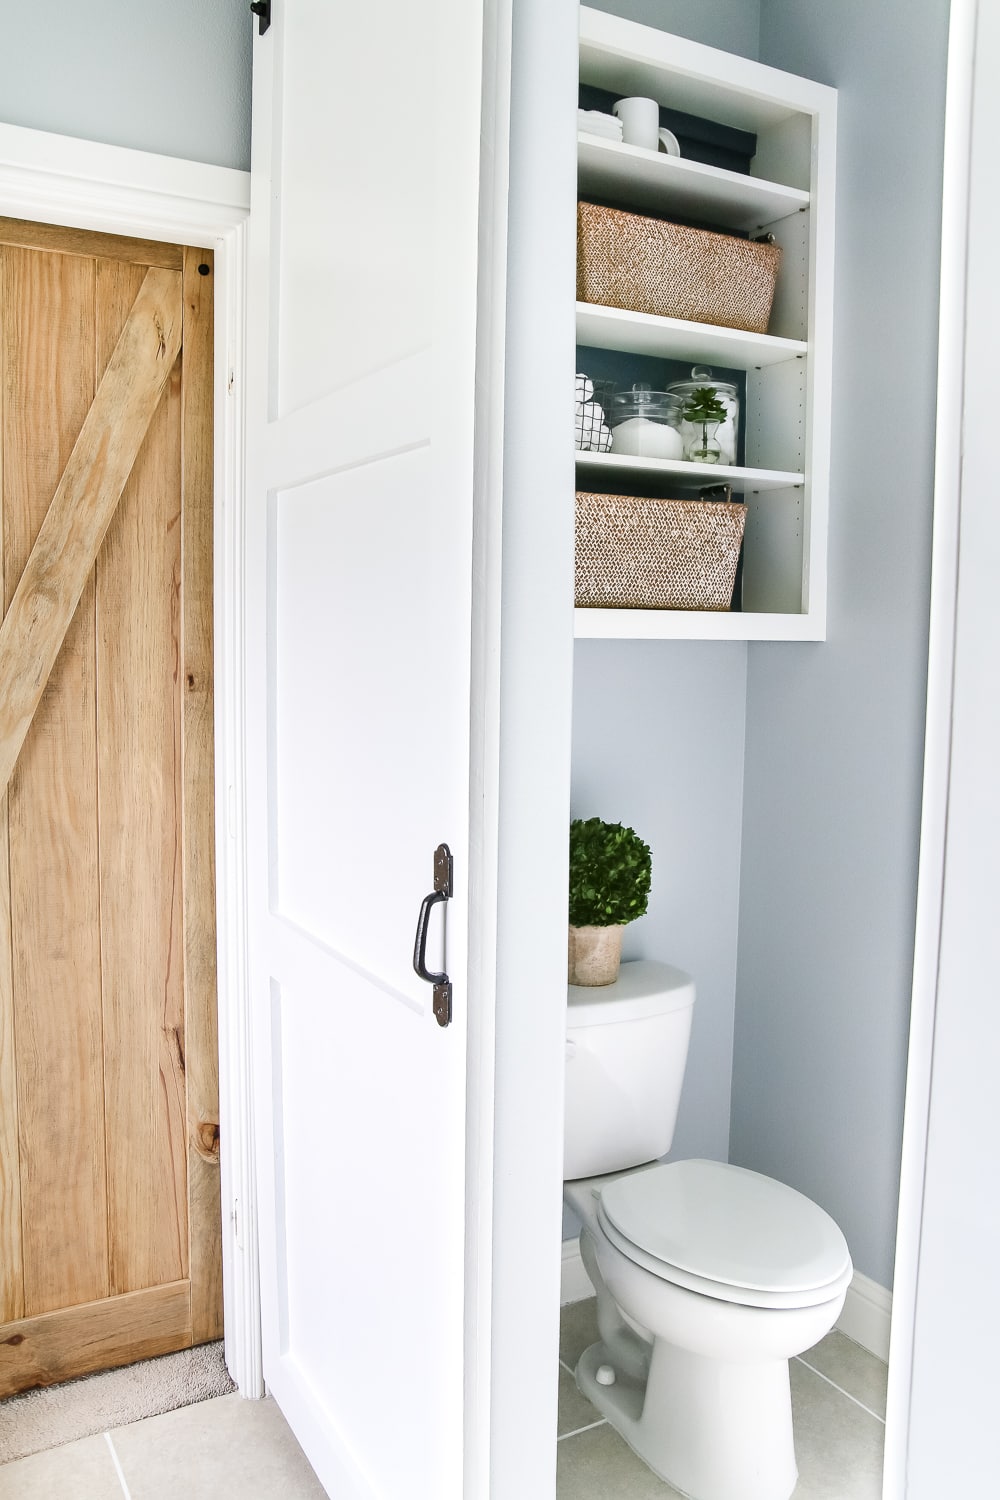
And we updated the water closet by removing the cabinet door and painting the back to match the vanity.
Speaking of the water closet, it was formerly open to the rest of the bathroom, but a barn door was the perfect solution to providing a bit of privacy. The opening was especially tall and narrow, so we built a custom door and hung it from a header with a sliding track.
To complement that barn door and avoid banging into it with the bathroom door, we removed the original door to the space and replaced it with a pre-made barn door kit: the ReliaBilt Z-frame Soft Close Pine Sliding Barn Door. The door came unfinished, so we stained it with Minwax Weathered Oak and sealed it with polyeurathane to protect it from the bathroom’s moisture. Hung on a sliding track outside of the bathroom, it blended the design of their new bath with their master bedroom.
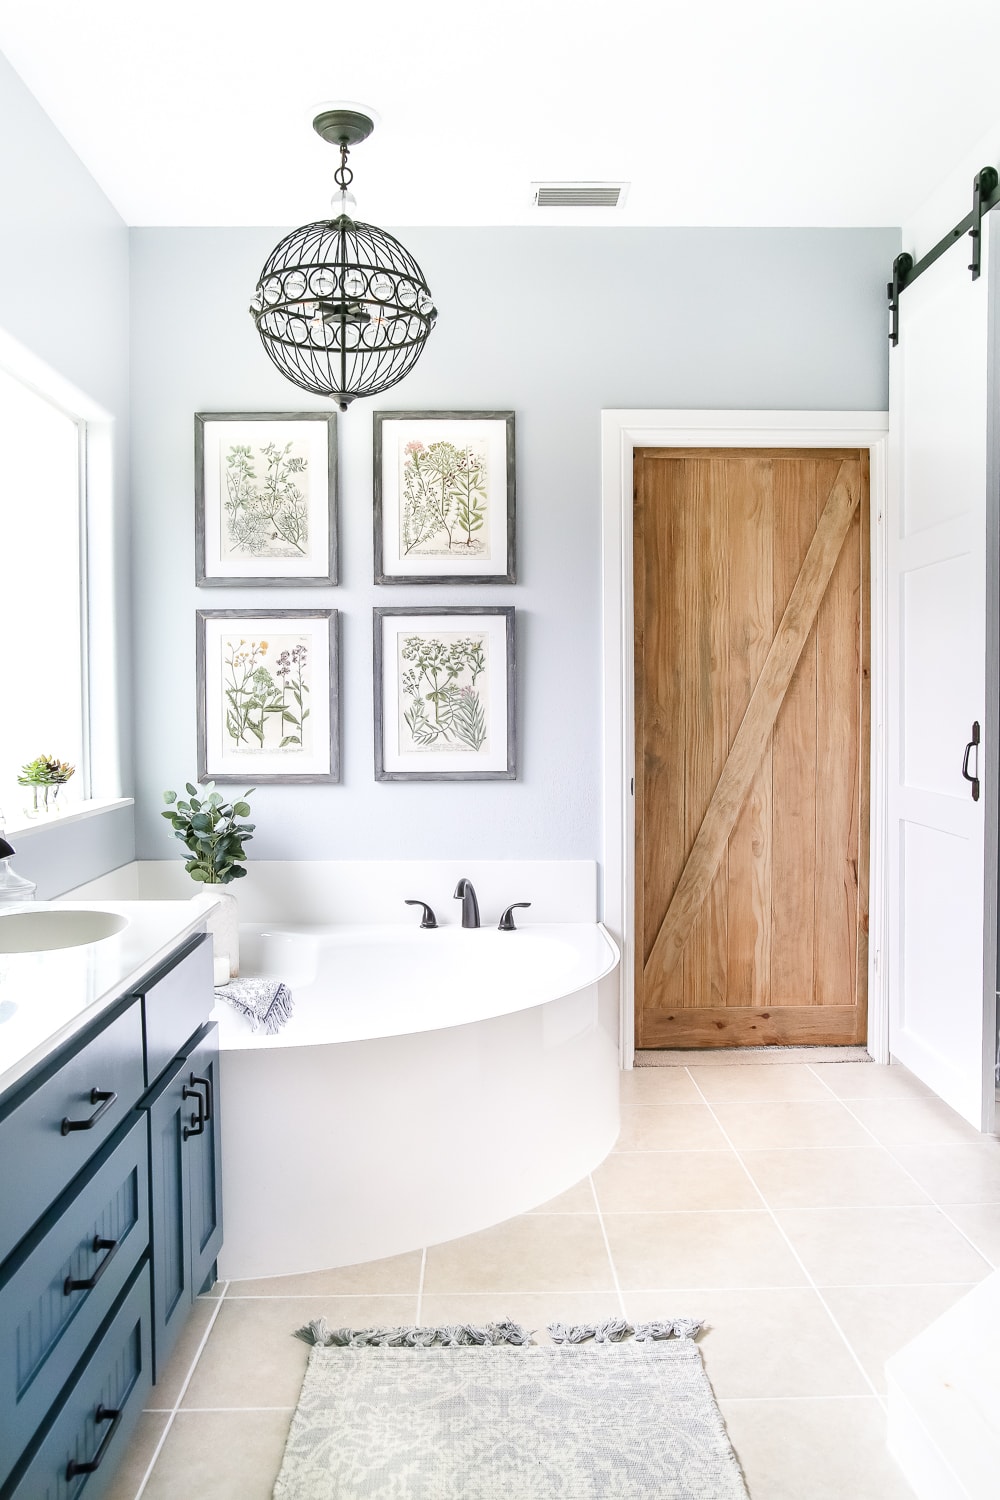
Finally, we added tons of decorative touches. These 4-Piece Framed Garden Prints offer some soft, feminine lines to complement all the more industrial and rugged features.
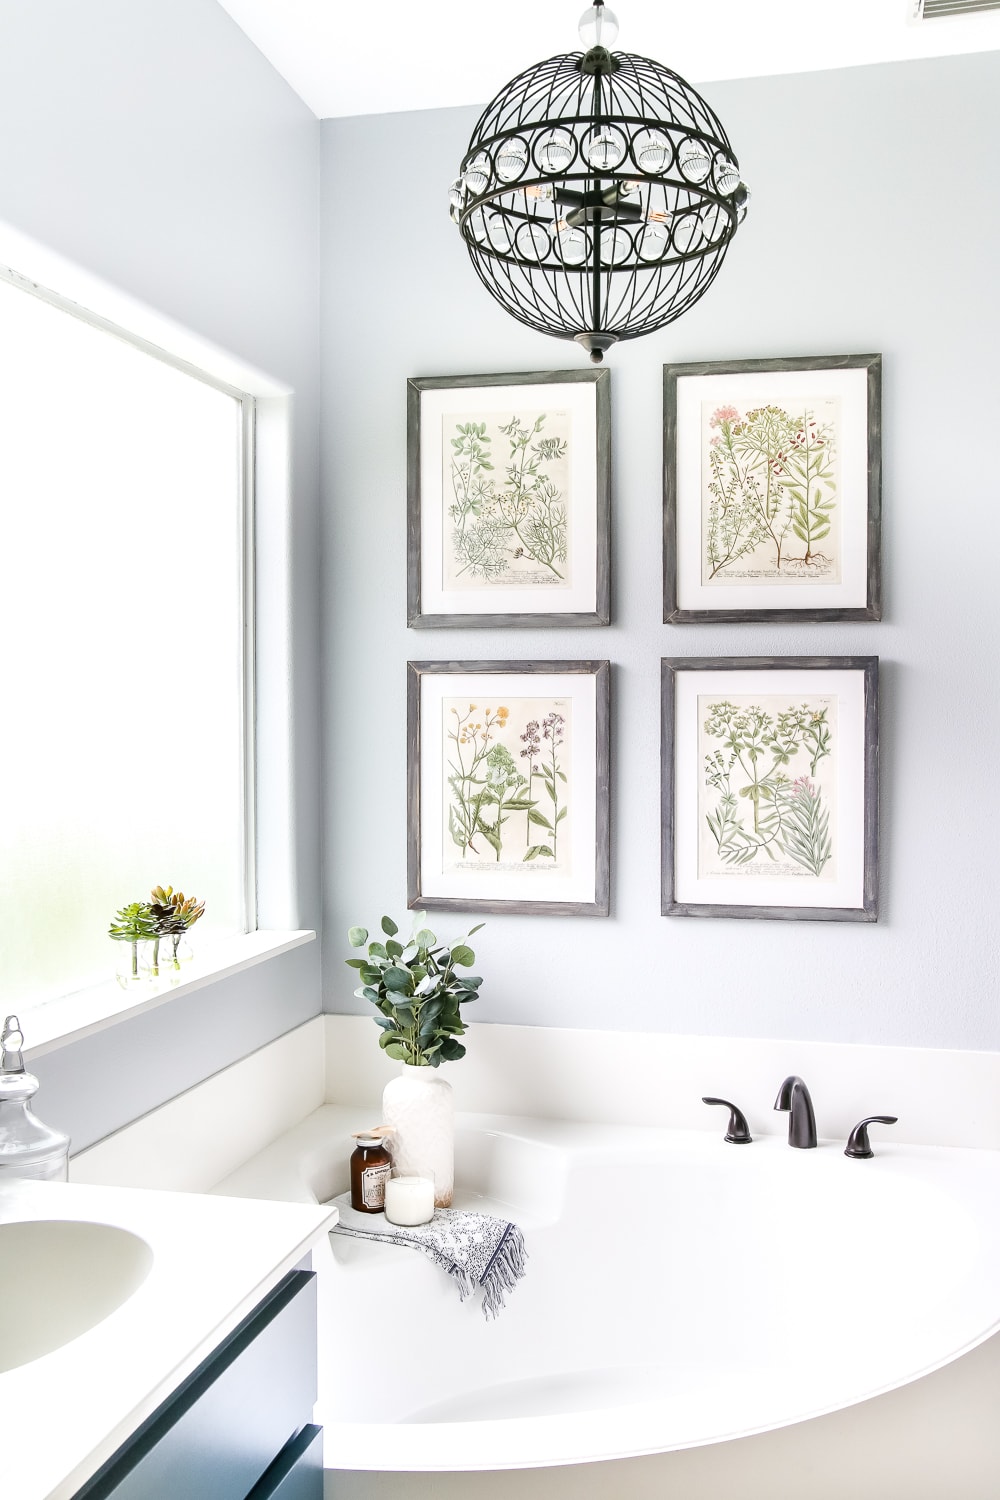
More florals and faux succulents bring life into the space.
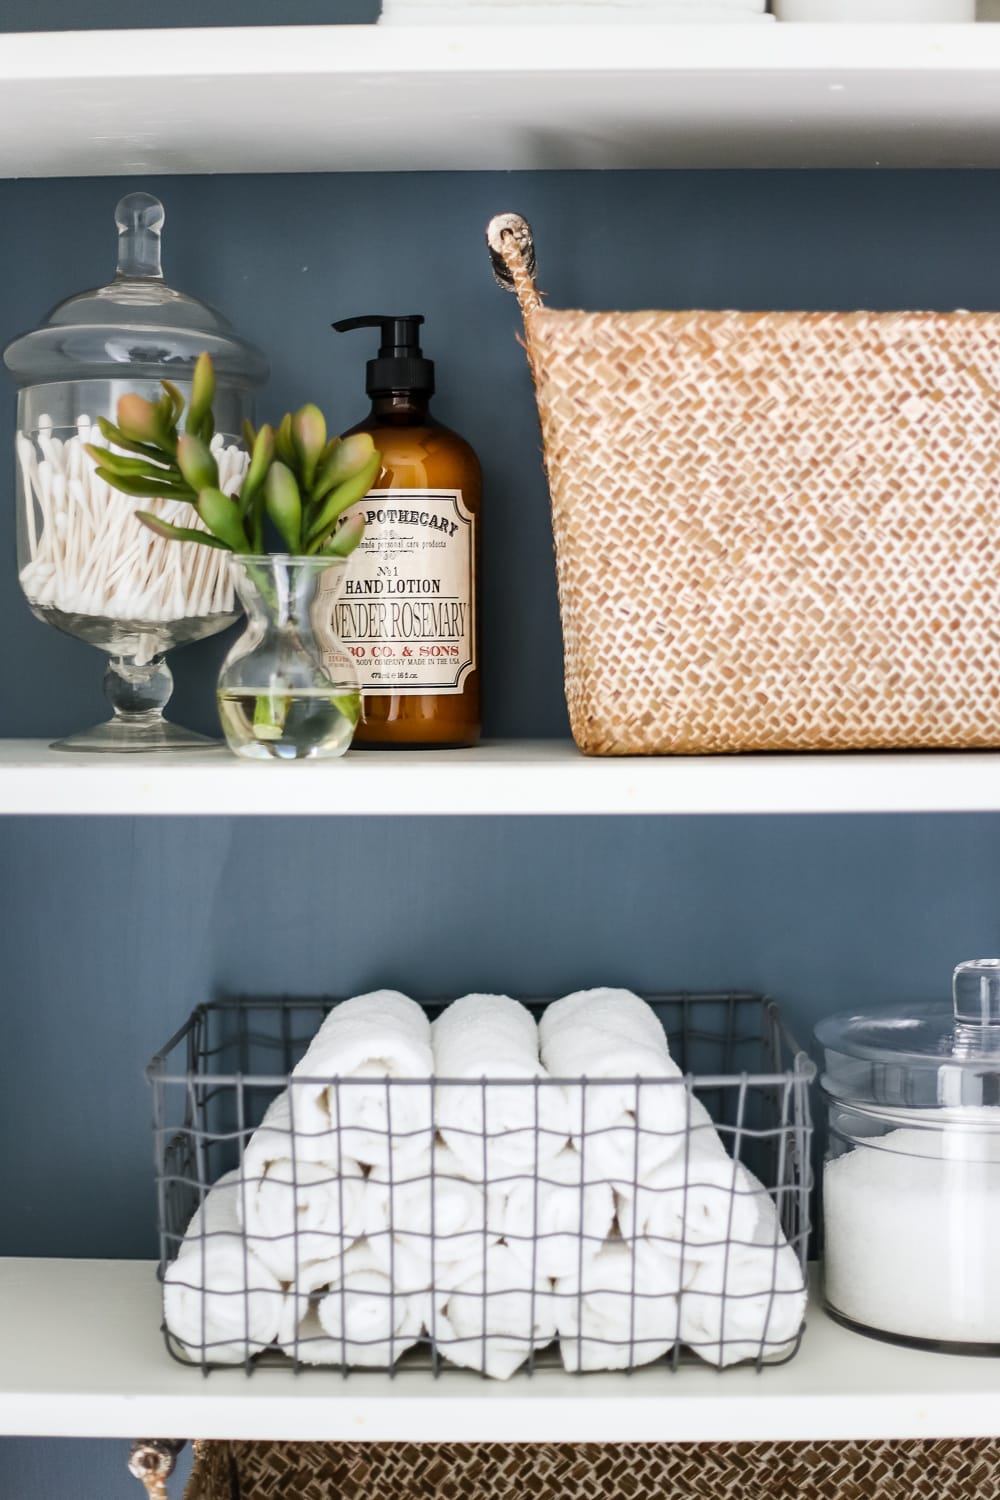
Apothecary jars and baskets help to store bath essentials.
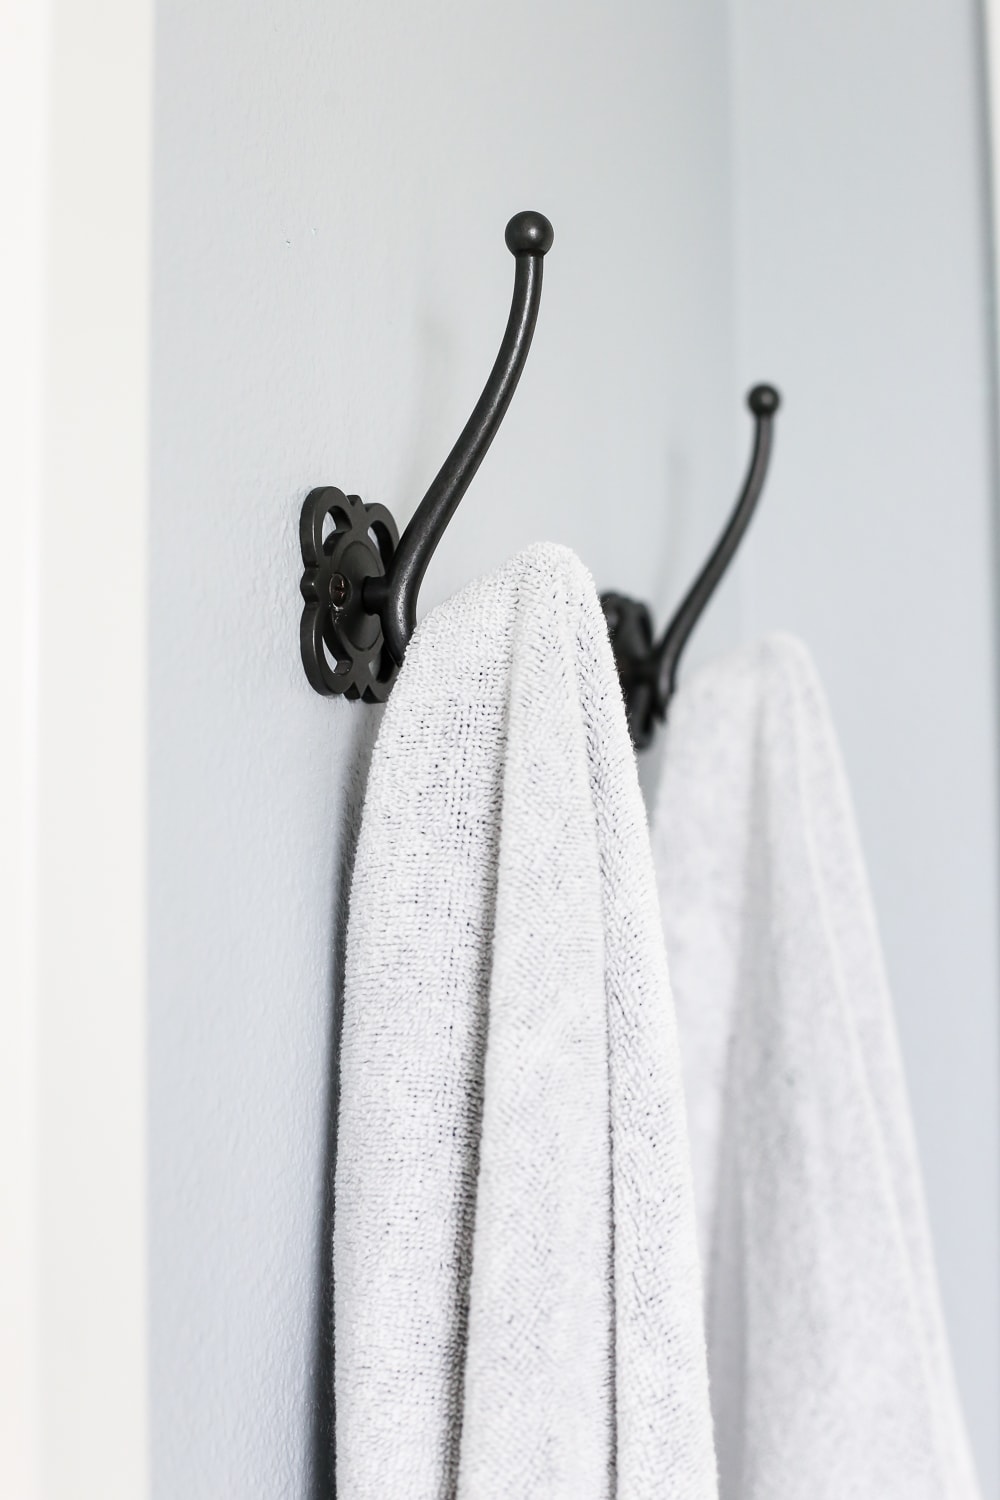
And we can’t forget functional extras like towel hooks.
Looking back, I can’t decide if the 48 hours felt like 4 or 400… It was exhausting (at 8 months pregnant nonetheless!), but the result was so worth it.
Love what you see? Hover your mouse over the images below (or tap on mobile) for direct links to some sources!

And here is a complete source list to help you achieve this look.
- Wall Paint: Sherwin Williams Gray Screen
- Cabinet Paint: Sherwin Williams Slate Tile
- Grout and Barn Door Paint: Valspar Du Jour
- Mirror Frame Stain: Minwax Dark Walnut
- Barn Door Stain: Minwax Weathered Oak
- Sink Faucets
- Shower Head
- Chandelier
- Vanity Lights
- Seeded Glass Vanity Shades
- Botanical Prints
- Barn Door Kit
- Blue Botanical Art
- Boxwoods
- Succulents
- Cabinet Pulls
- Wall Hooks
- Door Knob
- Toilet Paper Holder
- Towel Ring
Thank you again to Lowe’s for sponsoring this makeover, to the homeowners for trusting us with their space, and to my fellow bloggers… Go team!


Oh wow, what an amazing difference. I love it.
Thank you!
Love this! Where did you get the new shower door? It matches perfectly!
Thank you, Ashley! All of the products were provided by Lowes.
This makeover looks amazing! Did you remove the vanity to paint it or did you paint it while installed?
Thank you! If I remember right, we removed the doors to paint them, but we left the vanity in place. I hope this helps!
It’s beautiful Rachel!
I love the frame on top of the existing mirror. When we redid our bathrooms 11 years ago, we chose to keep the existing mirrors. I wanted framed mirrors, but they budget was maxed and we never did frame them. I’d love to hear more about how you attached these to the wall above the existing mirror.
Thank you! Many tutorials can be found online to frame bathroom mirrors, but it does depend on the depth of your mirrors and the trim. Most people use construction adhesive to adhere the trim. Hope that helps!
Wow Rachel, you guys have done a great job! The bathroom looks completely different! It looks so much cleaner and more alive! Well done!
Thanks, Daniel!
Love the makeover.Did I miss an announcement…….the sweet baby?
Yes, my sweet number 4 blessing arrived in May!
Did you paint the shower door trim?
No, the door was replaced- great question!
Wow! What an amazing transformation. You all made this bathroom look like a million bucks.
Thank you, Shelly!
It looks absolutely marvellous. How is that baby doing(if you have already made that announcement I have unfortunately missed it) regards from Betty in Ontario, Canada.
She’s doing wonderfully! Glad you enjoyed the makeover, too.
Beautiful update….you ALL have skills !!!!!
Thank you!
I enjoyed this immensely! I LOVE makeovers because most often a little goes a long way. I can’t imagine doing this when eight months pregnant, you are Wonder Woman! I also LOVE the colors along with everything else. TFS
Ha, thank you! It wasn’t easy.
Love the bathroom makeover, especially without ripping out walls, sinks, and vanities. I slightly renovated our master bath and bought a beautiful mini chandelier to replace a recessed lighting kit over our tub with high ceilings. Unfortunately, my electrician wouldn’t install because it didn’t meet code in Georgia. 😏 I was very disappointed especially seeing them hung all over tubs in lots of blogs and magazines. Maybe next time.
Oh, I am sorry to hear that! It certainly adds a lot to the overall look.
You have listed everything except the towels, which of course I love.
Any idea where these came from? Please!
Thank you! The towels were from World Market. 🙂
The bathroom came out beautiful! I like the mix of rustic and industrial touches used in the space. I do have a question though. Was the shower frame replaced or painted to match the other hardware?
Yes, the shower frame was replaced with new trim.
I love this makeover for the bathroom, it is absolutely gorgeous! So beautiful and everything went together so well! Thank you for sharing! Great job!
Thank you, Susan!
This looks fantastic! Love everything about this! Where did you get the apothecary jars? Were they from Lowe’s as well?
Thank you so much! The large apothecary jar was from Hobby Lobby, and the little ones were from Target, I think.
Looks beautiful! Where did you find the rug?
Unfortunately, I don’t have the source for the rug! But, I agree, it is beautiful.
Where did the baskets in the water closet come from? I’m looking for some to go on my shelves in the laundry room to hold hangers. I’m having a hard time finding some wide enough. These look they would be just the right size plus they are pretty.
Unfortunately, I don’t have a source for those! But, I find craft stores the best place to search for baskets.
Grout can be painted?!!!! That sounds much easier than scrubbing it till your hands ache. Any tricks to doing that?
Like any paint job, just clean and prep well and follow the directions for the grout paint. 🙂
Love the makeover? How did you paint the grout?
Thanks! We started with Kilz Original primer and then followed up with Valspar Duramax Exterior paint. To avoid the tile, you can tape it all off or just use a little artist brush (we did some of both). I hope this helps!
It looks amazing! What is the make/model of the bathtub?
Hi, the tub came with the home, so I am afraid I don’t know! 🙂
Where did you find the new doors in and out of the bathroom? (Not the sliding barn door). Thank you.
The closet door (the one by the vanity) was original to the space. The gray/brown stained door is another sliding barn door (the sliding track is on the other side of the wall, so you can’t see it from the bathroom) that comes pre-made from Lowes. The link is in the post. I hope this helps!
Hi! Did you do something to the shower door? It looks silver in the original pictures, but dark/bronze in your reveal?
The shower door was replaced as it was rusted in places. 🙂
So beautiful! What steps did to do to paint the vanity? Thank you!
Thank you! We followed a very similar process to this tutorial. Hope this helps!
Wow! I love the new paint colors. My bathroom is exactly the same color as the before and I have been pouring over Pinterest for a new refresh idea. You just nailed it for me! Thanks to you and all of the team.
Karen, I am so glad it inspired you! 🙂
HI can you tell me the paint color of the cabinets
Hi Pamela! It’s Sherwin Williams Slate Tile. Hope that helps!
Hi Rachel!
Did you all lighten the paint color?? Or was the lighting just that good! Love the combination!
Thank you,
Sarah
We didn’t lighten the paint, but we did use Lightroom to lighten the image! I think it’s always best to get a sample and see how you like it in your room. 🙂
I love it! What is the color of the cabinet paint?
Thanks! It’s called Slate Tile by Sherwin Williams. 🙂
Hi did you sand down the cabinets before repainting them?
Hi Robert! We didn’t but I have sanded and painted cabinets in the past and I definitely recommend it!
Hi there! I have the same layout for my water closet— it’s open now, but I’d LOVE to close it off with a barn door. Our opening also goes all the way to the ceiling so we would definitely need to install a header. Do you remember what you did to build the header for the barn door track? Thanks! This makeover is wonderful!
Great question… but I’m afraid I don’t remember! I think we just installed a painted 1×12 (or maybe 2×12?) across the opening, securing it into the studs on either side. I know we installed the track along the header, so that makes the most sense to me looking back. I’m so sorry I don’t remember the specifics!
Did you use a satin or semi-gloss paint for the cabinets?
I’m afraid I don’t remember for sure (I’m sorry!), but I think it was satin.
Hi Rachel,
Great makeover! Do you know if the cabinets were sanded and primed before they were painted?
Thanks,
Tammy
We cleaned them and lightly scuffed the cabinets, but we didn’t sand the original paint off. 😉