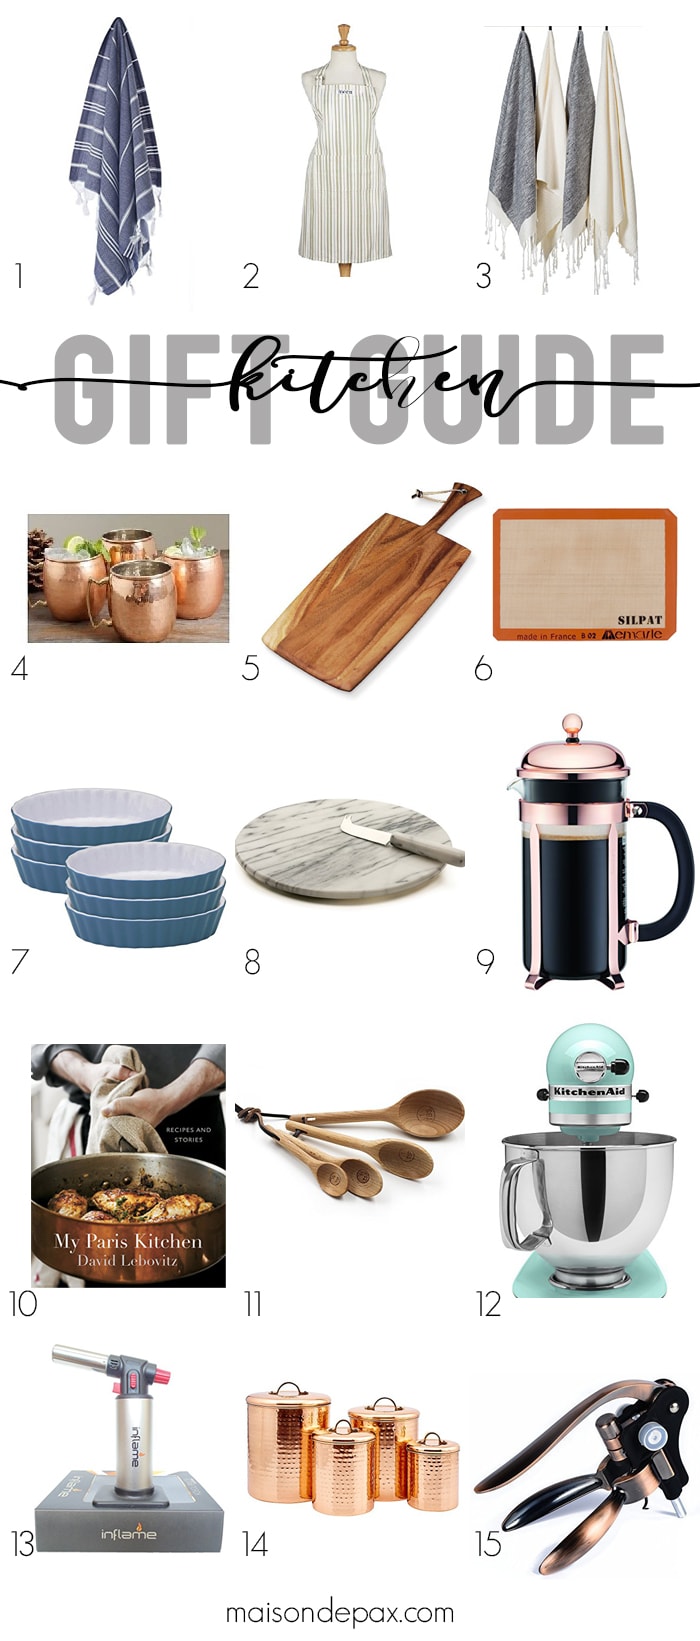
How to Refinish a Table with a Natural Wood Look
Find out how to refinish a table to give it a well-protected, durable, natural looking wood finish.
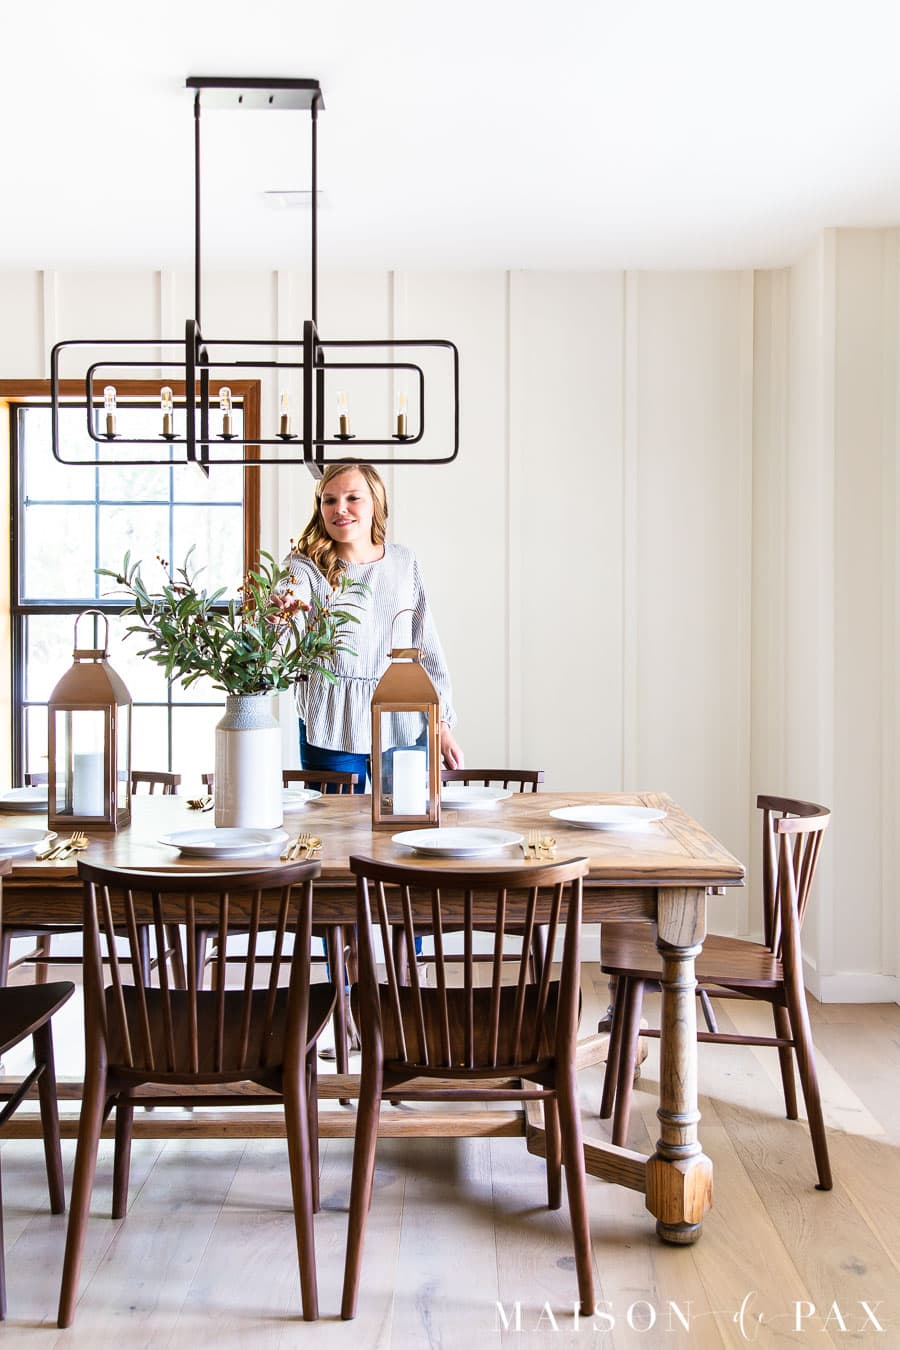
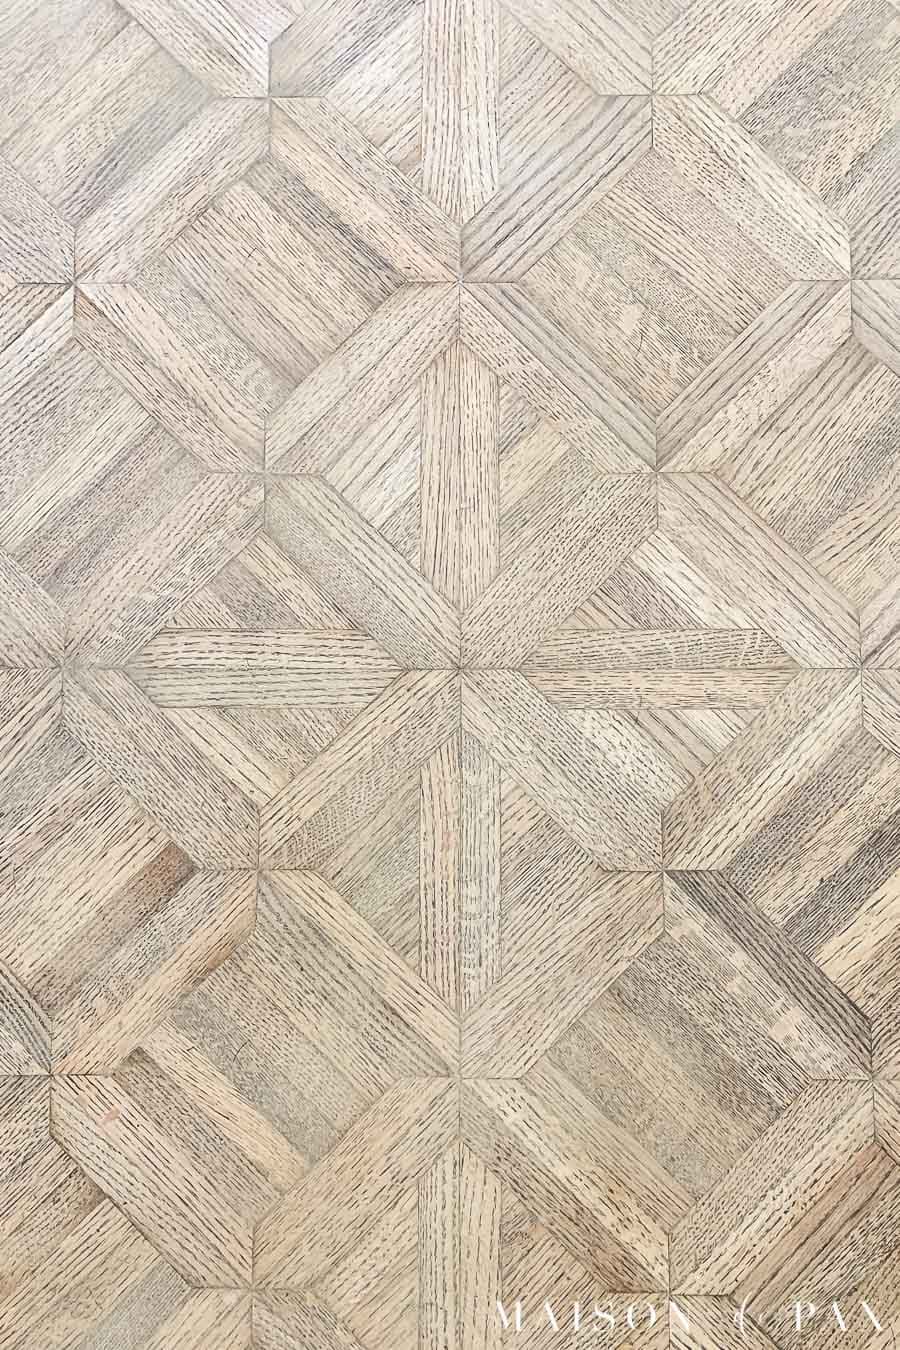
This oak table makeover might seriously be the biggest labor of love I’ve tackled for our ranch house. It was a dated Craigslist find… But I loved the size (it’s enormous!), the real oak (yay, hardwood!), and the parquet look on the top (which remind me of our floors when we lived in Paris).
It weighs about a million pounds, though, and it had a lot of old varnish and stain that had to go. I knew I wanted a casual, raw wood look to bring the more elegant lines of the table into the more casual feel of our ranch kitchen and dining room.
So I stripped the whole thing down to the raw wood and worked hard to find a way to give the table a durable finish while still keeping the (mostly) natural wood look. It’s not perfect; I have yet to find a way to give a truly durable finish on a piece without changing the look at all, but I feel like I came pretty close on this table.
Dining Table Makeover
I’m going to walk you through how to refinish dining tables below, but if you’d like to replicate the look, be sure to read the extra info below the tutorial for more tips and details!
Materials Needed
- contractor paper and/or plastic drop cloths
- chemical resistant gloves, safety glasses, and protective mask
- citrus stripper, chemical stripper, and mineral spirits
- rags, cheap paint brushes, plastic putty knife, and steel wool in varying grades
- metal or glass containers
- palm sander with different sandpaper ranging from 100-300
- gray wood stain
- wipe on poly
How to refinish a table
How to refinish an oak dining table for a natural wood look
- Protect
Lay down protection for your floors, ensure you have proper ventilation, and gather all necessary supplies.
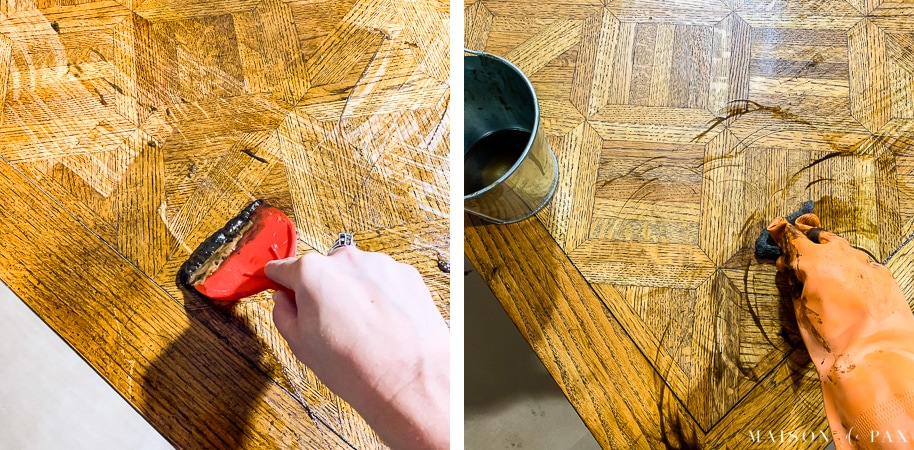
- Strip
Use the citrus stripper first to remove the bulk of the old finish, then use the chemical stripper to remove the final traces. The effectiveness of each step will depend upon the type of finish on your piece. *See this post for a full, step by step tutorial on stripping off old stain and varnish

- Sand
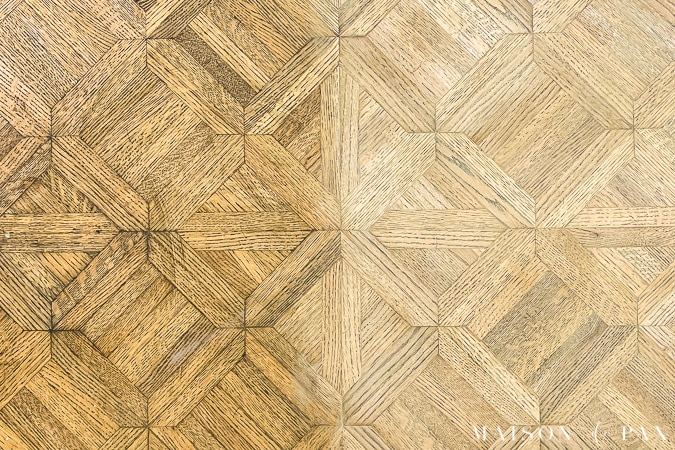
Starting with 150 grit sand paper, give the entire piece a light sanding with a palm sander. Gradually move to higher grit papers (220, even 300) until the piece is as smooth as you would like. As you can see, this step should remove the final traces of the stain you treated chemically.
*Note: be sure your table is solid wood, not veneer before sanding heavily… Veneers need to be treated much more delicately.
- Clean
Clean the entire piece until it is free of sanding dust. I started by blowing it off with an air compressor, then wiped it with dry rags, and finished with a cloth dipped in mineral spirits. If you are struggling to get the piece truly clean, try a tack cloth as a final step.
Tip: Once clean, place your furniture on blocks or paint cans to keep it far from any dust or dirt from the floors.
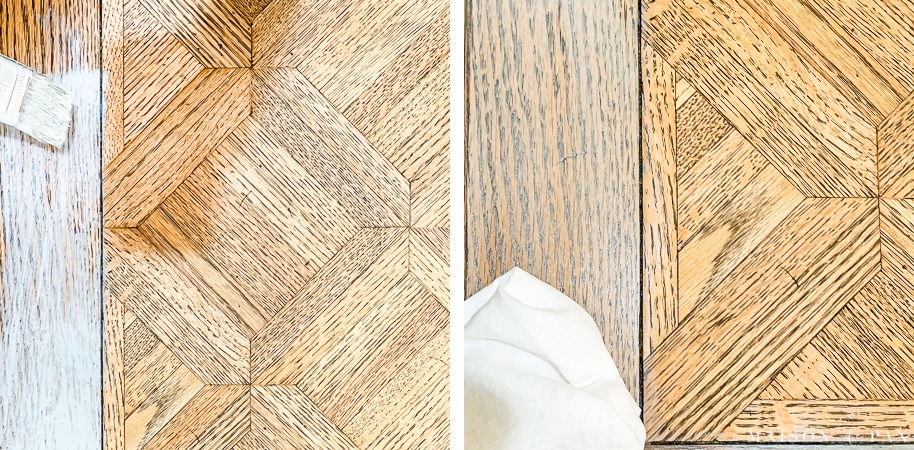
- Stain
Apply wood stain in the direction of the wood. I used this gray stain to counteract the orange tones of the wood. Work in small areas. Allow the stain to sit for 10-15 seconds and then wipe off with a lint free rag.
- Seal
When the stain has fully dried, apply a matte wipe-on poly. I applied three coats according to the package directions for a durable finish. Be sure to wait the recommended drying time between coats.
As you can see, it does darken the wood slightly (on the left), but it stays a nice neutral color, rather than pulling orange. (Also, the sealer is still wet in this image; the difference is actually even less once the sealer dries).


How to get a raw wood look on oak
A few more thoughts on the process…
If you’ve done any furniture refinishing, you know that the application of sealer (whether it’s wax, polyurethane, or varnish) can change the look and color of the wood. There are few things more frustrating than stripping a piece of furniture until you love the look and then having it change completely when you go to seal it!
The problem with oak is that it tends to lean orange when hydrated and sealed. In order to avoid that 70’s and 80’s orange oak look, you’ll want to counteract the warm orange tones with cool ones.
A gray or white stain is generally your best option. You can see on this little test section below what a difference this fast drying gray stain makes when sealer is added. On the left, I tested some gray stain; on the right, it is simply the raw wood. (The slightly darker shape is mimicking the effect of sealer.)
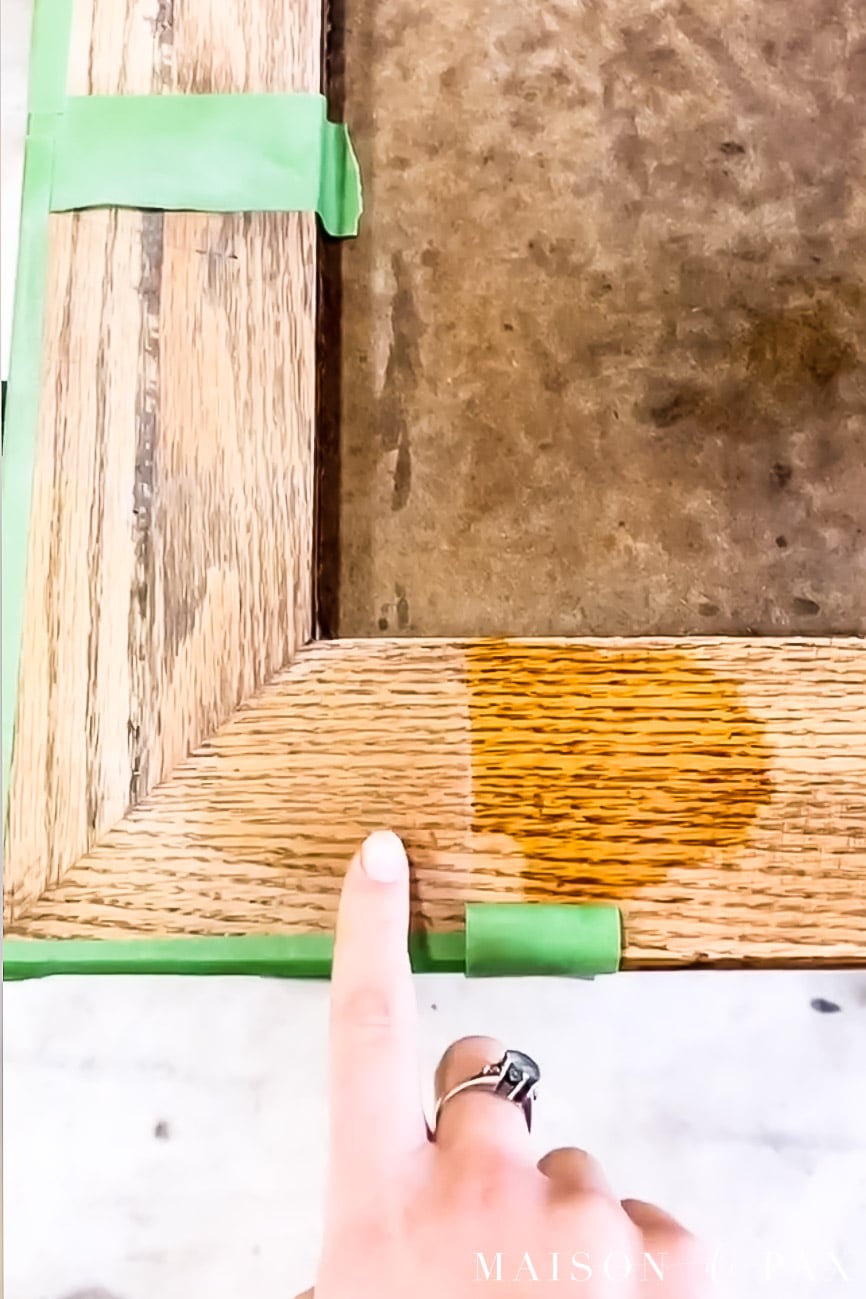
Where the wood is completely raw, the sealer makes it much darker and more orange. Where the gray stain had been applied, the sealer merely darkened the wood slightly, but did not change the color noticeably.
Tip: to counteract orange tones in wood, apply a gray or white stain or wax.
That’s why I used this stain on this oak table before sealing.
How to test sealers on raw wood
Speaking of testing stain and sealer, I have a little trick for you. A great way to test what wood will look like when sealed is to squirt a little isopropyl alcohol (or rubbing alcohol) onto the wood. This will allow you to see the color changes that sealer will likely induce, but the alcohol will dry quickly and not require any additional cleaning or stripping.
Tip: squirt alcohol onto the raw or stained wood to test the potential color change effect of applying a sealer.
HOw to seal and protect a dining table
One of my most popular posts ever is a tutorial for achieving a raw wood look on refinished furniture. Unfortunately, though, that tutorial uses a wax finish. While wax finishes are excellent (in my humble opinion) for dressers, nightstands, cabinets, and other surfaces unlikely to get wet, I would not recommend a wax finish for a dining or kitchen table.
I’ve actually had wax finishes on dining room tables in the past, but they are high maintenance and very difficult to keep looking good, especially on the top of the table. I think the best finish for dining tables, especially if you are trying to achieve a natural wood look is a satin or matte (as non-shiny as you can find) polyurethane finish. Oil based finishes will typically be more durable than water based finishes.
And my favorite water resistant wood surface option these day is a wipe-on poly, rather than brush on. It is easy to apply and easier to get a smooth, natural looking finish with wipe-on polyurethane.
Tip: avoid wax finishes for dining tables. Instead, use a wipe-on polyurethane in matte to achieve a similarly smooth, non-shiny, protective surface.

I hope you found this tutorial on how to refinish a table helpful! You can pin it below for future reference, or check out any of my other furniture projects here.


Great tips Rachel! You did a beautiful job and it looks perfect in your lovely kitchen. I have a lot of redecorating on the slate which may include some furniture refinishing, so this is really good timing! Thanks so much!
I am so glad it was helpful, Barbara!
Looks great Rachel. I’m loving the raw wood finish more and more these days!
Thank you, Tanya! It always stays in style!
i love how you were able to get away from the orangey look of the oak. all the work was worth the beautiful table you ended up with.
Thank you, Mary! I love the results.
You did an excellent job! The table looks terrific!
Thank you, Jean!
Oh my goodness this is amazing! Where did you get your dining-room chairs?
Hi Kyle! They are from Article: https://www.article.com/product/11399/rus-matte-walnut-dining-chair
Thank you so much!
Hi Rachel,
I followed your tutorial and used the sunbleached stain. I applied one coat and wiped off as I went along. I let it dry overnight and the next day tried to apply the wipe on poly. It looks like some of the stain wiped off onto my rag and the finish now looks uneven. Any tips or tricks to keep this from happening?
Hmmm strange! I hate it when things like that happen. I wonder if the stain wasn’t sinking into the wood for some reason? Did you sand the piece really well before staining? That could help open the grain for the stain to sink in. I’m so sorry it’s giving you trouble!
I’m trying to achieve something similar to this with my kitchen cabinets. My wood pulls orange and red undertones, which I hate. I’m trying to get a very light brown natural and neutral brown stain. Have you ever tried using sun bleached or white stains, then put a light brown stain over that after dried? I’m wondering if using the white or sun bleached would stop the orange from coming trough the brown stain. Thanks for your opinion and look forward to hearing from you.
I have definitely used gray and white stain to counteract the red/orange undertones. I’ve layered stains, too, but not in that specific formula. It’s a great idea, though! Is there a back of a door or some hidden portion you can use to experiment? Unfortunately, wood all takes stain differently, so it’s hard to know exactly how it might turn out without trying. Best of luck!
Just for reference: I watched Family Handyman use Seal Coat Shellac over a wood that doesn’t take stain as evenly and then he applied a gel stain over that and then protective coat. I’m wondering (for future users facing same challenge) if you could do your grey or whitewash coats to tone orange down and then apply seal coat and then a brown gel stain over the top of that. He used for wood grain but what about to seal color?
I love how many different ideas there are for finishing wood furniture; it’s such a fun creative process! I think that sounds like a very interesting way to do it. The only caution I would give to that method is that it is harder to play with the wood tones after applying a sealer coat. Gel stain is designed to go over sealer, but most other products aren’t… so once you put that first coat of sealer on, your options are much more limited. If you didn’t like the effect, you would have to restrip everything. But as I always say, if you can experiment on just one door or an inconspicuous place, go for it! 🙂
Do you use interior or exterior semi transparent stains to achieve this look? I love it. Trying to do this for a table that I previously chalk painted. Thanks!
On an interior table, I used interior stain! I hope that helps.
Hi Rachel,
I couldn’t believe I found your tutorial
As we we’re just about to refinish our oak table….and it is the exact same table you have so it made the process soooo much easier!! We did add the step a good
wood conditioner before adding the stain which I think probably helped with any blotchy parts….because there are so many types of oak in the inlay, and we wanted as even a color as possible, we did do a sun bleached stain and rubbed it off to our desired tone. On the red oak areas it was important to let it sit a tad longer, but basically it was a 15-20 second stain and quick rub, using small areas as you suggested. Wish I could upload the before after photo cuz it’s remarkable and stunning! Thanks so much for the perfect tutorial for us!!
Jeanne
I’m so glad it was helpful, Jeanne! I love restoring furniture to its previous glory.
I am about to refinish this same table too! Do either of you know if the parquet is a veneer or solid wood? I’m nervous to start sanding the table top. Thanks
Hi Melissa! My table is solid wood, but do check for veneer as it can be tricker to refinish.
Thank you for this helpful tutorial! I am refinishing an end table and coffee table. Unfortunately, the unbleached stain you used is not available at Lowe’s or Home Depot. Can you recommend another? Thanks!
I’m sorry to hear they’ve stopped carrying it! This one looks like it might be similar, though I haven’t actually tried it in person, unfortunately. The important thing is that you find a stain that has gray tones but is still translucent and not too dark. I hope this helps!
I stained my pine dining room table “Special Walnut” and it’s brought out the red tones in the wood. Would a light grey stain on top help? What can I do?
Thanks
Sorry for the delay, Renee! Stains are so hard, since it depends on so many factors: the age of the wood, the amount of tanins in the wood, the previous finish (and whether or not it was removed entirely), etc. But yes, theoretically, a gray stain can counteract the red-orange colors that many woods have. It may be a bit tough with special walnut since you’re already getting rather dark… the gray stain may just make it darker. But it’s certainly worth a try in an inconspicuous place! I hope this helps. Good luck!
Thank you for all of these good tips and ideas! I’m thinking about stripping a dark brown stained cherry wood Pennsylvania House dining table (and maybe chairs). Do you have any experience with cherry? thanks!
I don’t but keep in mind that it will be difficult to get the red tones out of the final product when staining! If you love that, then go for it.
What kind of wipe on poly did you use? The link to the poly is broken! I’m dying to try this on my table! Thank you!
It’s a satin wipe-on poly by Watco. Home Depot’s website seems to be having trouble today, but hopefully this link will work for you. Hope this helps!
Rachel, Thank you very much! Your experience and advice is greatly appreciated.
Of course, Michelle! 🙂
I was scrolling through Pinterest and came across this post featuring my exact dining room table. Had a chuckle at your description of finding a VERY dated table on Craig’s list. I guess it depends on your perspective. To me, it’s a timeless classic. I use it in a wainscotted, grass clothed, chalk painted furnitured dining room and find it oh so current looking. I love the look of your table in its setting as well. To each his own.
You make a great point: how the room is put together can make all the difference! This table mostly seemed dated because of its wear and tear and the shag carpeted dining room it came out of. 😉 Your dining room sounds so very lovely!
I came across your table redo. It is lovely. My table is from my teen years (I’m 75) so the table is pretty old. When the table is wet it does have hints of red so I’m thinking it is oak. So far, I’ve stripped and sanded my table and am ready to stain. I’ve purchased a weathered oak stain and hope it will give me the weathered look. Am also wondering if poly is the way to go or is oil ok to use?
Either works well! It’s your preference.
Hi Rachel, thank you for this post! I am so in love with your table, super jealous you were able to score this beauty. Your piece has inspired me to take on a new project. I am working a solid oak dinning table. We stripped and sanded but I have some blotchy areas where the darker/orange wood is pulling through. The wood appears to be raw and the finish has been fully removed. Have you encountered this before? Would you suggest a lower grit for sanding, bleaching, or repeat the stripper? Thank you in advance!
Thank you, Chloe! I do think another round of stripper and another sanding might do the trick, but it’s so hard to say. It’s possible that the wood was never very uniform in color even before it was stained originally (you just never know with natural materials!). I would probably start with 150 grit sandpaper (doesn’t destroy the wood but removes more than 220) and see if you can make some progress on those blotchy spots. If that doesn’t work, then another round of chemical stripper might help. Finally, it’s possible that a light coat of stain (especially if you’re planning to follow this post and use a gray stain) might help even out the discolorations. Good luck!!
I’m going to be doing my oak dining table soon, and I’m worried about doing the rounded areas in the legs , stripping and sanding those areas. Did you find it difficult?
The rounded parts are always the hardest! This is why I use chemical strippers sometimes, rather than just trying to sand off the old finish. I actually just finished an old oak desk; I started with citristrip, cleaned up the residue with chemical stripper, and sanded the finished result by hand with 220 paper. It was a lot of work, but the legs turned out beautiful!
I am trying to do this to a parquet veneer red oak table. .i have stripped and sanded but still has red tones. I want a bleached weathered look. Any suggestions?
You may try using a grey stain wash to cut out the red tones.
I’m refinishing an oak dining table that’s very similar to yours. When you stained the parquet parts – did you stain each parquet part in the grain direction? Or how did you get that nice and not blotchy look? Help!