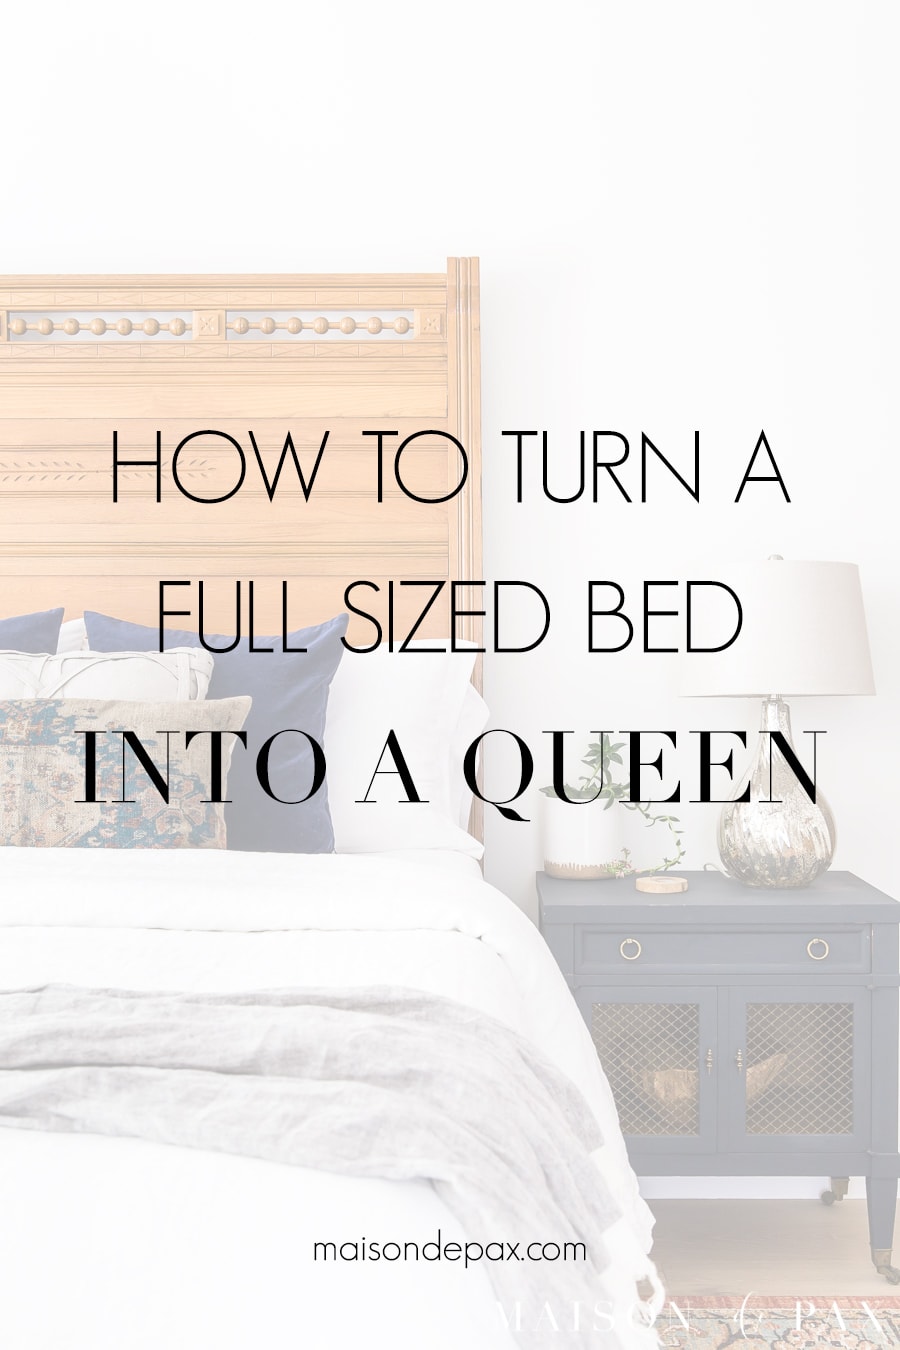
How to Make an Antique Full Bed into a Queen
Converting a full headboard into a queen bed is easy! Find out how to use a queen sized mattress with a full sized headboard without damaging the headboard… the perfect solution for a full sized antique bed!

As a certified nerd, I love family history. Between my husband and me, we have farmers, lawyers, factory workers, small business owners, geologists, teachers… and that only goes back a couple of generations. But one thing they almost all had in common (and of which I am the glorious beneficiary) is they passed down beautiful furniture. Our home is now filled with vintage and antique furniture that has been in the family for at least 2 if not 3-4 generations.
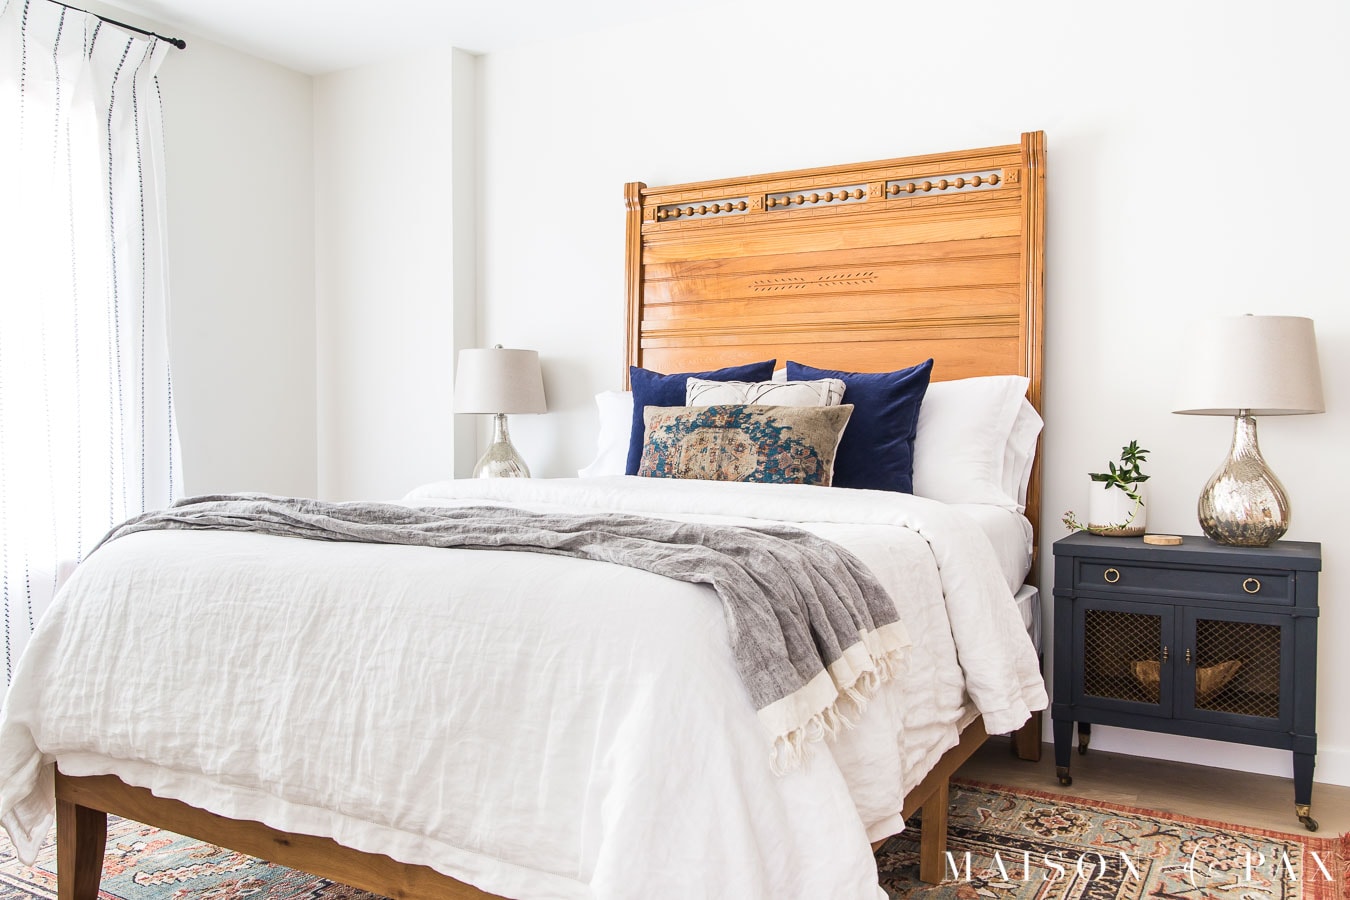
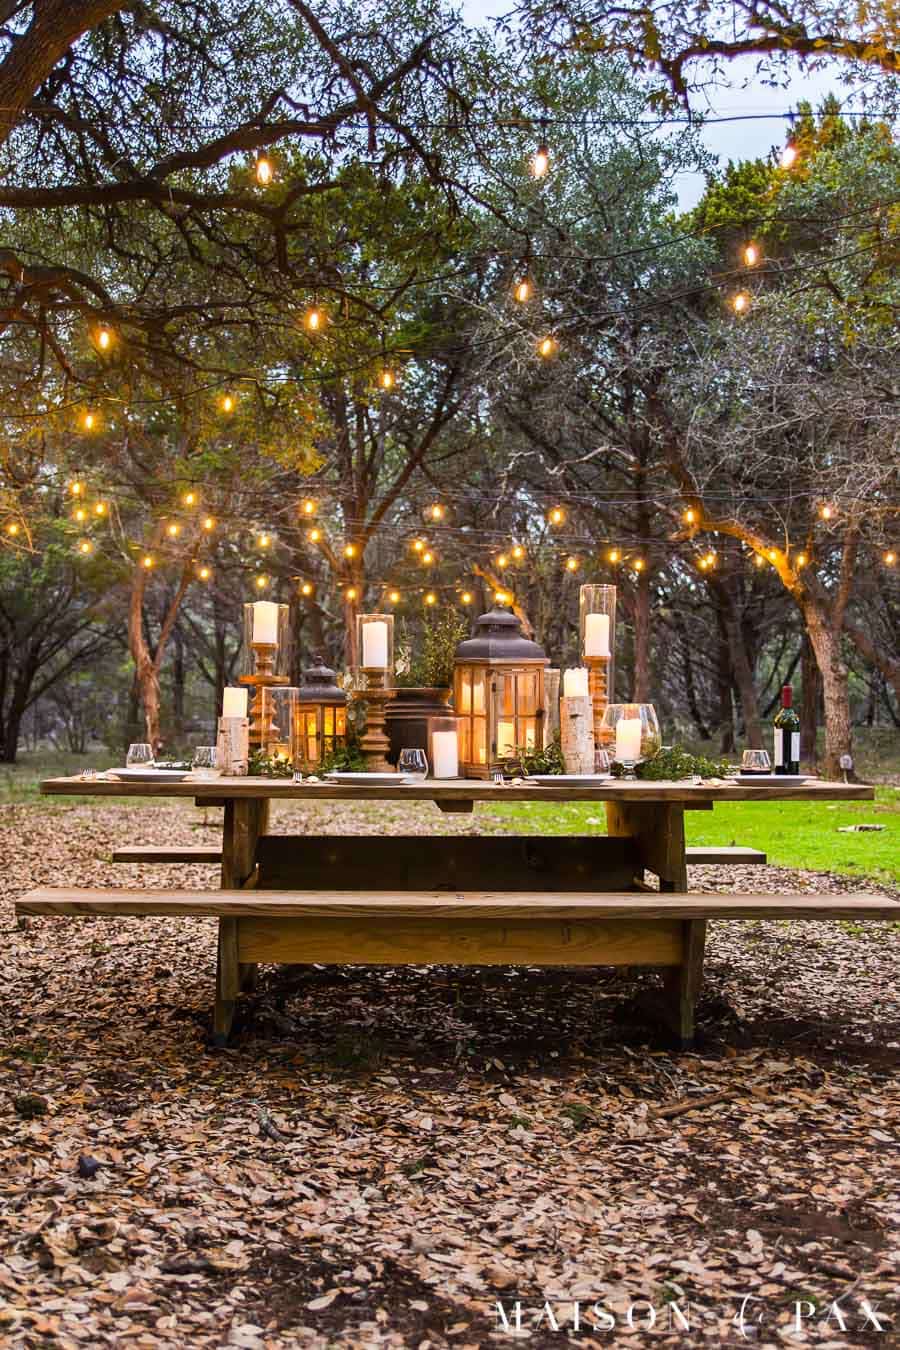
One recent gift from my in-laws was an antique bedroom set that had belonged to my husband’s great aunt. It’s a beautiful American farmhouse style bed. An antique double bed. And – as much as I love antique furniture and appreciate my in-laws giving it to us, I’m afraid a full size mattress is not in the cards.
The style, though, was perfect for the ranch house. Primitive, simple, a little elegant (not to mention free and a family piece 😉 ), so I hated to let it go to waste. I also didn’t want to damage the 150 year old bed, though. Fortunately, my father and I came up with a brilliant solution..

This post contains affiliate links. Click here to read my full disclosure.
Converting a Full to a Queen
Custom full to queen converters do exist (usually with iron bed extensions over the bed rails), but I wanted something simpler. An obvious option for converting a full-sized bed into a queen is to attach the headboard to the wall and use a basic metal or wood queen bed frame in front of it.
But the problem with this solution is two fold. First, the bed might tend to slide away from the headboard (something that drives me crazy). Second, unless you get really creative with strapping, that requires damaging the full-sized headboard. With this beautiful antique bed, we didn’t want to drill any holes into the bed frame.
Instead, we purchased this inexpensive wooden platform bed and made a simple wooden clamp in order to secure the headboard. The difference in width was so small that the headboard looks like it was made for the bed.
GET THE LOOK:

Since the original bed had a headboard and footboard, we actually were able to use the footboard as a little headboard in our attic bedroom which has lower ceilings. We have stored the side rails and preserved the antique in its entirety, which was important to my husband.
How to convert an antique full bed into a queen
Materials needed:
- full sized headboard
- wooden queen sized platform frame (or something similar)
- 2×4 lumber (scraps may be enough)
- 1×4 lumber (scaps may be enough)
- drill
- wood screws
- 7″ carriage bolt (or longer, if needed) with washer and nut
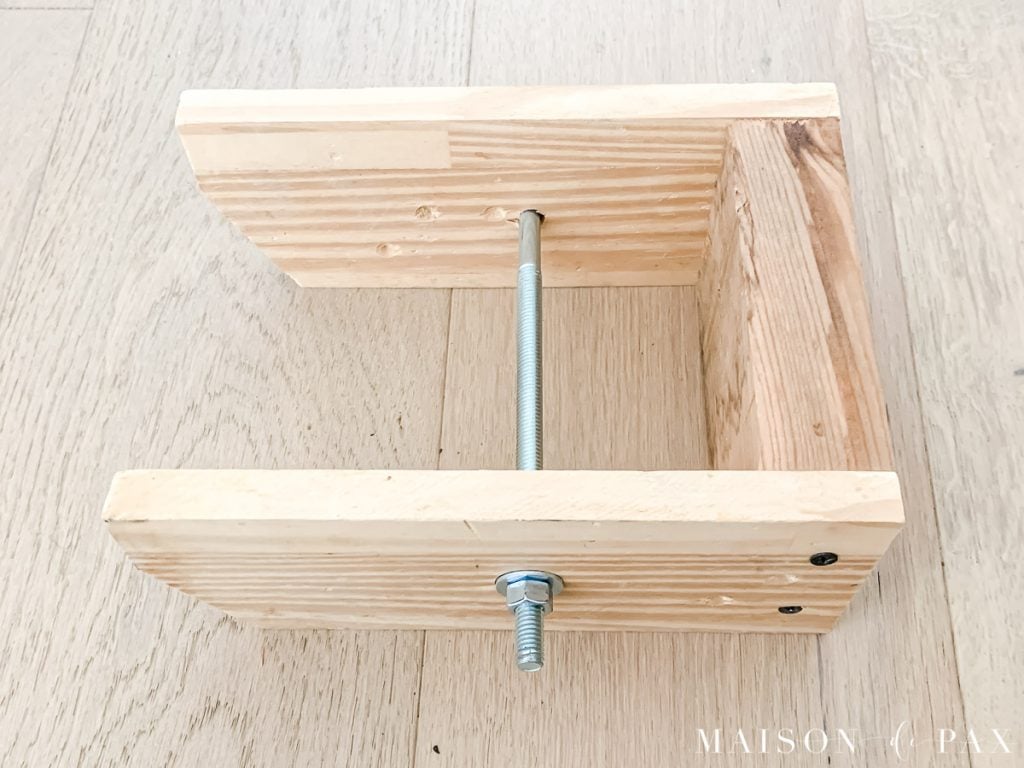
I think it sometimes helps to have an end goal in mind before you begin. This is what the u-shaped clamp you will be building looks like, and all the details are below!
How to make a wood pressure clamp to attach a queen size bed frame to a full size headboard without damaging the headboard:
- Measure and cut
Place your bed frame up against the headboard and measure the combined width of the bed frame leg and the headboard leg. Subtract 1/4″ and cut two 2×4 pieces (one for each clamp) to that length. For example, our frame leg and headboard leg combined was 5 3/4″, so we cut two pieces of 2×4 to 5 1/2″.
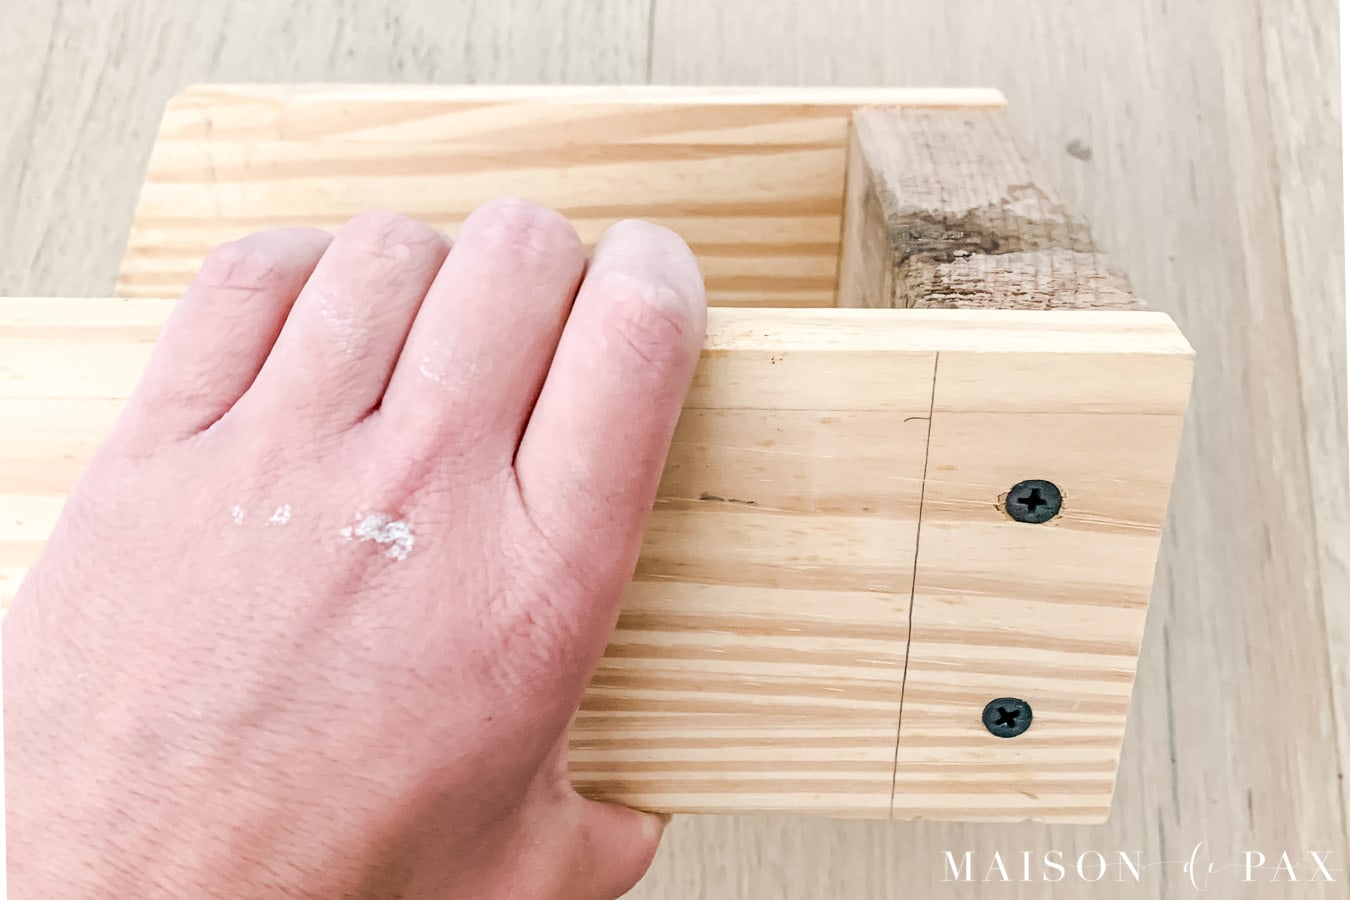
Cut four (two for each clamp) 9″ 1×4 pieces. - Assemble in a U
Using wood screws, attach two of your 1×4 pieces into the ends of one 2×4 pieces to create a U. Repeat for second set.

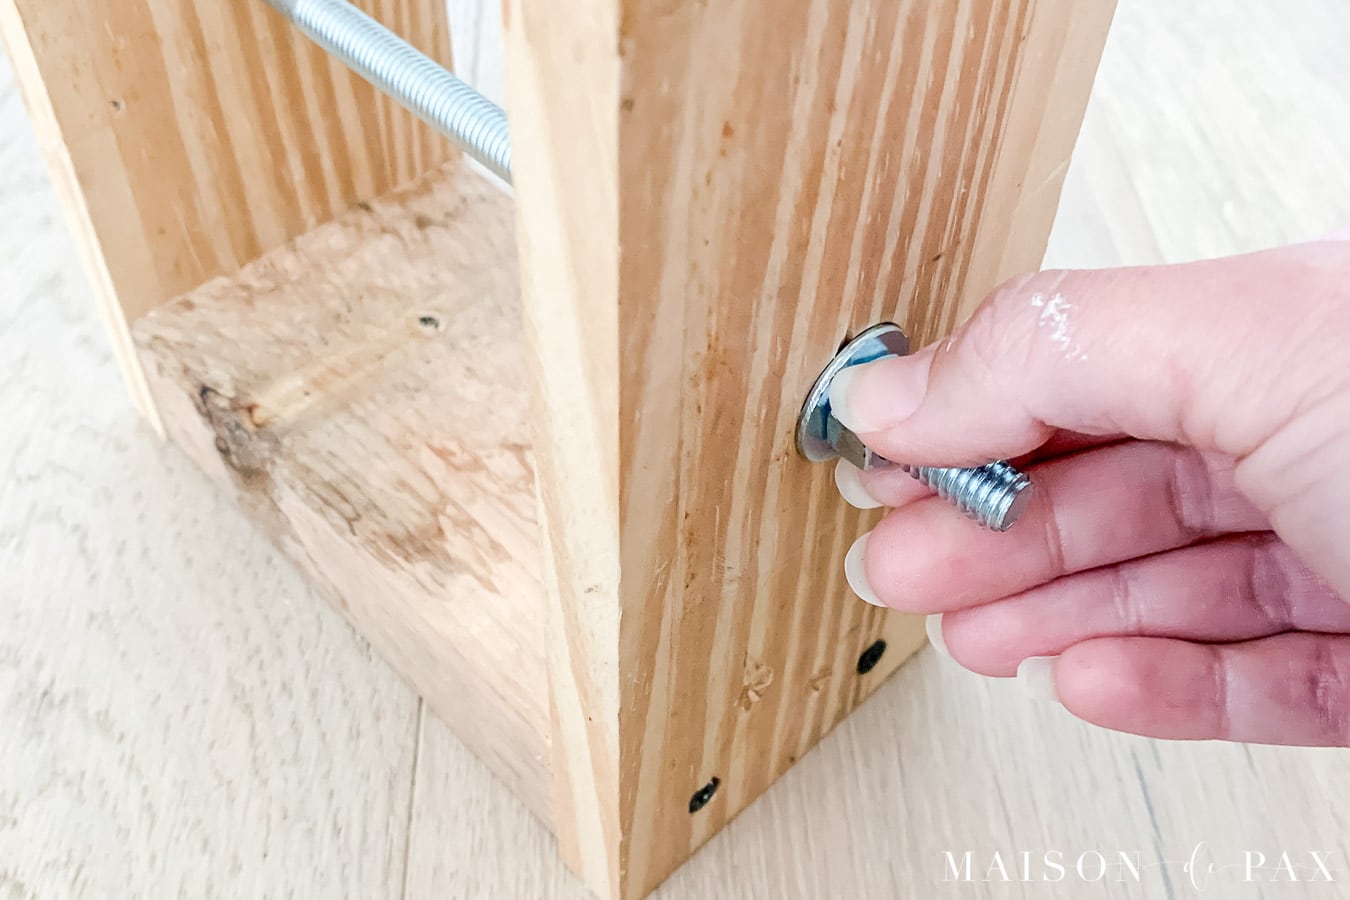
- Drill and insert the tension bolt
Approximately 3″ from the 2×4, drill two holes through the center of the 1×4 pieces. Place the carriage bolt through the holes (this is why you might need one longer than 7″ if your measurement in step 1 was wider than mine). Secure the washer nut on the opposite end. Repeat for second clamp.
- Slide the clamp onto the legs
This may take two people. Ensure that your headboard is vertical, then slide the bed frame up against the headboard. Slide the clamp from the inside (so it is not visible) over both legs. Tighten the nut on the tension bolt until the headboard is secure. Repeat for second side. (Note: the bolt does not go through either the bed frame or the headboard; it is simply below the piece of the bed frame that you see in the image below.)
- Add mattress and make bed
Now that the headboard is secure, make your bed as usual! I suggest a fuller duvet or blanket in order to hang down at the footboard and cover the mattress and box springs. Another good tip for making beds without footboards look beautiful is to use a fitted sheet on your box spring so that it looks more finished.
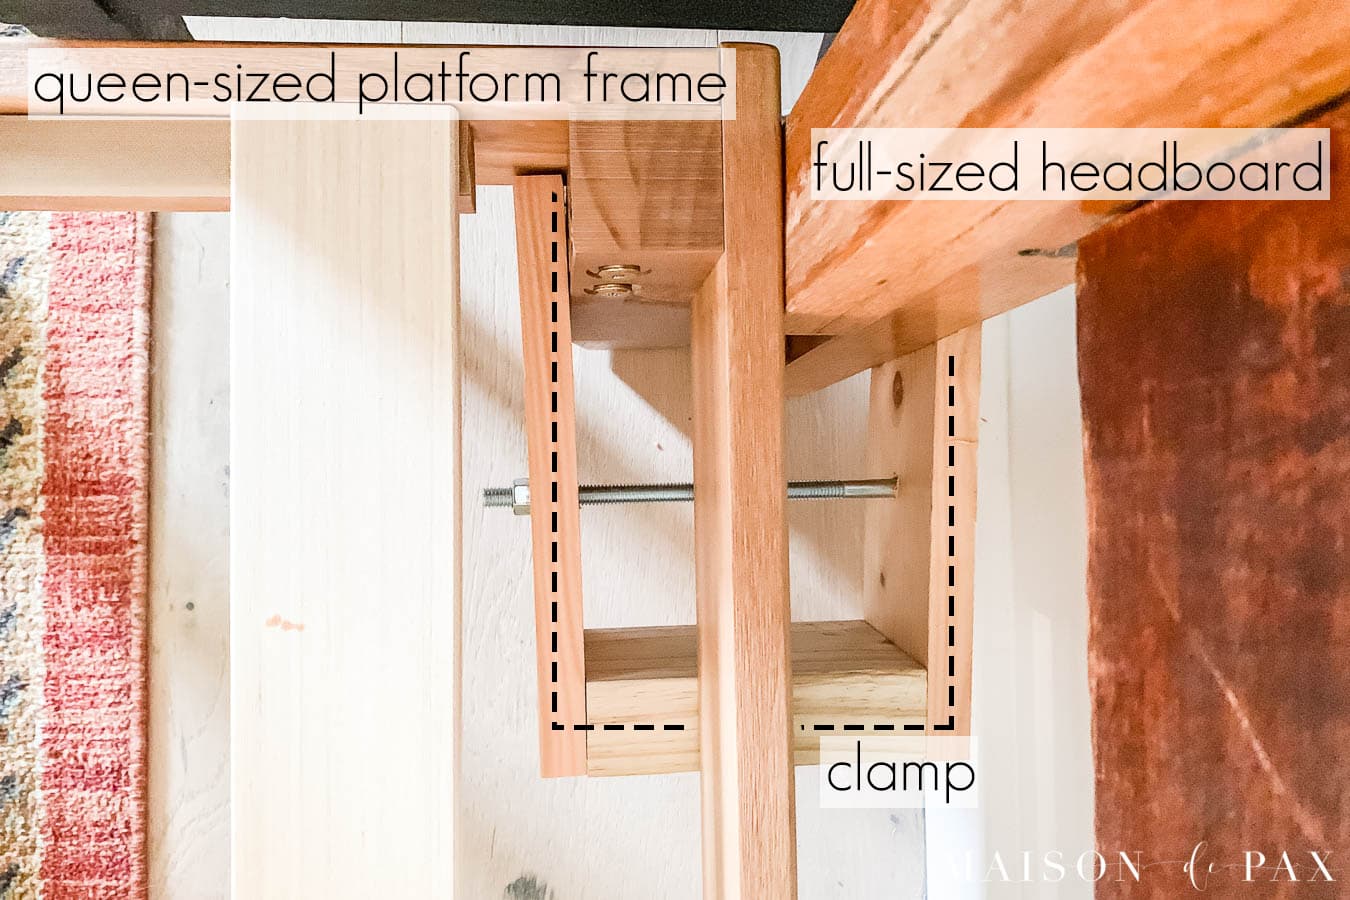
The clamps are truly hidden from sight, and the inch or so difference between the bed frame and headboard is basically invisible.

We have now been using these beds for about a year at Little Pax Ranch, and I haven’t even had to tighten the tension bolt (though that is obviously an option if you start to feel any wobble!), I’m so thankful we were able to create something that didn’t damage this antique bed, and even more thankful we get to enjoy not just one but two beautiful headboards!
If you have a full-sized antique headboard (and psst… Craigslist or Facebook Marketplace are wonderful places to find these, usually for much less than queen-sized beds)… consider upgrading to a queen! 🙂


Hi Rachel. So glad you came up with a solution for your antique bed. But just so your readers know, there is a company that makes rails that work with a full size bed, but can accommodate a queen mattress. I bought a set years ago for a full bed at a local antique mall.
Thank you so much, Becky! You’re right, I have seen some conversion rails, but the ones I saw didn’t seem particularly sturdy. I’m so glad you were able to find some locally that worked for you!
What is the name of the company?
Where can I purchase it?
Hi Karina! Unfortunately, this is an antique gifted to me.
You are so brilliant! What a wonderful idea!! Looks awesome!
You are too kind, Judy. Thank you so so much!
I love your makeover very nice 😘
Thank you, Jean!
Great idea and really looks nice, so glad you did this tutorial.
Thanks, as always, Marlene!
I love this idea, thank you for sharing it. A wonderful way to get more bane for the buck. Stay safe
Thanks, Ivory! I do love repurposing when I can!
Glad I found this post!
I can adapt this idea for an inherited carved wooden screen I want to use as a headboard for our king bed. Maybe even my teen daughter’s full-size upholstered headboard and her queen bed frame.
Thanks.
That sounds like an amazing idea, Kellie!
Love this and planning to convert our two full antique beds but have two questions – what is the purpose of the U – I am so confused about that and why you just don’t drill the frame of the bed into the headboard which is attached to the wall. Secondly, our beds are oak – do you have a good source for oak queen frames? thanks so much, Carolyn
Good question! My husband really didn’t want to drill through this antique bed frame; he preferred to leave it in its original condition. So the purpose of the U was to allow it to be attached securely to the new queen sized wooden frame without drilling any holes into the antique headboard. 🙂 I’m afraid I don’t have a resource for an oak frame, but we found ours on Amazon and were happy with it. I hope this helps!
Thank you so very much! That makes total sense and I didn’t think twice about drilling into the headboard to secure to the wall. I’ll take another look at the images when we are ready to make the u attachment. And thanks for the mention that you found your frame on Amazon. I’ll get looking for our two!
Thank you so very much Kellie! That makes total sense and I didn’t think twice about drilling into the headboard to secure to the wall. I’ll take another look at the images when we are ready to make the u attachment. And thanks for the mention that you found your frame on Amazon. I’ll get looking for our two!
The bed frame you chose- is it a good one? Does it squeak? We disassembled our family heirloom bedframe because the rail-conversion kit we got made every single bit of movement terrible loud and squeaky. I’m particularly curious to know if this bed frame gets slept on regularly and if it has lasted. The reviews were definitely mixed on amazon.
Great question, Lizzy. We have been super happy with it and haven’t had any trouble with it squeaking… but as it’s at our ranch house, it probably only gets use 1/3 of the time, so that’s all I can speak to. I hope this helps in some way!
Great idea. I would like to use my late great grandparents’ full sized wrought iron headboard but have the same issue. This won’t work exactly the same as with the wood headboard but with a modification or two I think it may work!
I’m so glad to hear that this was helpful, Dee. I hope your project goes well!
I am so excited to have found this tutorial! I have inherited 2 antique Eastfield beds and have been in a quandary for weeks trying to figure out how to make them work! Like you, I did not want to drill into these lovely pieces but was ready to sell them until I found this solution!
I completely understand, Julie! It’s a shame to drill into these beautiful antiques. I hope this tutorial serves you well!
Hi, super tutorial! Did you still mount the headboard to the wall, or just use the the clamp you made?
Thanks! We did not have to mount the headboard to the wall. The clamp is sufficient!
Love this post! Do you know if this idea would work with a 3/4 bed headboard that is 50” wide? Would the difference in width between a 3/4 bed headboard and a queen frame be too great? Do you happen to know the width of the full size headboard that you used?
Good questions! I think that might be a stretch… Queen size mattresses are 60″ wide (full size are 54), and the headboards are typically 2-3″ wider even than that. I’m not able to measure it right now, but I think the headboard we used was probably 56-8″ wide, which left only ~1-2″ per side of overlap for the queen mattress. If your headboard is only 50″ wide, then you will have a full 5″ on each side. I’m afraid the clamps won’t work with such a discrepancy. I’m sorry to tell you that!
Thank you for your feedback!
Of course! 🙂
This is genius! Can you tell me if you were able to use both a box spring and a mattress on the platform frame?
Thanks for a great solution to the problem!
Hi Jannine! Yes, we have both.
Thank you so much for your response!
Please indulge me a couple of more questions…
What is the length of the longer sides of the “U”? I believe they are six inches, but the picture with the man’s hand holding one side makes the length appear longer than 6 inches. Also, does the “U” get
attached to the bed frame?
Thanks again! I want to make sure I get this right!
Jannine
Apologies for the slow reply! I just found this message buried. I hope the information is still useful to you. The longer sides of the U on the clamp we used are roughly 9 inches long (I apologize that the post said 6… I’m not sure why), but less would work, too, since we also have a gap between the legs and the bolt. Truly, it’s a very flexible model! And no, nothing is actually attached to either the frame or the headboard; the U simply creates a tension and acts as a clamp to hold the frame and headboard legs together. I hope this helps!
I love this and appreciate your post. I currently have my queen mattress sitting ON TOP of the box spring and full size mattress inside antique frame. Did you store the side rails because the mattress is longer than the full size frame? That’s what I’ve found I’ll have to do if I want to convert to queen size.
I’m glad you found it helpful! Apologies for the delay. Yes, we simply stored the side rails, and we actually used the footboard to make a second headboard in our little attic bedroom that has low ceilings. 🙂
Love this! Clever, respectful of the antique bed, and beautiful. One question, though–how do you keep your pillows from falling between the headboard and mattress?
Thank you so much! There is actually no gap. The clamp pulls the headboard right up against the mattress. 🙂
Hmmmm…in the photo with step #4 of the instructions, it looks like the mattress would be stopped from being made flush with the headboard by the vertical element (the one that most of your label “full sized headboard” is on in the pic and which I assume you’re saying is a leg of the antique bed frame) the platform frame is bolted to.
In the pix of your very nicely-made bed, it looks like the queen-sized mattress wouldn’t fit between those two legs, leaving a gap of a few inches.
Sorry to be thick about this. The reason I’m so concerned is that we have a beautiful custom-made wooden bed frame that, due to what you could call protruding pilasters on either side of the headboard, doesn’t allow our mattress to make contact with the majority of the body of the headboard.
How neither we nor our carpenter noticed this at the time, I can’t imagine. But I do know that over the 24 years we’ve lived with the problem of our pillows squeezing down into that gap it has become increasingly madding!
We’re ready to scrap it and get a new bed frame and can’t find anything we like as much as the antique ones we’ve seen. I hope we can get one and convert it using your ingenious plan. I know it will depend on the headboard antique headboard, but I just want to be sure we won’t end up with another annoying gap!
I think I see what you’re talking about. We do have a piece on the leg of the headboard that sticks ~1.5″ deeper than the headboard itself. Is that what you are referring to? It is the part that would receive the side rails if we were using them. Our is only about 10″ tall, though, and we have a boxspring on our bed which comes to the top of that piece. So the mattress actually sits about 1.5″ closer to the headboard than the box spring (honestly, it’s not something I’ve ever noticed before, but now that I’m examining it, I see that). With that arrangement, there isn’t a gap between the mattress and the headboard. I hope this helps explain it in some way!
So, the main body of our headboard sits between two beefy posts, pretty much like a 4 X 4 fence post you may have seen with simple carved finial at the top. Unfortunately, the board part is recessed, by way of a series of moldings, toward the back of those posts.
Arrrgh, it’s so hard to discuss as terms such as “back,” “below”, etc. can mean different things depending on the central reference point! But I think you do understand what I’m saying and that I understand your explanation. Thanks so much for taking the time to address my question!
You blog is brilliant, so thanks for sharing–I love your style and envy your skills!
Thank you, Sarah!