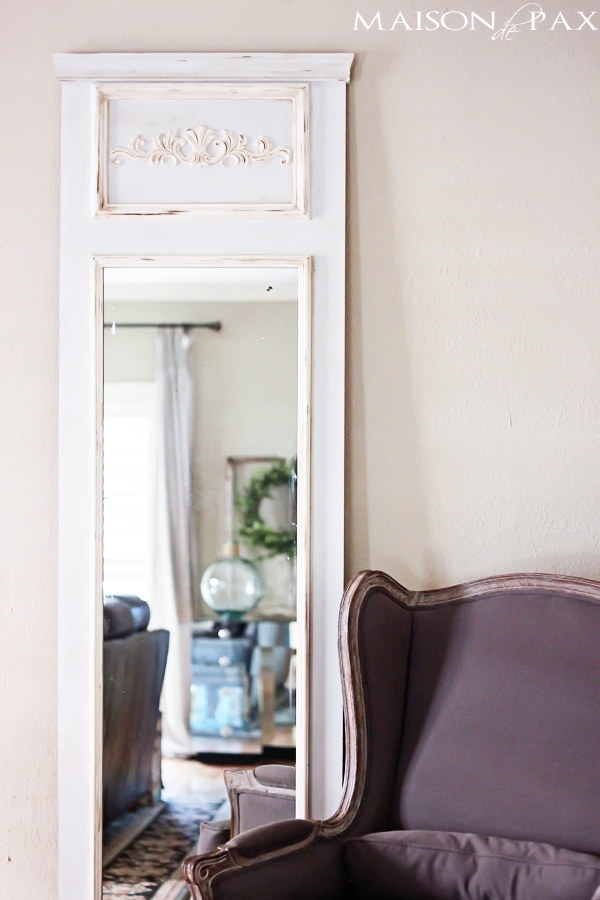
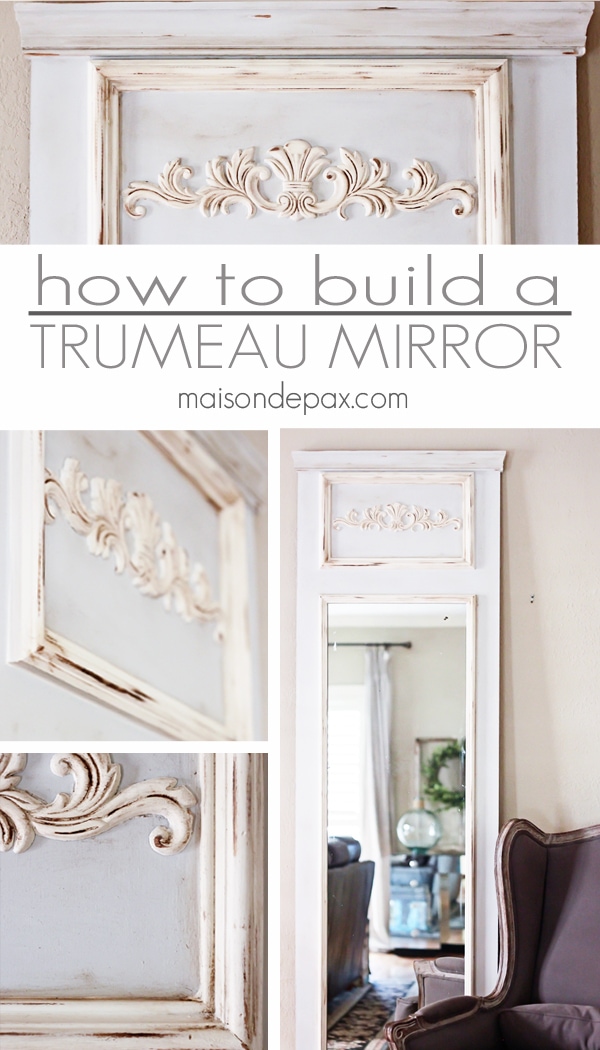
How to Build a Trumeau Mirror
This is one of those projects I’ve had in my mind’s eye for a couple of years… even since I found an old mirror in our attic.
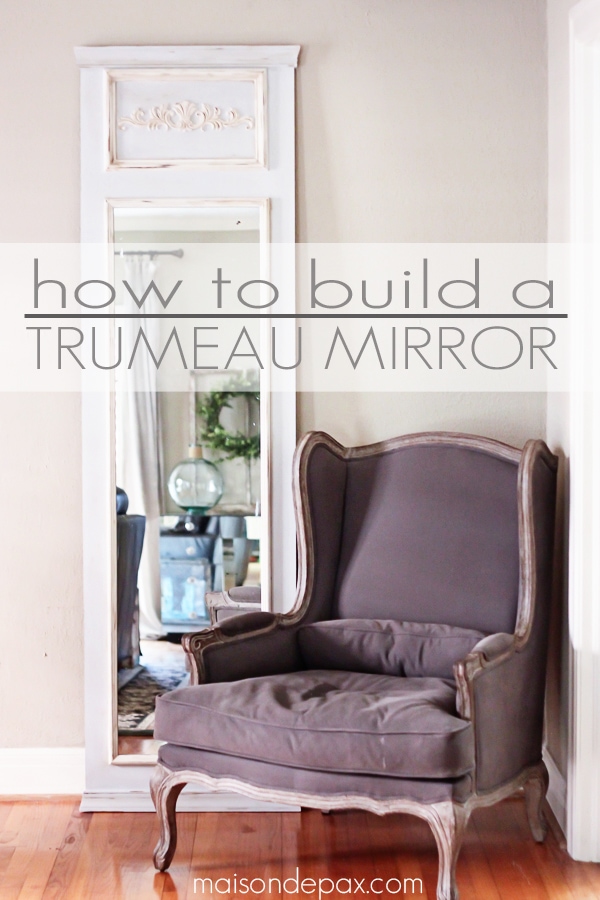
The silvering was a little messed up, but I think that just adds character, so I thought an antique looking frame would be best. And as you know, I have a thing for French design. 😉
This was really fun to make, and fortunately, it’s easy to customize to your own liking.
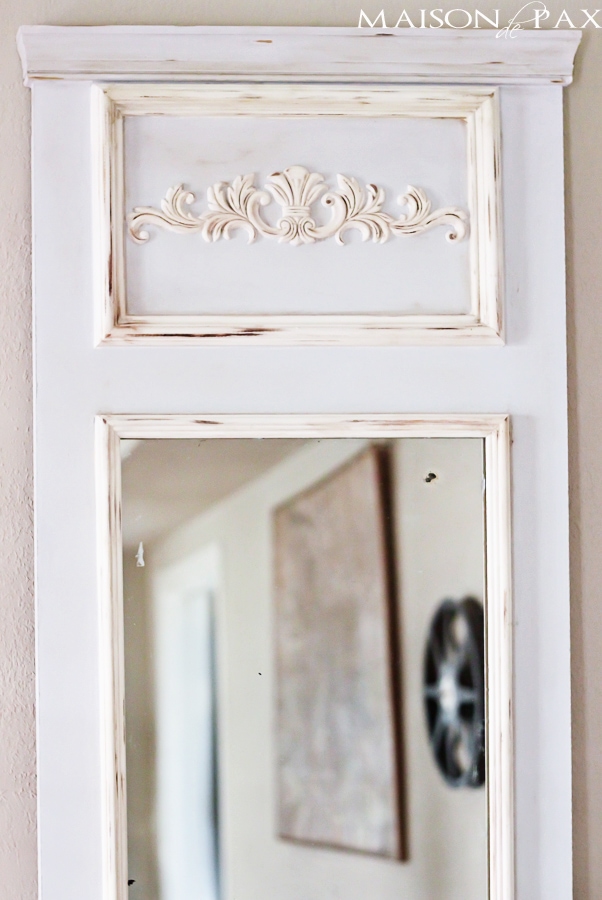
Now before I give you the step-by-step instructions, I must first apologize for the funny lighting in these photos. I confess that I was having a VERY hard time not showing you all myself or my dining room (in which the contents of our entire kitchen are stacked to the ceiling because of our current kitchen renovation) in the mirror. But I digress…
Materials needed to build a diy trumeau mirror:
This post contains affiliate links for your convenience. Click here to read my full disclosure policy.
- 3/4″ mdf or plywood (beware: heavy! You can try thinner, but be sure it is thick enough to keep the mirror safe)
- mirror and 1″ decorative trim with a groove to surround the mirror (or you could use something like this that is already trimmed)
- similar trim without a groove (to create the box above the mirror)
- decorative carving (found mine at Lowe’s for $6, but here is a similar one on amazon)
- thicker decorative trim for top and bottom (mine was 2.5″)
- miter saw or hand saw
- air compressor and finish nailer (or hammer and finishing nails)
- construction adhesive
- paintable caulk and caulk gun (or I think this little tube can be used without a gun if you don’t already have one)
- paint, brush
How to build a trumeau mirror:
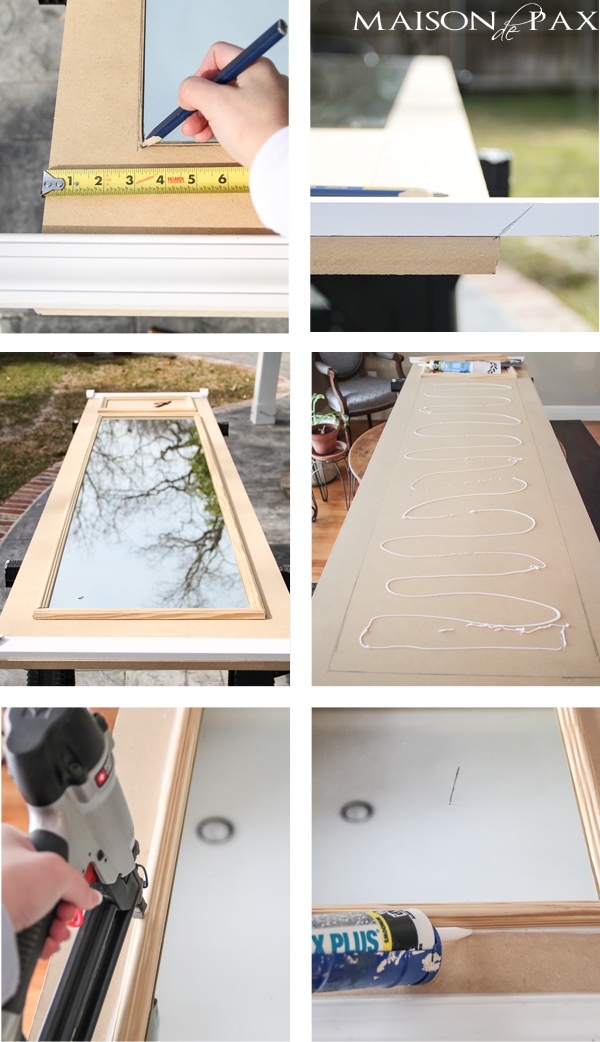
1. (not pictured) Lay your mirror on the floor and decide how much space you’d like to border it and how large you want your decorative section at the top.
2. (not pictured) Cut plywood or mdf to the full desired size.
3. Layout your mirror and trim pieces, marking with pencil where they should go.
4. Make sure you have your angles correct when marking your trim and cut accordingly using a chop saw or hand saw.
5. Lay all the pieces out one final time to ensure they fit properly.
6. Use construction adhesive to attach your mirror.
7. Use a thin bead of wood glue and finishing nails to attach your trim (be sure you don’t nail your mirror!!)
8. Caulk all seems.
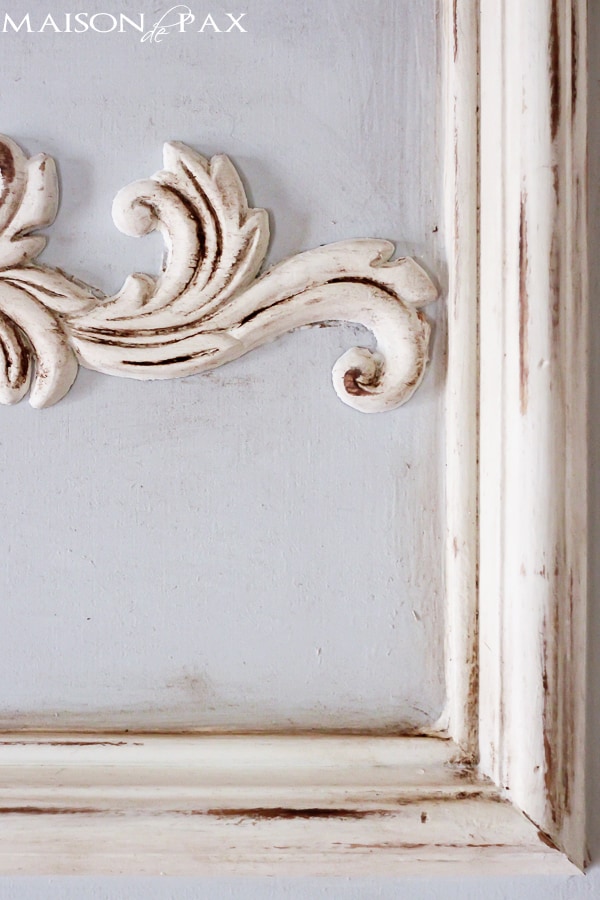
You can really paint it any way you like. I’ll share a full tutorial on my particular process later, but I think that’s enough for now.
What do you think? Could you build one?

MORE CREATIVE MAKEOVERS:

How to Give Metal an Industrial, Brushed Steel Look


Just gorgeous, Rachel. I love those mirrors and maybe some day I (and hubby) will build one.
Thank you so much, Kim! It was a fun project. 🙂
Gorgeous!!! Really great job! Looking forward to the painting process. Have been wanting to do something like this for a mirror above bathroom sink but on a smaller scale, I may now have to go for it.
Many Blessings to you, Candy
Thank you, Candy! I’m so glad you like it. And a smaller one in the bathroom would be gorgeous! Hopefully I can get that painting tutorial together soon. 😉
Hello! I, too, love this mirror tutorial…is it possible to get the tutorial for the painting process you used for this mirror? So soft and elegant!!
Thank you so much, Bonnie! I confess that I don’t really remember exactly what I did… But I do know it involved two different colors of chalk paint and a clear and dark wax finish. Here are a couple of painting tutorials that might be helpful: layered milk paint and whitewashed dining set.
gorgeous project Rachel! I love trumeau mirrors, they’re so elegant. I’ve been wanting to make one for a while, so glad I saw this post!
I’m so glad you like it, Cynthia! Thank you!!
Rachel this is beautiful, you did a great job on it. I may try this, but I’ll need to hunt down a large mirror first.
Thank you so much, Diana! You could always try a cheap framed mirror (from Target or Walmart); you might be able to glue the entire thing to your backer. That would save you having to frame the mirror with trim. 🙂
It is really just lovely,can’t believe you made it, you are a wonder.
You are so kind, Marlene!!
I LOVE THIS!!!! I’ve been thinking about doing this for awhile as well:) This is so awesome, it’s beautiful:) You did a fab job!
Thank you so much, Cindy!! I so appreciate that. 🙂
Perfect timing :). I am needing a large mirror for my living room. That is lovely!
Wonderful! I’m so glad you like it, Holly. 🙂
Breathtaking, Rachel! I adore this project. It would look great in my living room. I can see Bobby and me doing this one together. You make it look so fabulously antique! Brilliantly done!
You are so kind, Yvonne! It was a fun project to do; I hope you and Bobby get the chance to try it sometime! Thank you so very much. xx
This mirror is so cute. I love how you put everything together. Your housing ideas are truly inspirational.
You are far too kind, Jordan. Thank you!!
Really lovely!
Thank you, Kim!
This was a great DIY project. The mirror would be great for almost any room in the house. Thanks for the steps.
Thank you so much, Tracy! I still haven’t decided where I’m going to put mine permanently. 😉
What a grand project! This was certainly worth the time to create! You have a great eye!!
You are so kind, Linda. Thank you!!
Hi Rachel,
I have a mirror that I was ready to give away, but now I know what I’ll do with it!
Thanks for this great DIY project!
Yay! I’m so glad to hear it, Juju! I hope you have fun making it. 🙂
Wow – the mirror is beautiful. Very impressive project. I would love for you to link this up to my Winter Blues Wednesday link party going on right now. Hope to see you there. http://diybydesign.blogspot.com
Thank you so much, Judy! I appreciate it!!
Rachel!!! Just stop! I’ve always wanted to make my own too. You beat me too it 😉 I’ll have to try your plans. I’m sharing on my FB page today and pinned like mad.
Hugs, Jamie
You’re such a doll, Jamie. Thank you! I should have known this was on your to do list. 😉 xx
Love this and how you aged it…perfect! 😉
You are so kind, Larissa. Thank you so much!! xx
Love this mirror. Great job. Please, let me know what colors of paints you used on this mirror. Going to do one for my granddaughter.
I’m so glad you like it, Sandra! You can find all the finishing details on this post here. I hope this helps!
Beautiful mirror love it! Rachel thank you for posting this. I’been wanting to make a trumeau mirror for a while,but couldn’t find any good instructions on how to build one until now.
I’m so glad you found it and that you think it’s helpful! Hope you enjoy making one. 🙂
Hi Rachel,
Love this mirror! Did you end up doing a tutorial on how you painted it?
Thank you, Emily! I did, and you can find that here. 🙂
This is beautiful and I’m excited to make it for my 5 year old girls’ room. Can you please tell me the size of the actual mirror and plywood you used for yours? Your dimensions seem perfect.
I’m so sorry for the slow reply, Cassie. I kept forgetting to go measure it! The mirror is 16″x60″, and the plywood is 24″x84″. I hope this helps!
Love the frame of the mirror. I am sharing this on Pinterest.
Thank you! So glad you like it.
Not sure if this was mentioned ( if so, excuse me) . What I ink would look spectacular is to antique the mirror before racing it on the board.
Very nice mirror! Can you show or tell how you did the top and bottom headers? Do they turn at the corners or just a straight piece across?
Thank you! I did cut my trim at 45 degrees to turn the corner and finish off the sides of the bottom, but I actually didn’t have enough scrap trim (which is what I was using for the project) to do the top, too! Ha! So I still cut it at 45 degrees (giving it the crown look), but I didn’t add side pieces on the top. Hope this helps!
I was overbid at an Estate Sale on a vintage Italian mirror I fell in love with. Seeing your awesome Trumeau Mirror project I feel this will make me happy again and have a beautiful mirror that I made! You make it look so simple! Love your posts and ideas!
I am so glad, Jacquelyn!
Love your trumeau mirror! I’m gathering up my supplies and have a few questions please!
1) Did you trim the sides of the raw edges of mdf?
2) Size of mirror only?
3) Overall dimension of completed project?
I’m super excited to build this, thank you so much!!!
Apologies for the slow reply, Bonnie! In answer to your questions:
1. I did not trim the sides of the raw mdf; I just painted them.
2. The mirror was 16″ wide by 60″ tall.
3. The final project is roughly 23″ x 83″
I hope this helps! Good luck!!
Thanks Rachael, no worries! I ended up making 2 of the mirrors and am absolutely in love with them! I had never heard of Trumeau Mirrors before so thank you, thank you!!! I have 2 granddaughters that will get them when they grow up, it is such a joy to know this! I’ve also written something on the back for each of the girls! In the meantime, they look beautiful in my dining room!!! Thanks again!!!! I’ll try and send a pic if I can figure out how!!!🤣🤪😉
I would love to see it, Bonnie! I love that you wrote a note on the back for your granddaughters.
Think I’m going to try this soon
Good luck, Caroline!