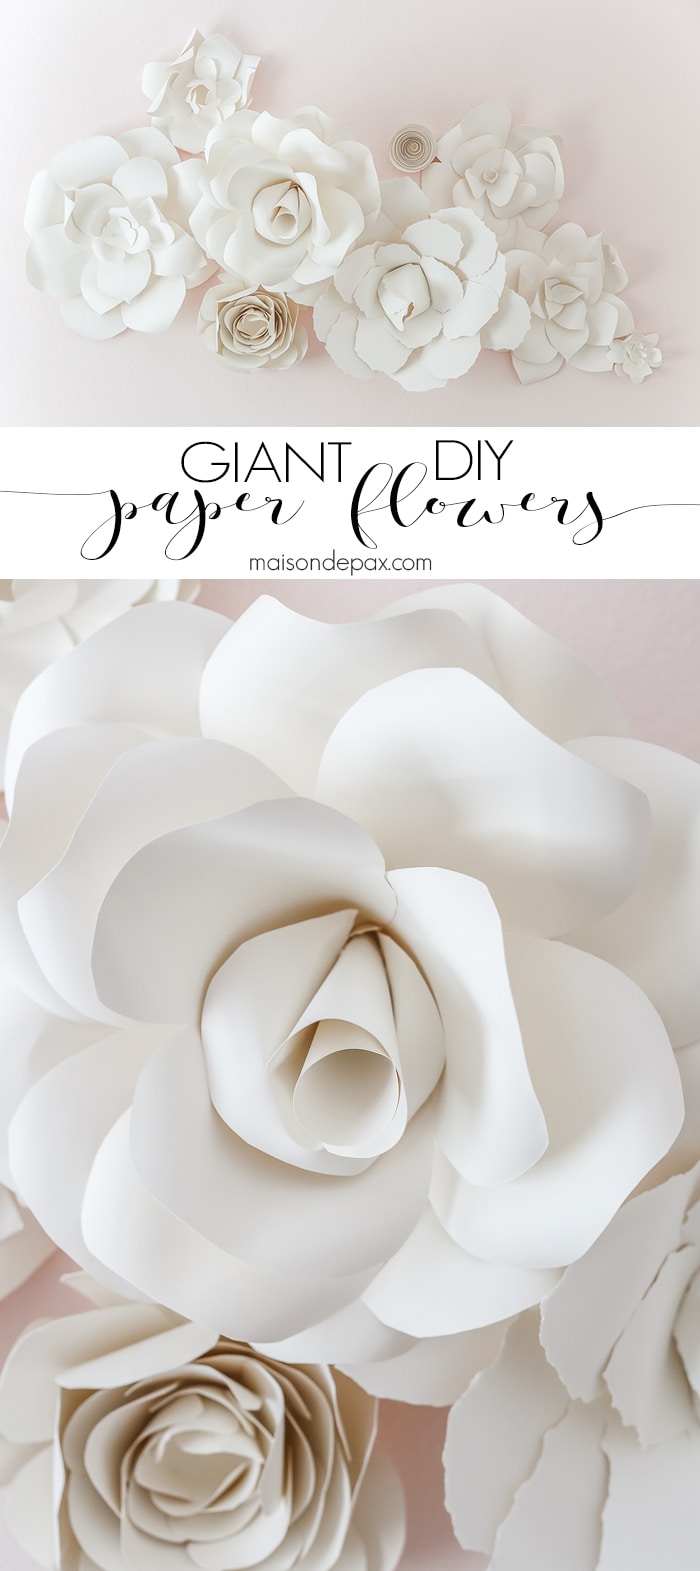
DIY Giant Paper Flowers Tutorial
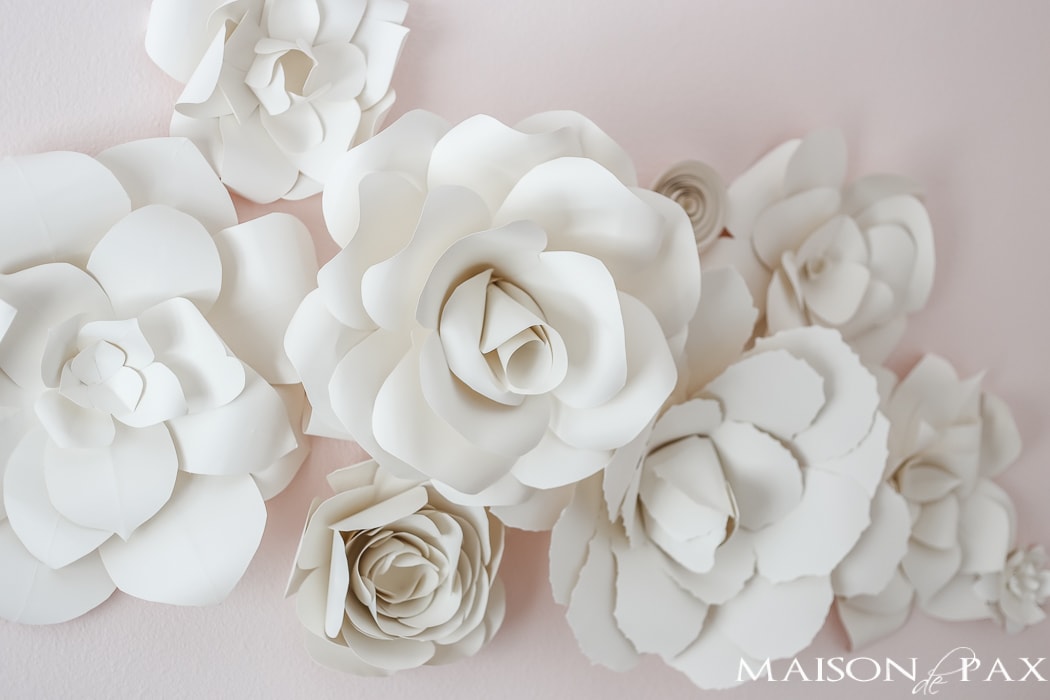
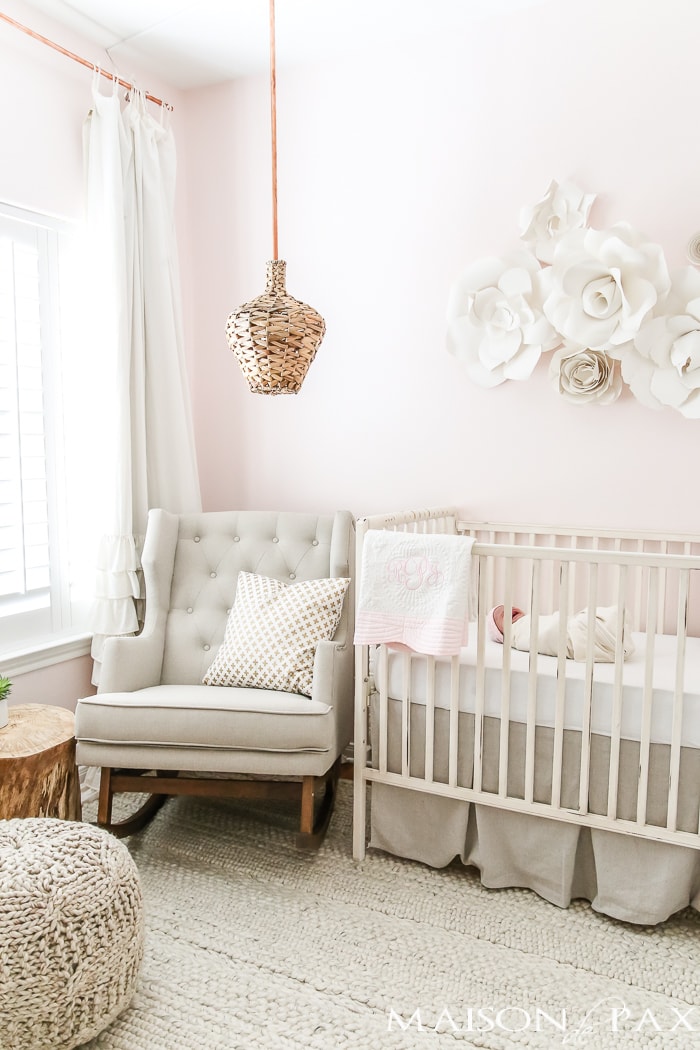
Looking for dramatic, elegant, affordable wall art? These diy paper flowers are simply stunning, and they would make the perfect backdrop for weddings, bridal showers, parties, nurseries, little girl’s rooms, or any elegant feminine space.
__________
I have been known to survive on dry shampoo and diet cokes.
And I often pretend I don’t notice when my kids eat off the floor.
Heck, sometimes I even pick it up and give it to them myself.
The reality is, I’m not the most elegant, formal, refined gal around… But the paper flower wall I made for my daughter’s new nursery has me feeling like pearls, heels, and champagne all the time.

A friend asked me the other day at the carpool line at school what I’d been working on in the nursery lately, and when I showed her a snapshot of the flowers, she immediately asked when she could come over and bring wine and learn how to make some. So while she may still receive a personal home decor workshop, I thought the rest of you might be interested, too. 😉
Rather than writing a step by step tutorial for all nine of the different craft flowers I made, I want to give you a general instruction for how to create giant paper flowers… The possibilities are endless! Also, I want to say that while I adjusted the size and some other details, I was particularly inspired by several tutorials, including this gardenia, this rose, and this ranunculus.
DIY Giant Paper Flowers Tutorial
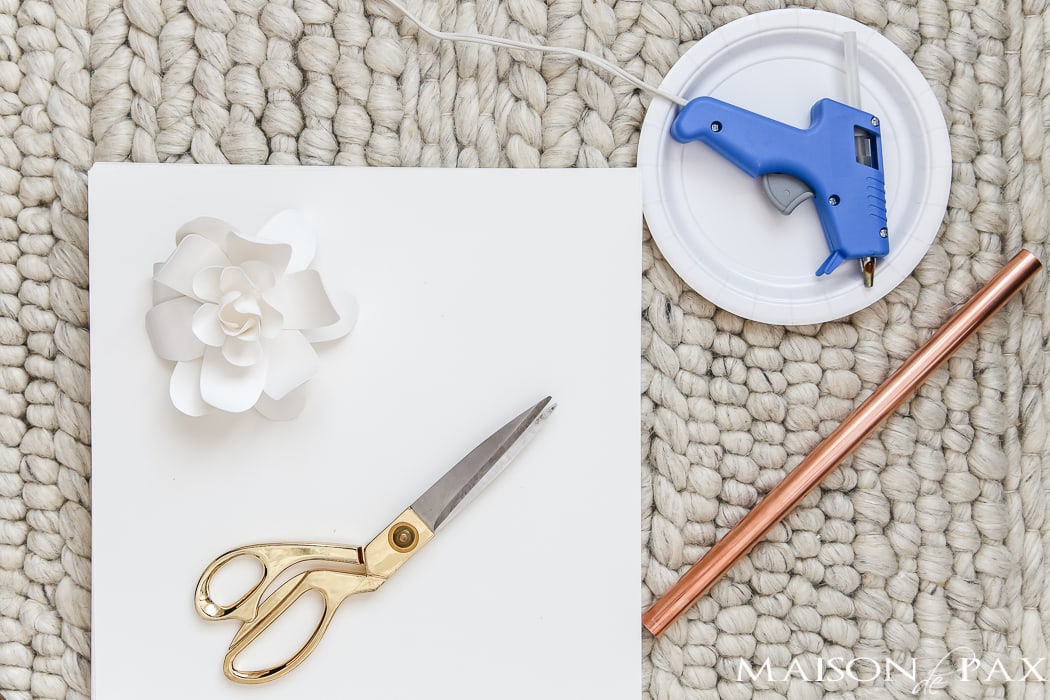
Supplies:
- 12×12″ paper (see below)
- pencil with good eraser
- sharp scissors
- hot glue gun
- pipe or other smooth cylinder
What paper to use for durable, beautiful wall flowers:
First things first, what paper to use. Crepe paper flowers and tissue paper flowers simply did have the substance I wanted. I admit that I’ve been drooling over these amazingly beautiful handmade flowers for years, but I couldn’t justify $600 for paper wall art.
So I did my research and found the perfect paper for this: French cotton paper in Natural (not too bright white, not too ivory) in 118lb weight (which is basically cardstock). And at $30 for a pack of 50 sheets of 12×12 (which was enough for all the flowers you see plus a few extra sheets), I thought it was perfect.
How to Make Giant Paper Flowers:
I’m afraid I don’t have a video tutorial or paper flower templates download, but I truly think anyone can create beautiful flowers with these simple steps.
- Choose your size
- Cut out petals
- Create depth
- Glue in stacks
- Create a center
Choosing your size:
Most of the best paper flower tutorials I found were for life-size (or close to it) flowers, which meant that most of the pieces needed to make the flowers could be cut from just one or two pieces of paper. I obviously wanted a much larger scale for most of my flowers. For my wall, I made three different sizes:
- 12″ radius (where only 1 or 2 large petals were cut from a single 12×12 sheet)
- 12″ diameter (where a single layer of the flower is the width of the 12×12 sheet)
- smaller (where several layers of a single flower were cut from a 12×12 sheet)

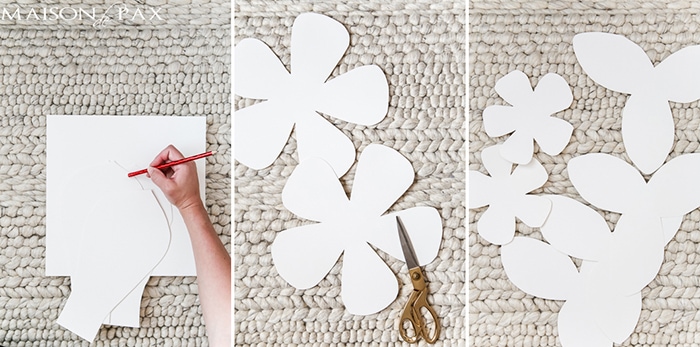
All of the options and suggestions below can be used on any of the various sizes. The only difference is how large you make your layers. For the largest flowers, you will cut out individual petals and glue them together to make your largest layers. For the medium flowers, you will cut your bottom layers as large as you can on a single 12×12 sheet. And for the smallest ones, you can start with any size layer you want. And for what it’s worth, I simply sketched my petals lightly in pencil. The pencil marks are erased very easily.
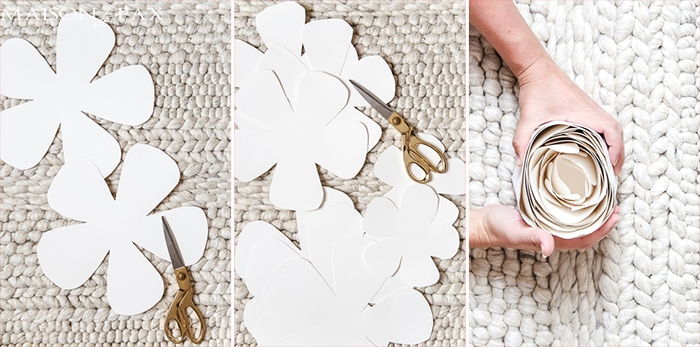
Making your petals:
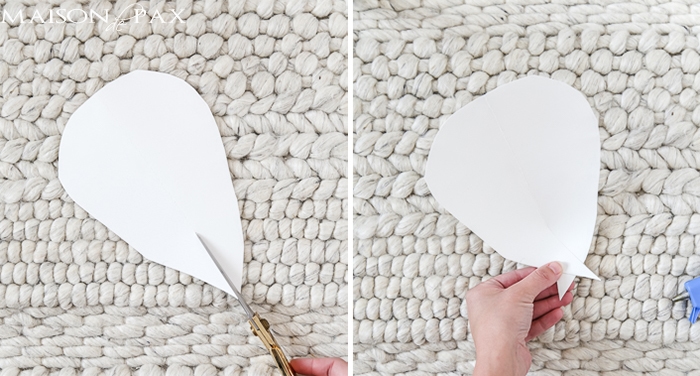
Once you have decided which size option you are making (and I suggest starting with smaller flowers and moving larger), you’ll need to decide the look of your petals. You have three basic options on your flower’s petal:
- shape
teardrop, rounded, more squared, pointed
- edges
The simplest is a smooth cut (be sure you are using strong, sharp scissors), but you can also do a wavy cut of some sort. My favorite (but it was more work) was to tear the paper to form a kind of paper rose. Since the paper is made of cotton, it tears with a front and a back (try tearing it and you’ll see what I mean), so be sure you tear it consistently so that the face of each petal is the “front” side of the tear.
- folds
Consider adding additional interest to your petals by folding them so the seams create a vein.

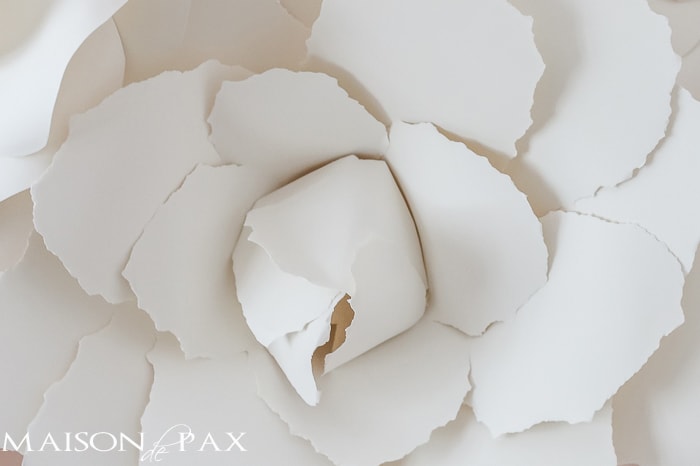
Creating depth:
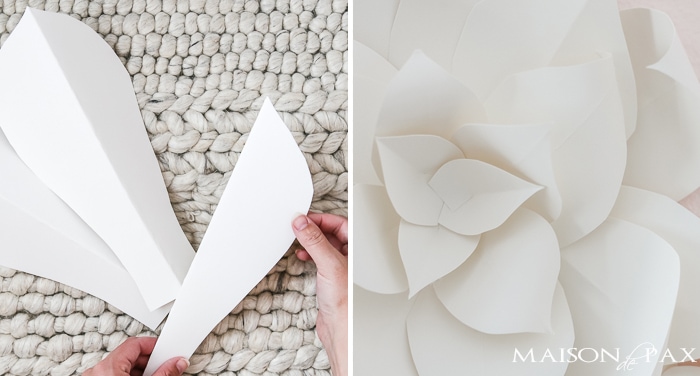
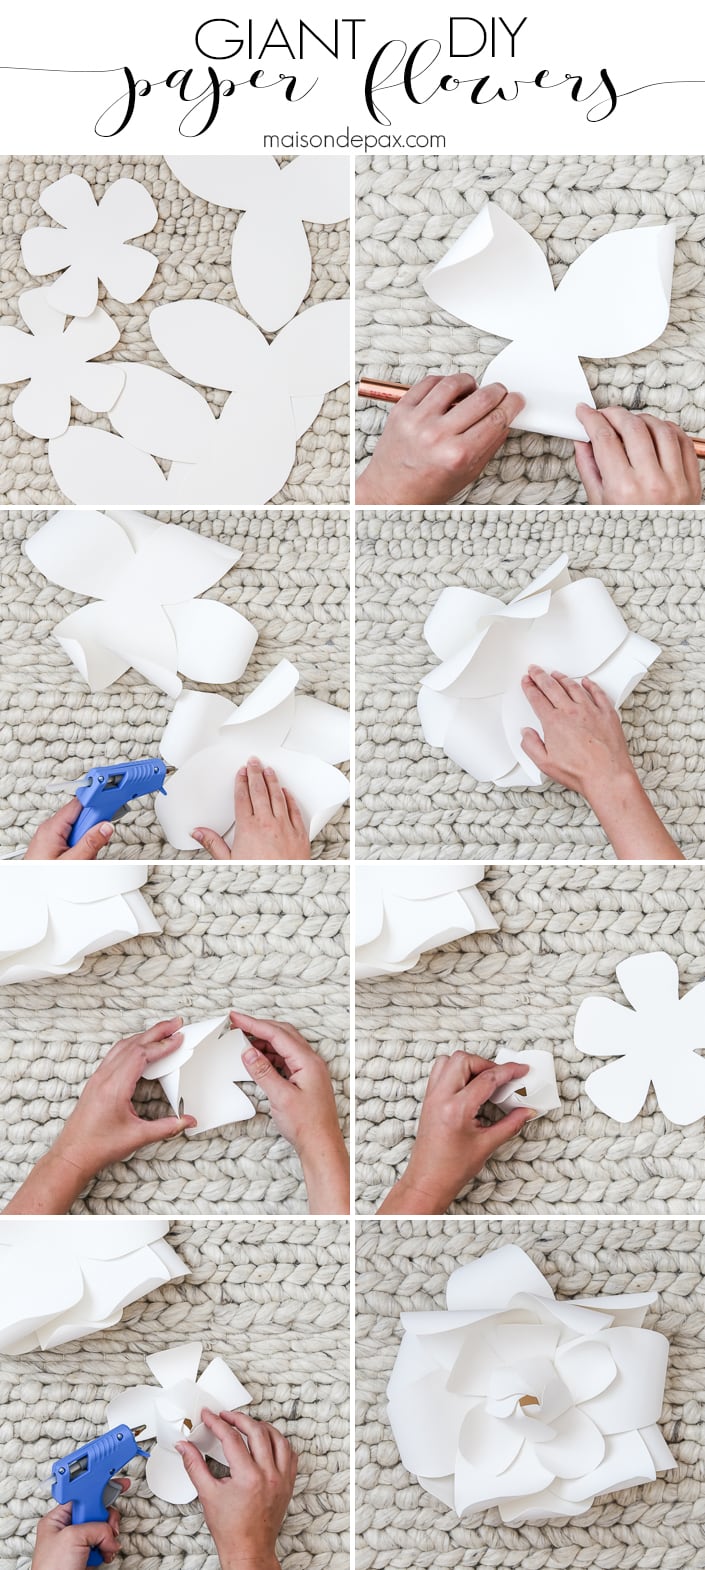
This step is KEY to giving your flowers a natural look. You will want a nice, smooth, round cylinder of some sort (even a broomstick would work). I happened to have a portion of copper pipe leftover from my copper curtain rods which was perfect. You have three main options to create depth:
- curl
You will actually want to do this on pretty much every flower’s petal even if you do one of the other techniques below. It is the softly curled organic edges that create a realistic feel to your flowers. If you choose flat petals, though, curling can alone create the depth you need, like in this flower. Just twist the edges of your petals softly around that pipe (or broom handle) and roll in different directions to create depth. - cut and glue
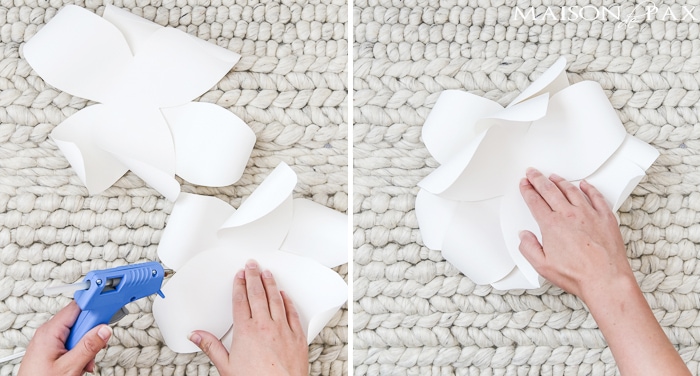
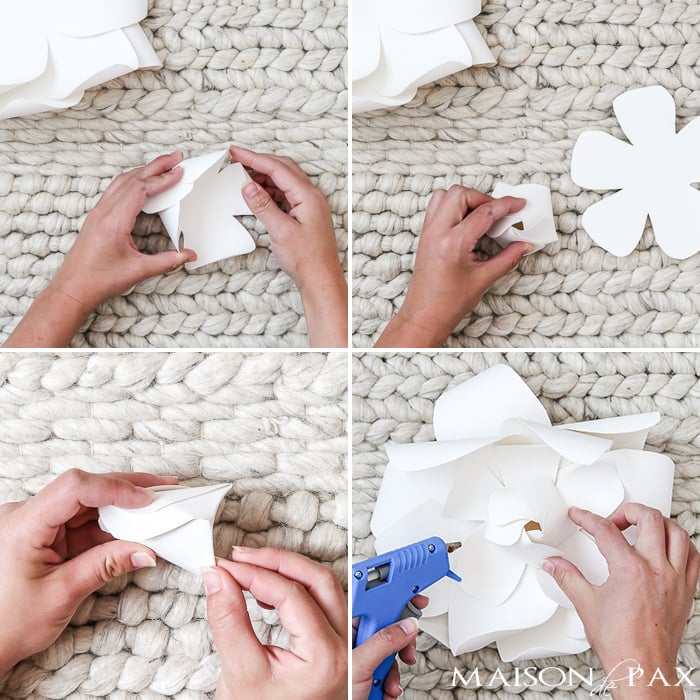
Another way to create depth is to cut a small slice up the center of the bottom of the petal and then cross one side of the petal cuts over the other and craft glue it in place. This will tip the top of the petal up into the air and give your flower more of a cup shape. - cone
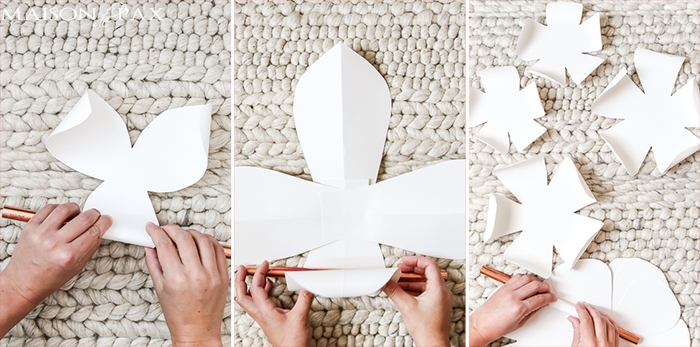
A third way to create depth in your flowers is to give each layer a cone shape. The easiest way to do this is to create your layers 1-2 petals short of a full circle and include a little flap that can overlay (see image below). Then pull the edges together and glue it to create a cone. If you are trying to create the largest sized flower, you will need to create each petal with a little extra flap separately (since your paper is only 12″ wide) and glue each petal together until you are one petal short of the full circle.
For flowers done like this, you’ll want to start with 1-2 cones of “x” number of petals, then another cone of “x-1” petals, and finally a cone of “x-2” (for example: two cones of 5 petals, one cone of 4 petals, then one cone of 3 petals) so that the cones increase in depth and diminish in size.
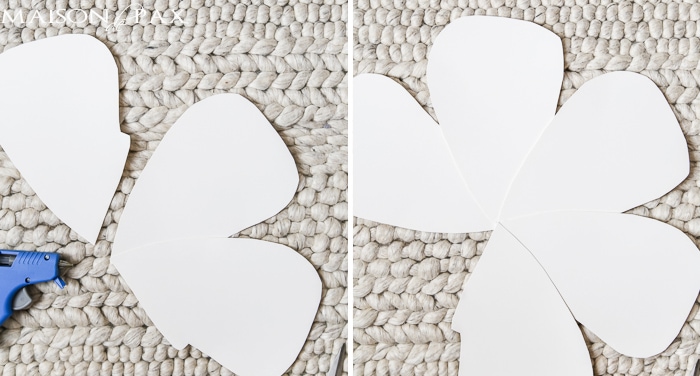
Gluing in stacks:
Second to the organic, curled edges, the layers of petals is probably the most important element in giving your flowers a natural look. You have basically unlimited options here, but I’m going to describe the three methods I used:
- pinwheel
Whether you start with flat petals, cup shaped petals, or cones, you will want to rotate your layers and glue so that the petals fill in the spaces between one another. For each flower, I started with at least two layers of the same size and number of petals (3, 4, or 5) and rotated enough to fill in between. Here I actually used four layers of 3 petals. - drop in size
For subsequent layers, you can simply cut a slightly smaller version of the same number and shape of petals as your first two layers. I used this method on the full one that mimics a ranunculus or peony. - change leaf number
Another option is to change the leaf number in differing layers. For example, in the flower below, I used four layers of 3 petals (pinwheeled and glued in the center of the flower), one layer of 5 slightly smaller flat petals (pinwheeled and glued), and one layer of 5 slightly smaller flat petals made into an overlapped bud center (instructions in next section).
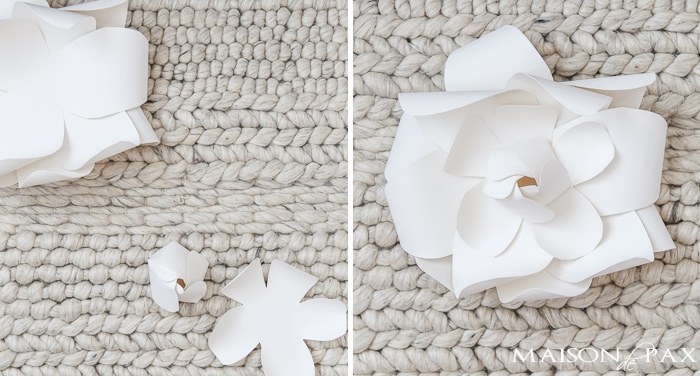
Creating a center:
The center is sometimes the trickiest, but can also be the most rewarding part. It is the finishing touch to your masterpiece. I used four different types of centers in the nine flowers I made:
- tiny petals
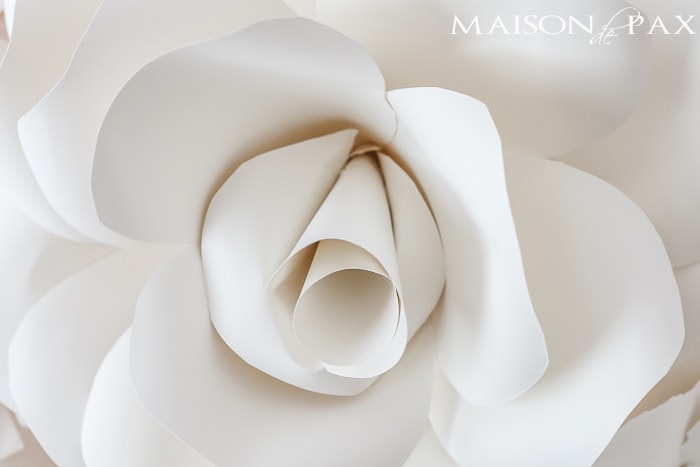
This is the easiest option. Just cut tiny versions of the petals you used on the rest of the flower and overlap them and glue them in the center. The tricky part is making sure even the base of the petals is attractive (because it won’t get covered up!) and not getting any glue where it is visible. - petal overlap (bud)
One of my favorite options was to start with a small, 5-petal shape. Curl the edges up and diagonally for interest, then overlap each petal to create a little cone. Once you have them all overlapped, squeeze the bottom edge with your fingers (creating a flat pentagon on the bottom) so that they will stay in place. If need be, you can add a drop of glue in a few places to keep the petals from unraveling. Then glue your little bud into the center of your flower.
- cone
For a petal that begins with cones for depth, you can cut single petals and simply wrap them into cones to create a center. Wrap the petal around a pencil or some other skinny stick to create the cone and glue the paper to itself (not to the pencil!). Then add a second (or even a third) petal around and keep gluing until the center feels full enough. Remove the pencil and insert the cone into the flower’s center. - spiral
The little spiral flower I made (which I chose to leave just as it was) would also make an excellent center to a larger flower. This tutorial tells you exactly how to make these.
And that’s basically it! I hung them in my daughter’s nursery using command strips. These would also be beautiful as centerpieces, wall decor, or photo backdrops for wedding or baby showers, birthday parties, and more.
DIY GIANT PAPER FLOWER STEP BY STEP
To give you one more way to think about it, I’m going to put one of the flowers into a full picture tutorial for you. Here is the start to finish process for one medium sized flower.
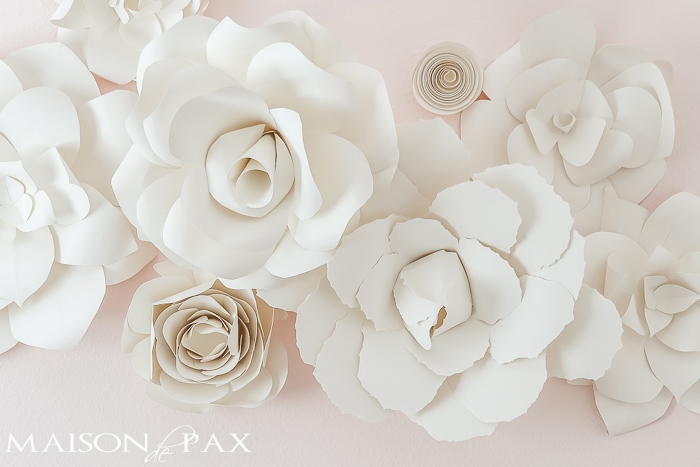
As I said, I wanted to give you room for your own creativity, but if you’re the type of person that simply wants to know exactly what I did for my bouquet (and which real flowers they resemble), here’s a quick breakdown:
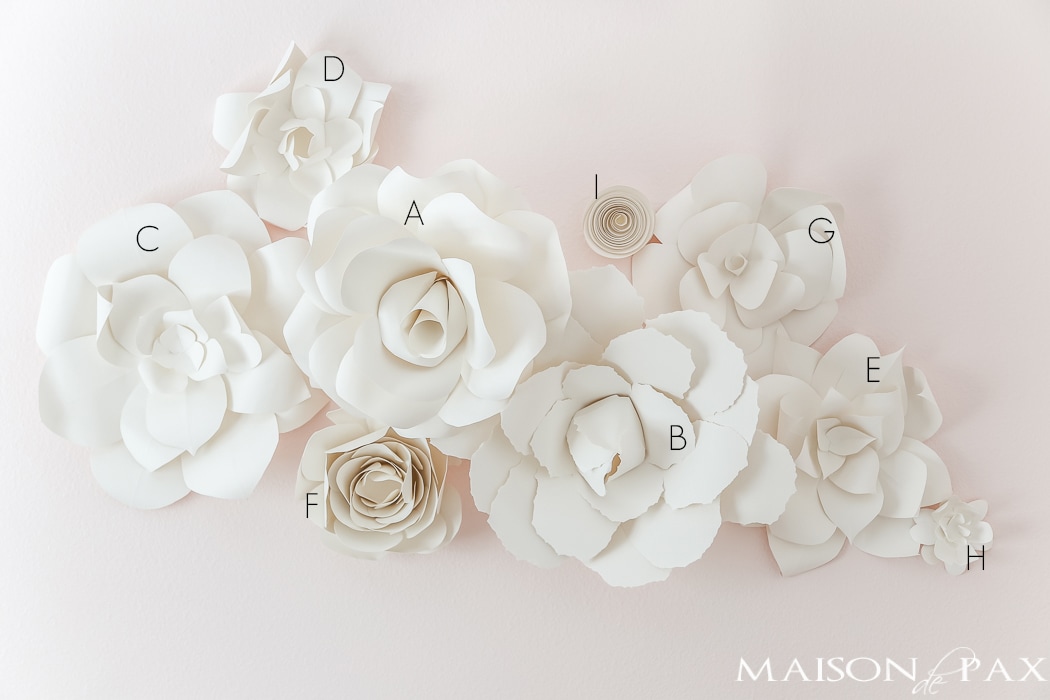
- 3 large (12″ radius) flowers:
- A – rose
petals: smooth cut with rounded edges and curled down diagonally in both directions
layers: two 5-petal cones, one 4-petal cone, one 3-petal cone
center: three single petals wrapped around a pencil - B – ripped rose
petals: ripped by hand and curled down; all except center were cut and glued to lift the edges
layers: two 4-petal large pinwheels, one 4-petal medium pinwheel, one 4-petal small pinwheel
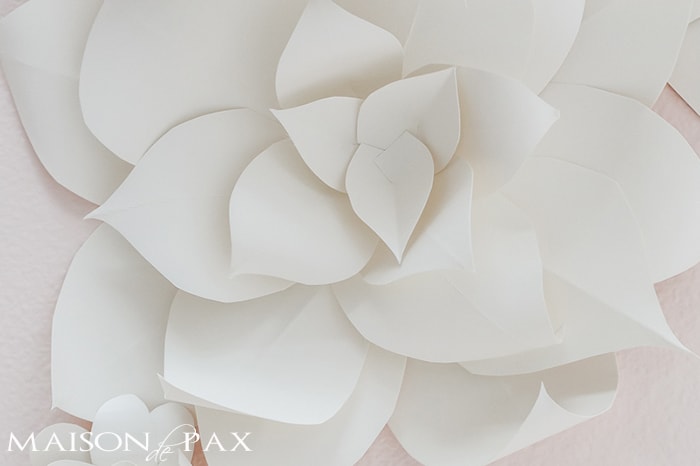
center: one more 4-petal small pinwheel overlapped into a bud for center - C – magnolia
petals: smooth cut with pointed ends and folded down the center then curled every which way
layers: two large 4-petal pinwheels, one medium 4-petal pinwheel, one medium 3-petal pinwheel, one small 4-petal pinwheel with petals cut and glued to lift the edges
center: created with three small petals cut and glued to lift the edges
- A – rose
- 4 medium (12″ diameter) flowers:
- D – gardenia: (see full picture tutorial above)
- E – magnolia: see C above but use smaller pinwheels
- F – ranunculus
petals: smooth cut with slightly squared edges curled up
layers; three large 5-petal layers, three medium 5-petal layers, two small 5-petal layers; small layer overlapped into center “bud” and each subsequent layer wrapped around that one moving outward; all petals smashed a bit at end to create texture - G – camelia
petals: smooth cut with slightly squared edges curled every which way
layers: two large 4-petal pinwheels, two medium 3-petal pinwheels, one small 3-petal pinwheel
center: a single petal curled into a little cone, cut to fit, and glued into center
- 2 small flowers:
- H – gardenia: (see full picture tutorial above)
- I – spiral
I hope you enjoy making these as much as I did. Don’t expect to have them all made in an hour. Give yourself chunks of time to work and time to walk away… But the result will be so worth it! And if you do make some, I’d love to see.

These are gorgeous! And they could be used in so many fun ways. Thanks for the tutorial, Rachel!
Thank you so much Randi!
do you have a website with templates?
Not at this time, unfortunately.
Thanks for the tutorial, if I would like to do this, what to use to create the petals?
I just drew the petals free hand and then cut them out from the paper. I hope this helps!
Hi! Is there a template to print for these flowers?
Hi Jane! No, I’m sorry, there isn’t a specific template, but I do discuss how to make your own template in the blog post.
Beautiful, I can’t wait to try! Thanks!
You are welcome!
Hi Rachel! This is fantastic tutorial! Thank you for taking the time to collect all of the details because I have always wanted to make these flowers. I rarely comment, but this blog inspires my home regularly. I really appreciate your creativity and your ability to curate beauty. That is your gift from God. Praying for the safe delivery of your beautiful baby, and safe delivery for you.
Thank you so much, Ginni! I am so glad I can serve you by inspiring you and your home. Rosie is here and she is a delight! Thanks again for stopping by.
Wow, these paper flowers look so nice. I will try to make it decorate in my room. I think I also can make a bottle flower with it. Thanks for sharing the way to make it.
You are so welcome!
I am so excited to try these flowers. My husband and I are renewing our wedding vows after 35 years of marriage. Like our original wedding our vow renewal will be done on a budget. I literally opened my craft cabinets and pulled everything white, beige and cream out and that is what I will use. I will however buy some paper to make these flowers. (I will scour my scrap booking paper first). Thank you for the tutorial.
You are so welcome! And happy anniversary!
These are beautiful!!!
Thank you!
Hi Rachel, I was feeling the need to be crafty and looked in my emails and there you were. Congratulations on new baby!!!!! Sweet times and blessings.
I want to make the magnolia flower and was hoping you have a template. I’d appreciate your help.
Nancy
Ha! I am glad it came to the rescue. Glad you enjoyed the tutorial.
Do you make these to purchase?
Also, the link to purchase paper does not say:
French cotton natural.
Is that the paper you used?
I’m afraid I’m not selling these. The description of the paper used to say country of origin: France, but they seem to have redesigned the page a bit and left that off. It is the same company and same type of paper I purchased, though! I hope this helps!
How did you secure them to the wall?
I used 3M strips. I had to glue an extra piece to the back of the large cone shaped rose (because the bottom isn’t flat) before I could use the strip, but otherwise they all worked great with small strips!
Where do I get the templates for any and all of these flowers. Every site you must buy them. Are there any for free. Thanks in advance. Sandy
I imagine you could search for free templates and find some, but I noticed what you noticed: most are for sale. That is why I didn’t use templates to create mine. Plus, most of the templates I found were smaller than I wanted anyway, which is why I made my larger ones using the 12″ wide or 24″ wide format. 🙂
Gorgeous! So elegant. Thank you for sharing!
So glad you like them!
These are so beautiful and elegant! Do you arrange them and secure them together before you hang them on the wall or do you hang them individually on the wall? I am not familiar with the 3M strips so I needed a little clarification. 🙂 Thank you again for sharing!
Thank you so much! I hung them individually; I started with the big rose in the center and just moved out from there one by one. 🙂 And here is an affiliate link to the strips I mentioned. Hope this helps!
Thank you for this beautiful flowers and your kindness !!
You are welcome!
I love these so much! Do you think that textured cardstock will still
Work? They didn’t have packs of white/ cream at Micheals when I went today.
Sure! Different paper will have a different look, but assuming the weight is heavy enough for it to hold the folds and curl, I imagine you can create some beautiful flowers!
I, too, love the look of these flowers and can’t fathom spending the money on them on Etsy (yet). I am the mother of a 15 month old boy, and 6 months pregnant with a baby girl. I also survive on dry shampoo and coffee, not diet coke lol. But close enough!
My plan is to try out one flower and decide if I can do a whole wall. Will probably only need 7 – 10 total, but it depends on the time commitment here. Wish me luck! Thanks for the tutorial!
I am so glad you found the post- and good luck! I am sure they will be beautiful.
Do you have a link to the magnolia you used?
I was inspired by this one, but I made the process up myself. 🙂
This tutorial is so helpful. I’m doing these for my wedding backdrop. I wanted to do them in my wedding colors but buying the paper in each of my colors is expensive. Could this paper stand up to painting? Do you have any suggestions? Thank you!
Actually, I have seen people use latex paint to make flowers, so I think it would be worth a try!
Hi Rachel , What a beautiful baby, so sweet, ….I am a great grand mother of several of these sweet babies, time goes so fast , enjoy your time with them, …I have one more question about the paper, I am having a hard time finding the french craft paper, is it possible to give us your source, ? I would be so grateful, thank you , I love your post
Hi Ruth! Thank you so so much for your sweet comment. I put a link to the paper in the post, but here it is again just in case it’s hiding there: https://www.paperandmore.com/product/5678/12×12-natural-white-cotton-cardstock-118lb-cover I hope this helps!
Thank you for the link , I found it after I emailed you , and thank you for responding to my email , I sent for the paper and have made one rose ,I love it and have plans to make more, How do you do it with four little ones , You make every thing so beautiful, I love following your post
Sounds perfect- I am so glad you got to try the tutorial.
These flowers are stunning. They just made my day! Also I love the vintage pictures. I love roses.
I love your site. Thanks
Thank you Joyce!
Rachel, I did it! I made the roses and love the way they turned out…they’re beautiful!!!
Thank you, RuthieB
Ruth, I am THRILLED to hear that! Thanks so much for coming back to share that. 🙂
I’m looking at doing this for my daughter due in January. How long did it take you to do all of them?
Good question! It probably took 30 min to an hour per flower (depending on the intricacy of the flower), but I was also creating the design and trying to photograph as I went. You could probably do it a bit quicker than that. 😉
Gorgeous!!! Do you have a video tutorial or one in the works?
I don’t, but I have had people report back that they followed the tutorial with success!
I love this so much, So pretty and such a thoughtful way to make paper flowers. Just fantastic…..
Thanks, Rebekah!
Do you have a template for the Rose (A)?
I don’t, I’m sorry.
I adore these flowers! Can’t wait to make a bunch of these beauties. Thank you for sharing ❤️
I’m so so glad to hear it! I hope you enjoy. 🙂
Hi Rachel,
Hope you’re doing well.
I felt madly in love with your beautiful rose paper flower that I am actually trying to craft one.
However I am stuck since I don’t understand how to give a cone shape to the first layer, mine remains flat…
On another hand, do I need to decrease the petal sizes while moving to the center?
Looking forward to your feedback.
With Love,
Amina
I’m so glad you like them! The trick is to make sure that your petals don’t complete a full circle. Glue them together so that they look like a circle with a piece of the pie cut out. Then pull it together and glue it and it will make a cone. Does that make sense? I hope this helps!
OMG, I’m so excited right now! I was on Fanciful Design Co’s site last night and was dreaming of their flower installations in my foyer. I just came to Pinterest to search for what more affordable alternatives might be out there. And here you are! I’m so excited to try this! Nervous, but optimistic!
You can do it, Liz!
Dear Rachel,
Love your website. Will be following. Loved your Christmas ideas. Refreshing! Also, I am definitely going to try the giant paper flowers.
Thank you,
N
Thanks, Nancy!
Hi Rachel,
This is awesome. Colored papers will also work in so many different ways, for a variety of roses etc. would be a great Mother’s Day gift.
Thanks for sharing 🙂
Great idea, Alexandra! 🙂
My 11 year old daughter and I enjoyed making several flowers for her bedroom wall (using ur tutorial!). Thank u so much! We are abt to attempt hanging them—I was thinking of mounting them with wire to hang like a framed piece), but I may just do the 3m strips u suggested. The paper u linked was perfect—easy to order and curls beautifully. 😊
I am so glad it was a success, Melissa! 🙂
Hello,
I made a set of these flowers for a client and she absolutely loved them. I really enjoyed making them with your tutorial and will be making another set for my niece’s nursery. I ordered the paper you linked and I loved it. It’s the perfect off white color. Thank you so much for sharing this tutorial. I tagged you on Instagram hope I get your stamp of approval. Thank a million.
That’s wonderful news! I’m SO thrilled to hear that you found the tutorial helpful and enjoyed the flowers so much. Take care!!
Love your post and this is a great papercraft tutorial
Thank you!
Hi Rachel!
Thank you for your tutorial! I want to make these for my daughters nursery. I see on the link provided they have pink card stock but only 100lb weight. What you recommended is 118. Do you think the 100 is heavy and sturdy enough to hold up on the wall? It doesnt say the pink is cotton card stock either. Do you know where I can purchase colored cotton card stock for this project? Does my question make sense(prego brain)?
Thank you, Ashley
I’m so glad you found it helpful, Ashley!! Unfortunately, I haven’t tried any of the other weights or colors on that website. I will say, though, that I ordered a single 8.5×11 sample from their website when I was trying to find the best weight and color for my project, and it was so easy and reasonable! You might just want to try that in a few weights/colors and see what works best. I hope this helps!
Ashley, what did you end up using?? I want to make some colored flowers as well, but am wondering about what paper to use then! I’m considering using the recommended paper and tinting the edges with stamp ink for some color…hmm.
This tutorial is AMAZING!
Thank you so much for the tutorial. They are so beautiful and dreamy. I want to make a flower wall for my wedding. Do you also have a YouTube channel?
Thank you so much! I’m so glad you found it helpful. 🙂 I do have a YouTube channel: youtube.com/maisondepax . I do not, however, have a tutorial for these flowers yet (though it is something I am hoping to work on soon!). Congratulations on your upcoming wedding!
These are absolutely stunning! Best I’ve seen and I have looked everywhere! I was wondering if you have created a template for these flowers. I have a granddaughter coming at the end of the month and would love to add these to her nursery!
I don’t, I’m sorry, but I’m sure they would be lovely for your granddaughter’s nursery.
Do you have to use a specific type of paper?
I definitely recommend the cotton paper that I linked to in the post, though any thick paper (like cardstock) could potentially achieve a somewhat similar effect. You will need something stiff enough to hold its shape when you roll it. I hope this helps!
Hi, I love the flowers you have made. I want to learn how to make these. Do you have a template for each flower that we can follow?It would be easier for me to print than trace. Have a great day!
I’m sorry, Lisa! I don’t have a template, I created as I went along.
UGH ok! Thank you! I am not that good with freehand. But I will try my best.
Finally got around to make these flowers! I started with the large ones (yes, I was very ambitious) and they turned out amazing! Thank you for an amazing tutorial!!! I do have a quick question though: how to hang the cone-shaped flowers? I read in one of the earlier comment that you added a piece but I still couldn’t figure it out (I’m not the handy kind and need detailed descriptions that’s why lol)
I’m so glad you like it! I’m afraid I don’t have any pictures, but I basically glued a tab on to the top of the point so that it could act as a tab to put the 3M strip on to. Does that make sense? I hope this helps!
Just beautiful..thanku so much for a clear and precise tutorial.
My niece has fallen in love with the large flowers and has requested a bunch of them for the wall of her nursery. Pretty excited to give them a go…thanks again. Much appreciated 😊
Kaz …
Of course! I’m so glad it was helpful and that you are making them!
Thanku. I also subscribed and am looking forward to reading all your previous projects and new ones to come 😊
Perfect! So glad to have you!
These are beautiful! Are they sturdy enough to dust so they stay beautiful for longer? Would love to make them for a friends babies nursery!
Leslie
Thank you so much! We’ve had ours for about two years, and they still look beautiful! 🙂
Hi Rachel….Thank you again for the beautiful flower tutorial! I want to make the cone rose but not sure if I’m to be decreasing the actual size of the petal as it layer towards the center? Or are all the petals cut the same size and it’s the elimination of one per layer that naturally decreases the size? Does that makes sense?? Thank you!
I confess that my brain has forgotten exactly what I did! But I’m pretty sure they were all the same size petals and just decreasing the number of petals per layer. I hope this helps!
Hello! Thank you for this! I was getting overwhelmed with prices for (less beautiful) paper flowers on Etsy. How did you attach these to the wall? Thanks so much!
I’m so glad you found this helpful! I used 3M strips to attach them to the wall. I’ve only knocked one off in the 2.5 years that they’ve been up! 🙂
Incredible Tutorial & stunning flowers…This is exactly what I have been searching for 🙂 Stay safe, Stay well during this difficult time. Catherine. xXx
Aww! I’m so glad you loved it, Catherine!
Please upload a video tutorial. I really need it.
These flowers are great🥰🥰🥰
Hi Nimmy! I don’t have a video tutorials to share right now, but you might find some similar paper flowers on YouTube.
Next time please upload video tutorials too
Do you have a template for these?
I don’t, I’m sorry!