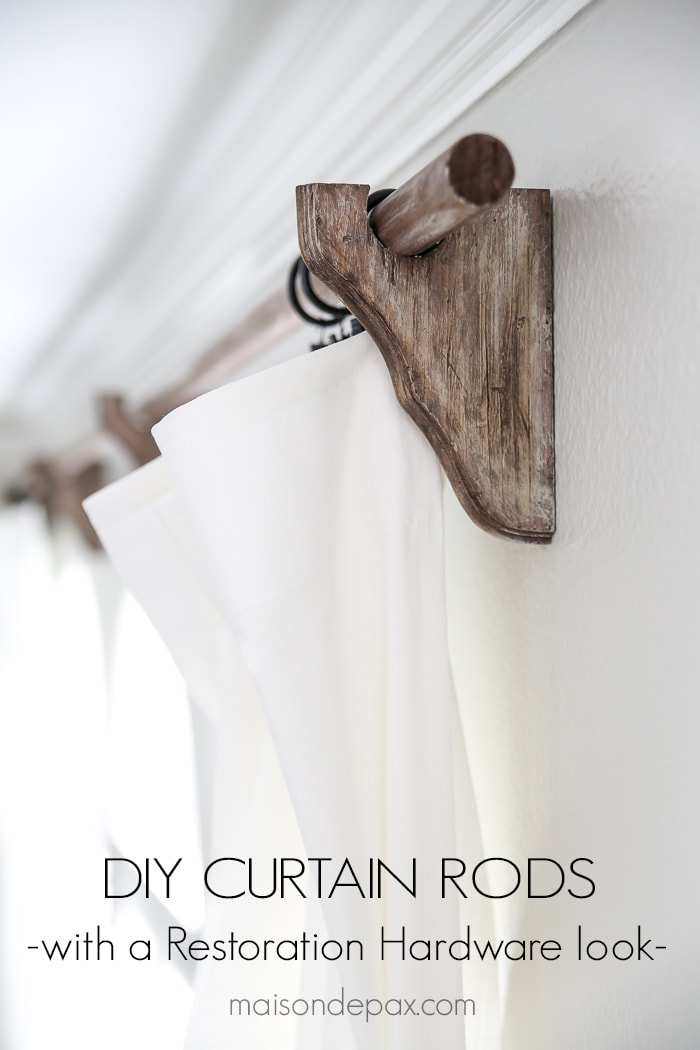
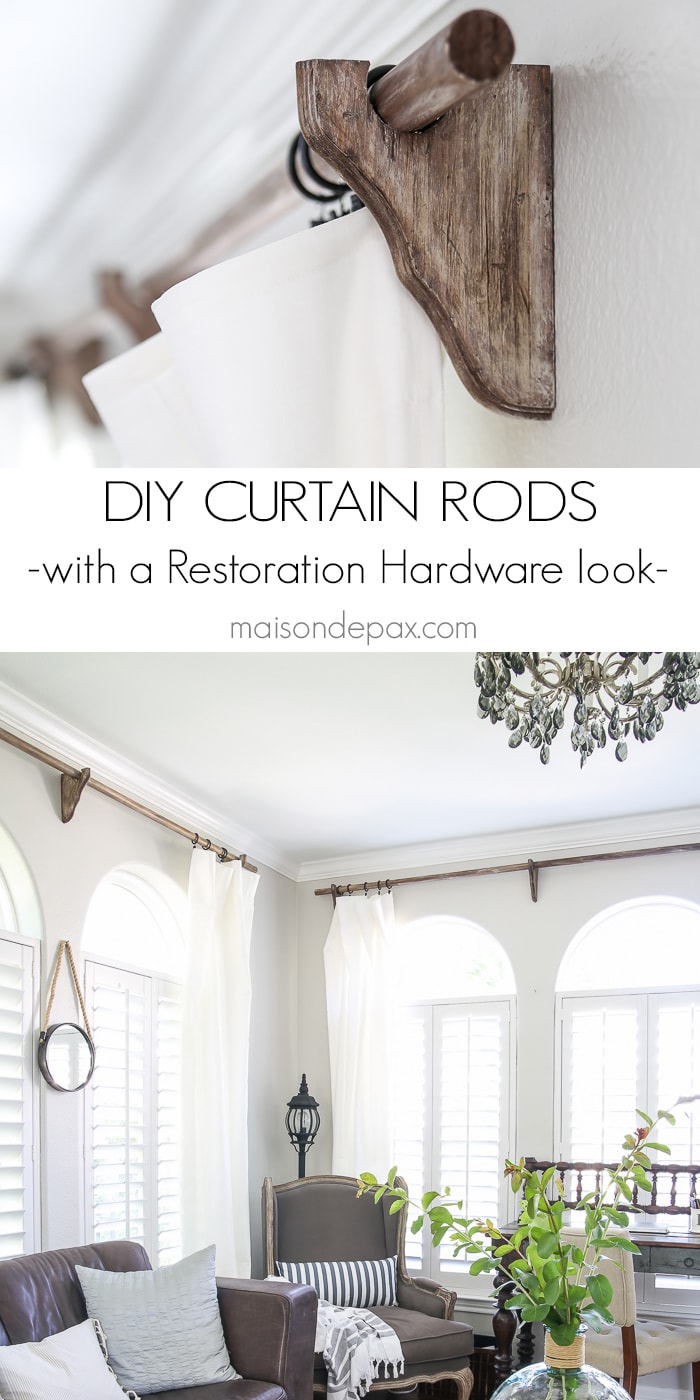
DIY Curtain Rods (Restoration Hardware Inspired)
Love budget-friendly DIY projects? Check out these DIY curtain rods inspired by Restoration Hardware.
Domino Mag recently named Maison de Pax as one of the 15 best design blogs to follow for budget-friendly design inspiration… Pick my jaw up off the floor because it totally knocked my socks off, first of all. I couldn’t be more honored. Secondly, it got me thinking that it’s been a while since I’ve give you a good ol’ straight, budget-friendly, DIY tutorial. So today I’m going to share how you can make gorgeous, real wood, DIY curtain rods that look like something from Restoration Hardware.
And the best part? A 6′ curtain rod will cost you less than $15 and an 8′ one less than $20. And we aren’t talking flimsy little things… These curtain rods are serious. Plus, with my secret for incredibly affordable luxurious curtains, you’re all set for your window decoration.
Now to be fair, like many DIY projects, they would cost a lot more if you didn’t have many of these supplies already on hand. And I spent more because I essentially made three and a half of them. But still, $50 for 24′ of gorgeous, real wood curtain rods seems pretty wonderful to me.
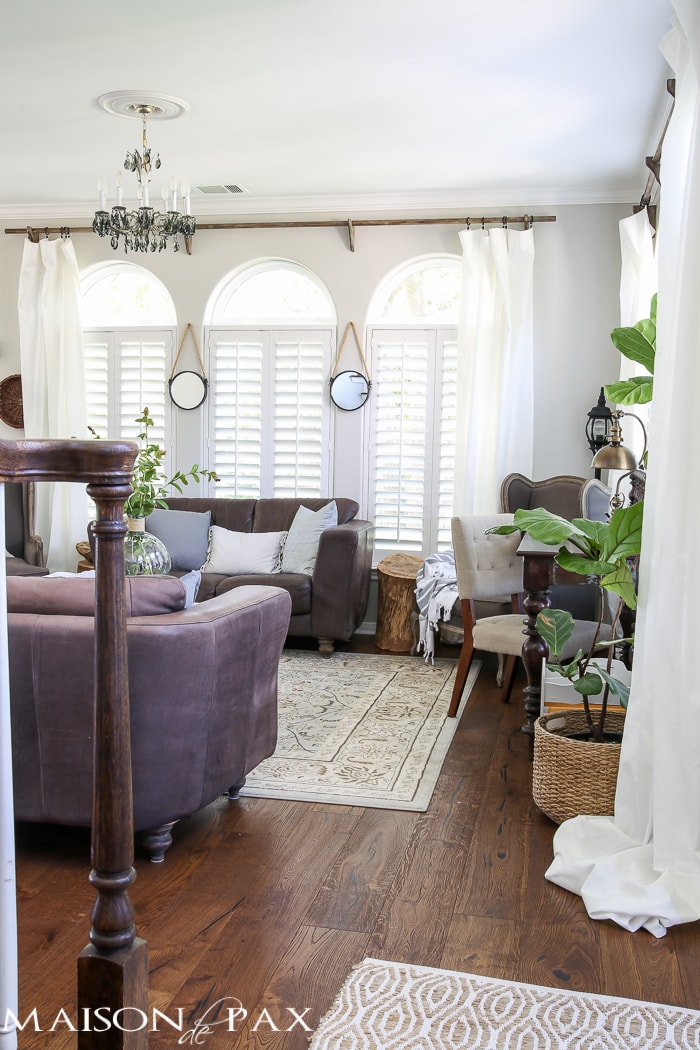
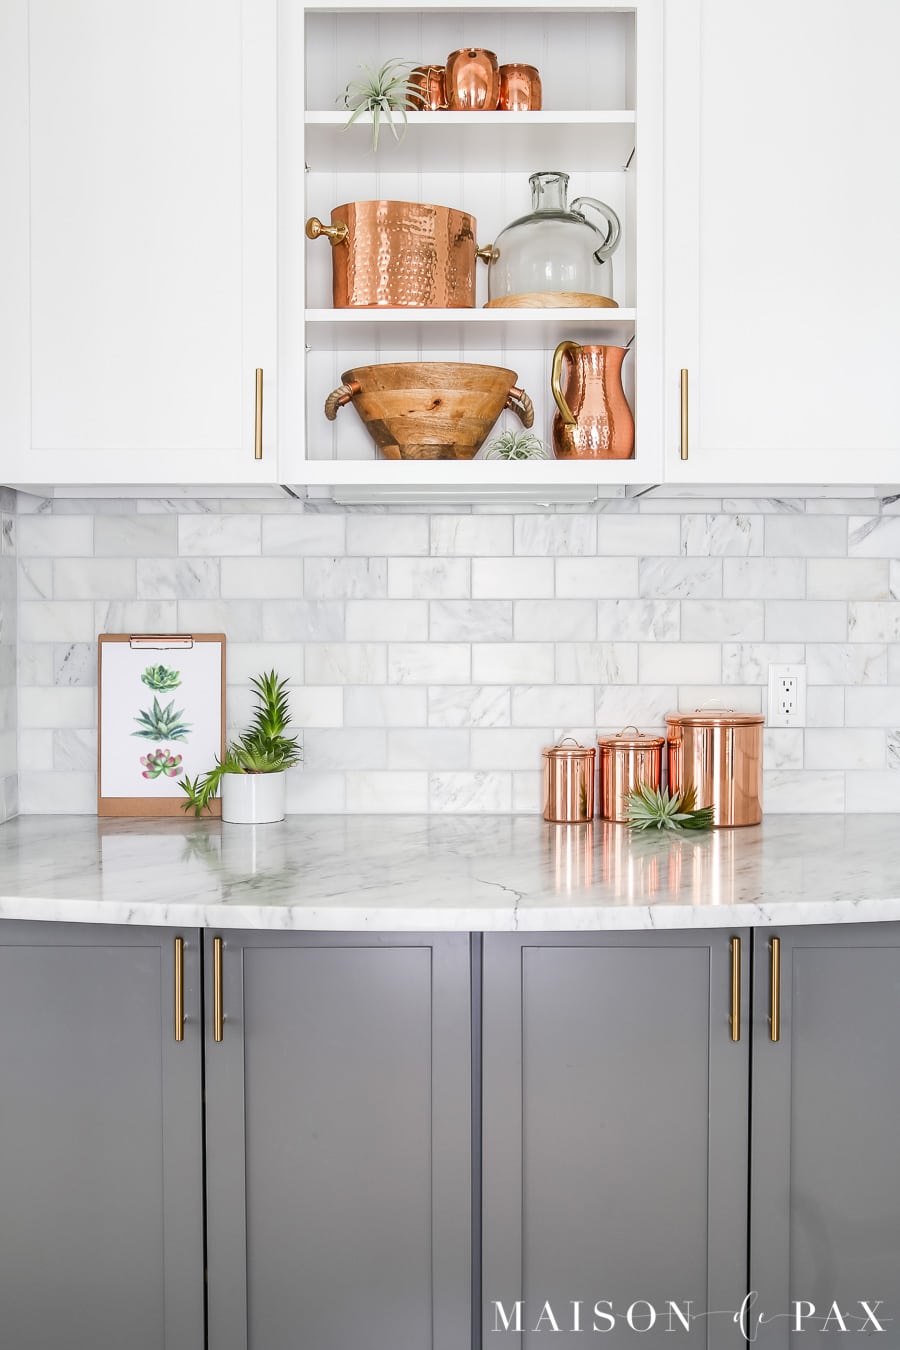
I always say that mixing some splurge items with some more affordable pieces (whatever “splurge” and “affordable” means to you) is the best way to create a beautiful space with long-lasting style. In that vein, we bought these chairs from Restoration Hardware for our living room several years ago (and, by the way, if you make the right finish choices and catch a sale, you can save quite a bit off the list price). I just love the aged look of the “burnt oak” wood, and I wanted to recreate that for my curtain rods.
The key is in the grain of the wood. And, let’s be honest, cheap wood doesn’t have beautiful natural grain… So I made some.
Materials needed to make DIY wood curtain rods:
This post contains affiliate links for your convenience. Click here to read my full disclosure policy.
- 2 (or more) of these wood brackets
- 1 1/4″ wood dowel cut to your desired width (1-2′ wider than your window)
- 1 1/2 to 2″ hole saw
- cordless drill
- medium grit sandpaper
- stainless steel wire brush
- Minwax Special Walnut stain (or this similar option from Home Depot)
- light warm gray chalk paint (I used Annie Sloan Cream and Paris Gray, but other options from local hardware stores are ok, too)
- dark wax (I used Annie Sloan)
- (optional) dowel screws
How to make Restoration Hardware inspired wooden curtain rods:
These instructions include how to make the curtain rod brackets and how to make your own curtain rod.
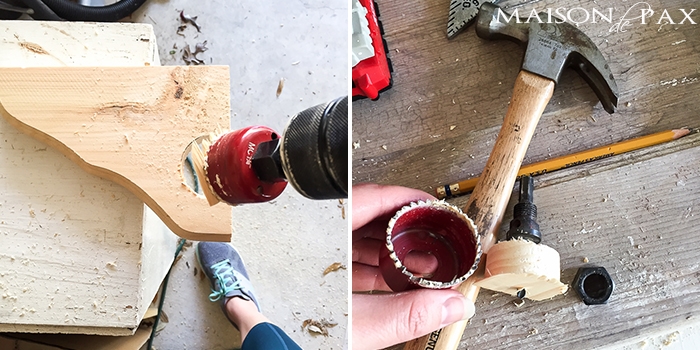
step 1: measure to drill your hole
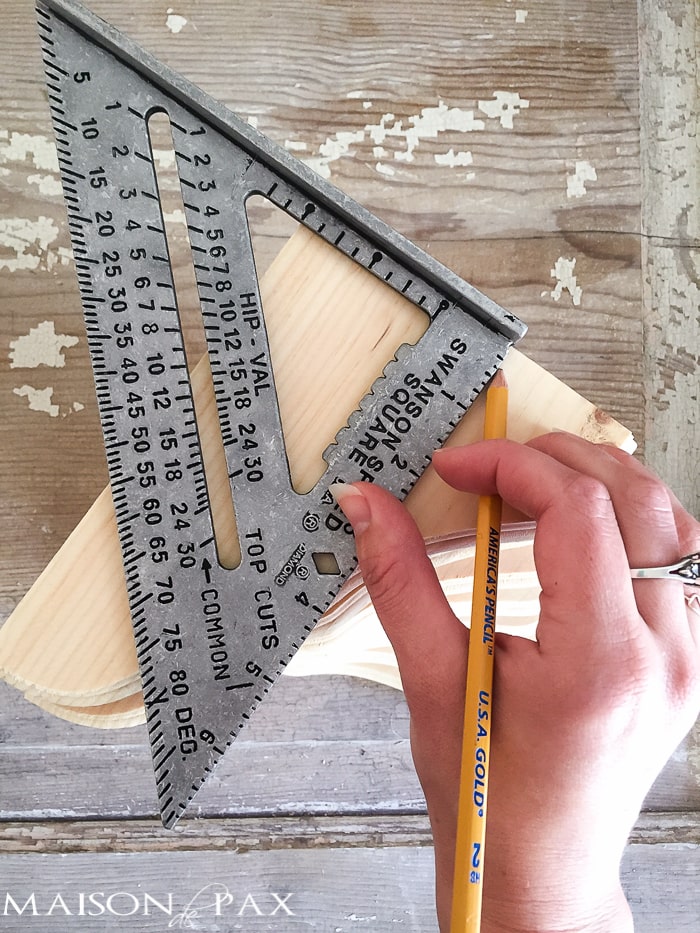
step 2: using your hole saw, cut out a semicircle from each bracket
A hole saw works by first drilling the center drill bit to hold it in place, and then the surrounding blade connects to cut. Therefore, you will drill into the wood just below the edge and actually be cutting slightly more than half a circle, if that makes sense.
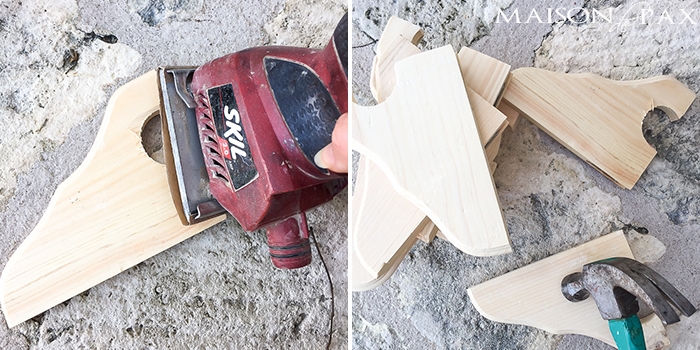
step 3: sand any rough edges from the cut
You can use an electric sander or sand by hand. Just get rid of the major rough edges.
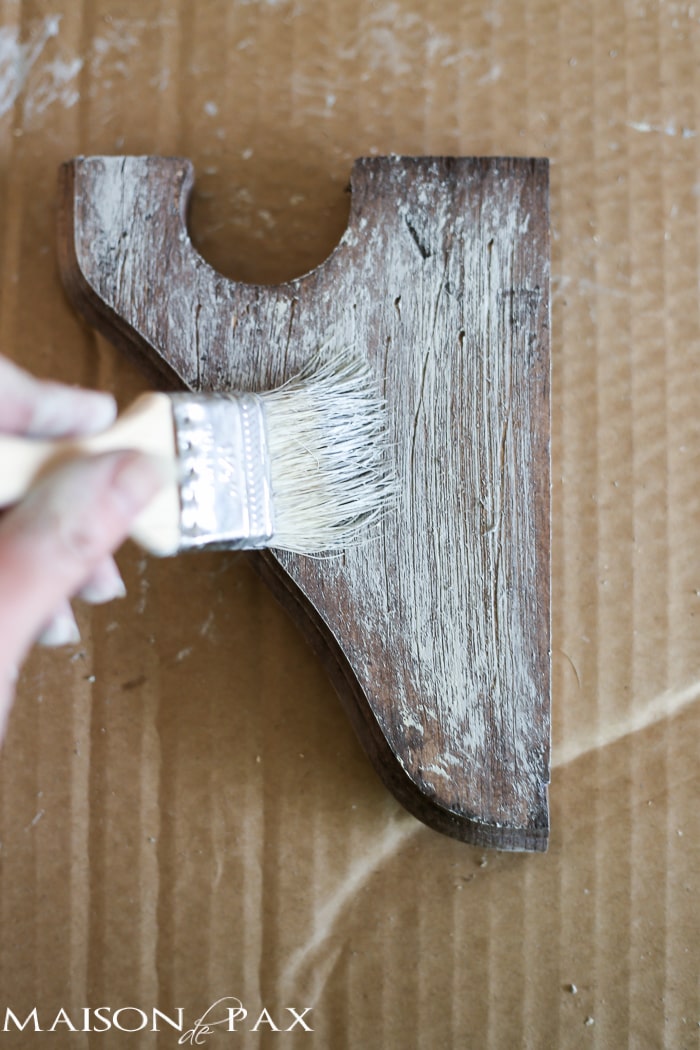
step 4: beat up your brackets
Use a hammer, screwdriver, or any other heavy object to distress your brackets (superficially only! don’t compromise their strength).
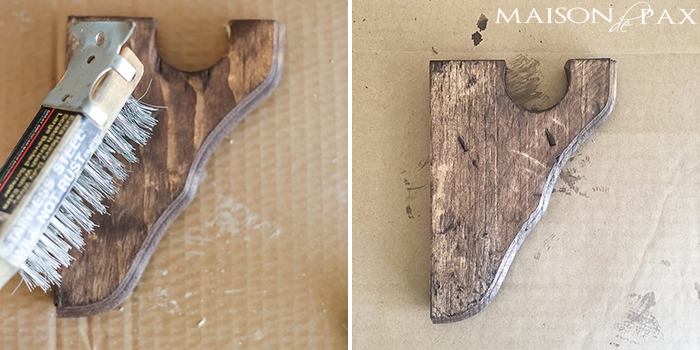
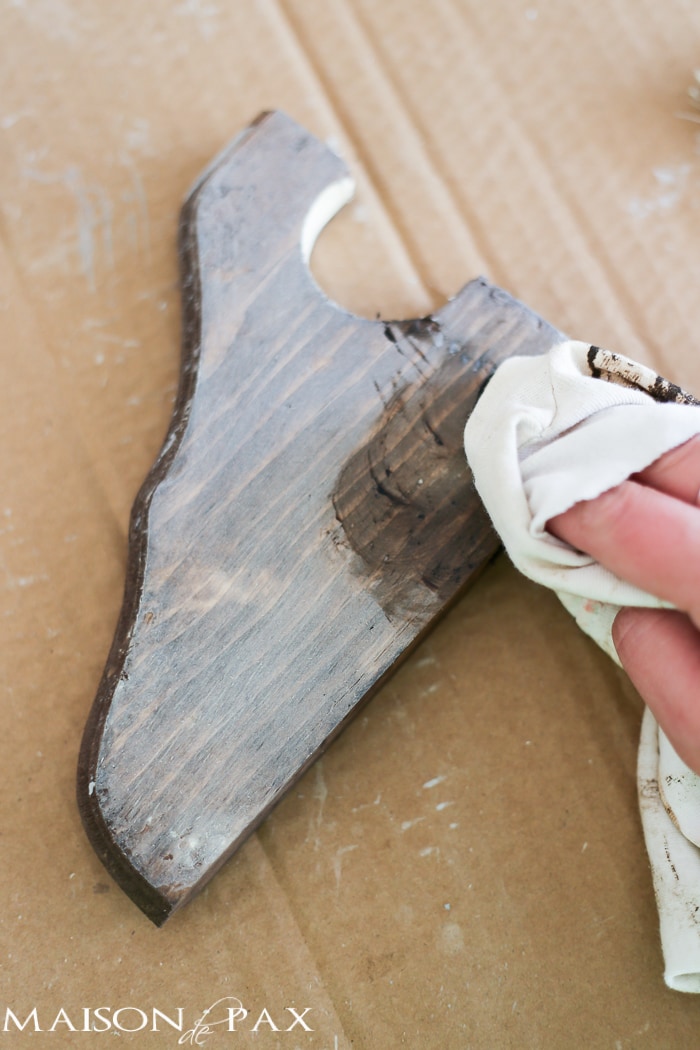
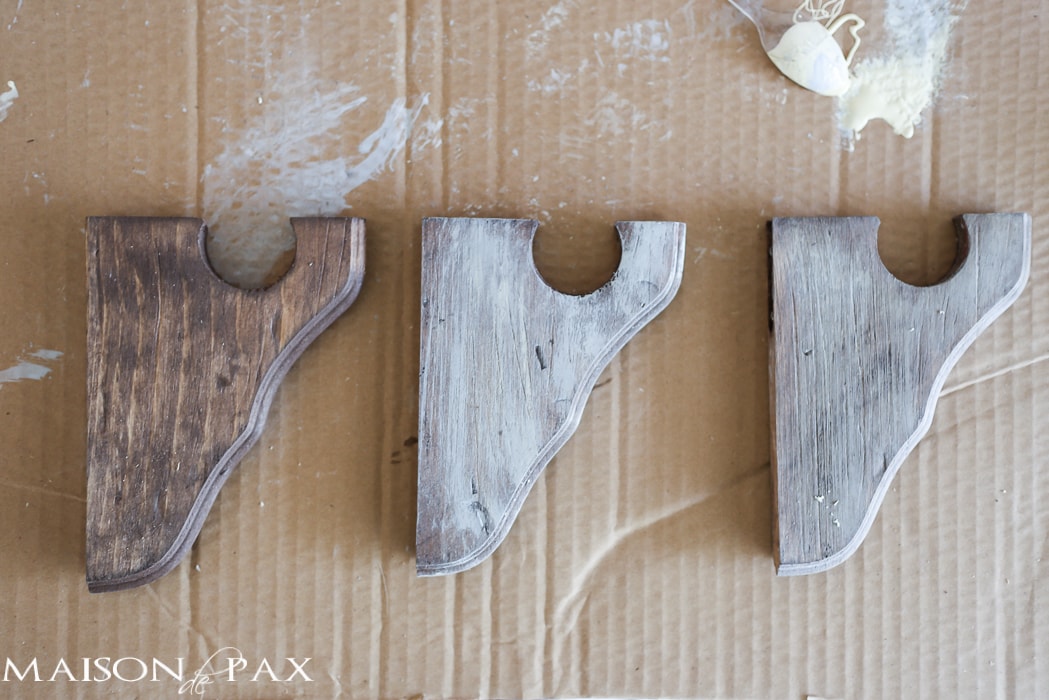
step 5: stain your brackets
Paint or wipe on the Special Walnut stain and wipe off the excess.
step 6: create grain in your brackets using the stainless steel brush
Run the wire brush vigorously up and down on both sides of your bracket. You are essential trying to create wood grain, so some waves are a good idea. However, strong pressure (enough to dig into the wood) is most important. I found it was easiest to make an impression in the wood if it was a little softer, so I did this before the stain was fully dry.
step 7: dry brush using your light warm gray paint
Once the stain is fully dry, take your light gray warm paint (I made mine by mixing two colors together)…
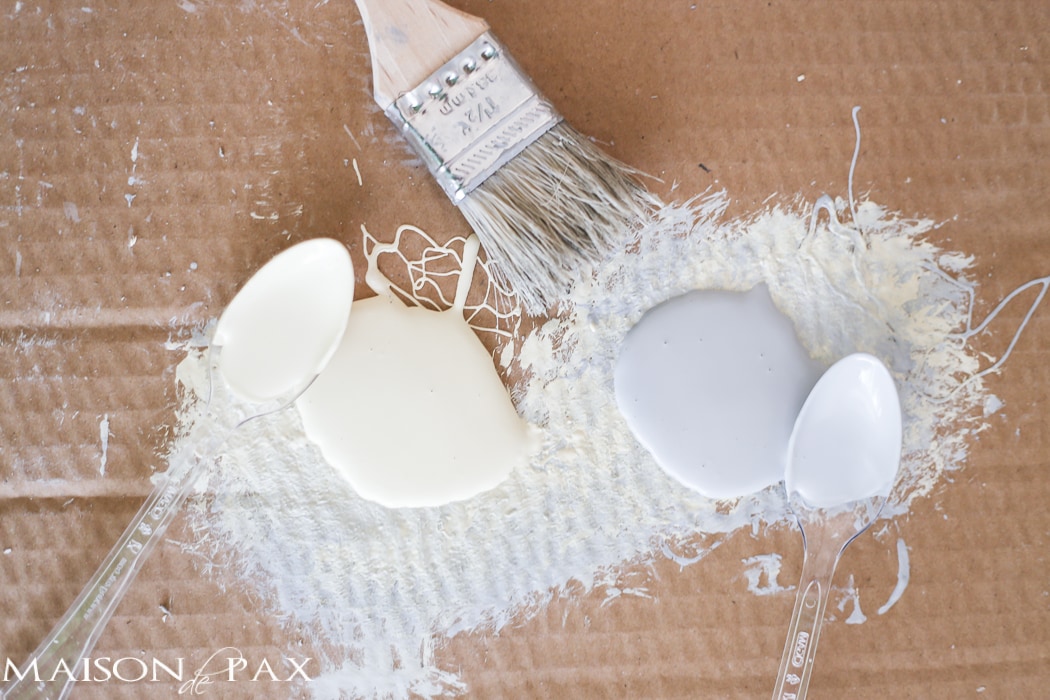
And dry brush a layer on the brackets. To dry brush, just touch a tiny bit of paint to the tips of the ends of your brush and lightly brush the wood. I like to use small, natural bristle brushes for this. See how the paint begins to reveal the distressing and “grain” even more?
step 8: wax liberally with dark wax
This is where your “grain” really appears. When your paint is dry, apply the wax liberally and rub with a cloth until it has the desired look.
Here you can see the progress of the finish: stained, dry brushed, waxed.
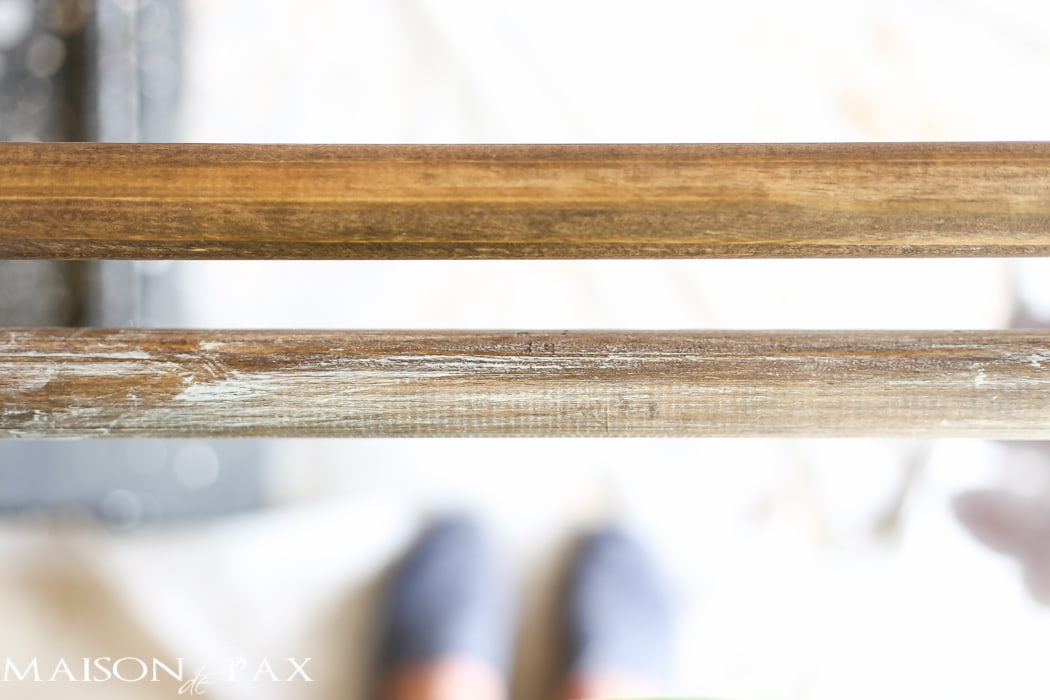
step 9: prepare your poles
Follow the same steps (minus the distressing – I didn’t want to damage my wooden dowel rods): stain, wire brush, dry brush, and wax.
step 10: hang your brackets
step 11 (if your windows are too wide for your dowels): connect dowels using dowel screws
As always, predrill your holes. For the record, you can buy dowels by the foot, but it’s usually more expensive than the precut ones. And if you do need to connect some, be sure you put the seam where a bracket will be. This will both hide any imperfections and support your joint.
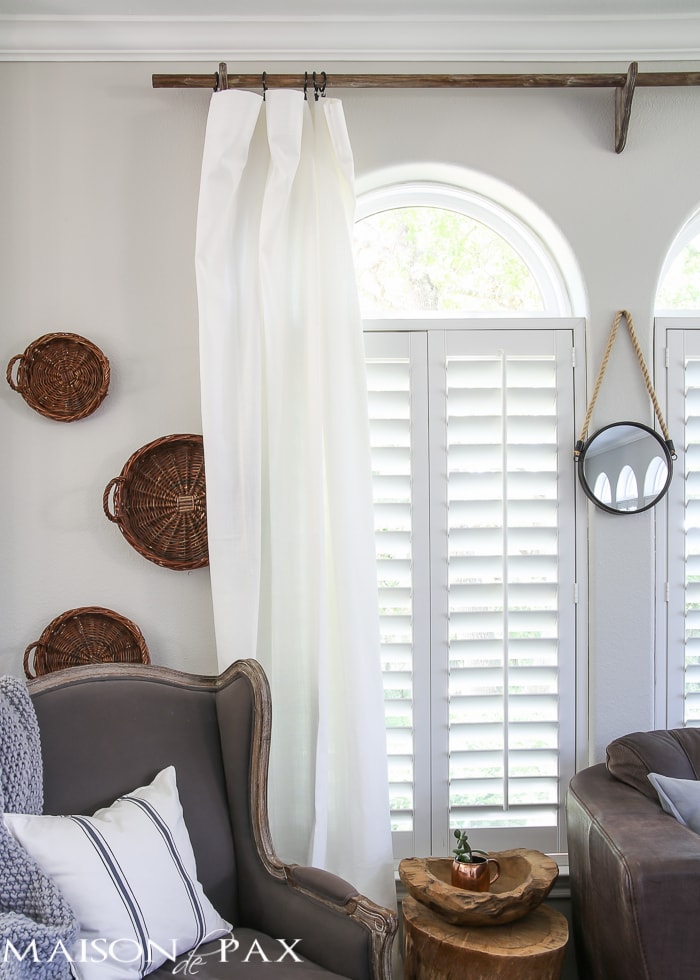
Screw them together to create extra long curtain rods. I chose not to use finials because I’m enjoying simple home decor these days, but you can add finials to the end of your curtain rod for a more formal look.
Hang your drapes and you’re all set!
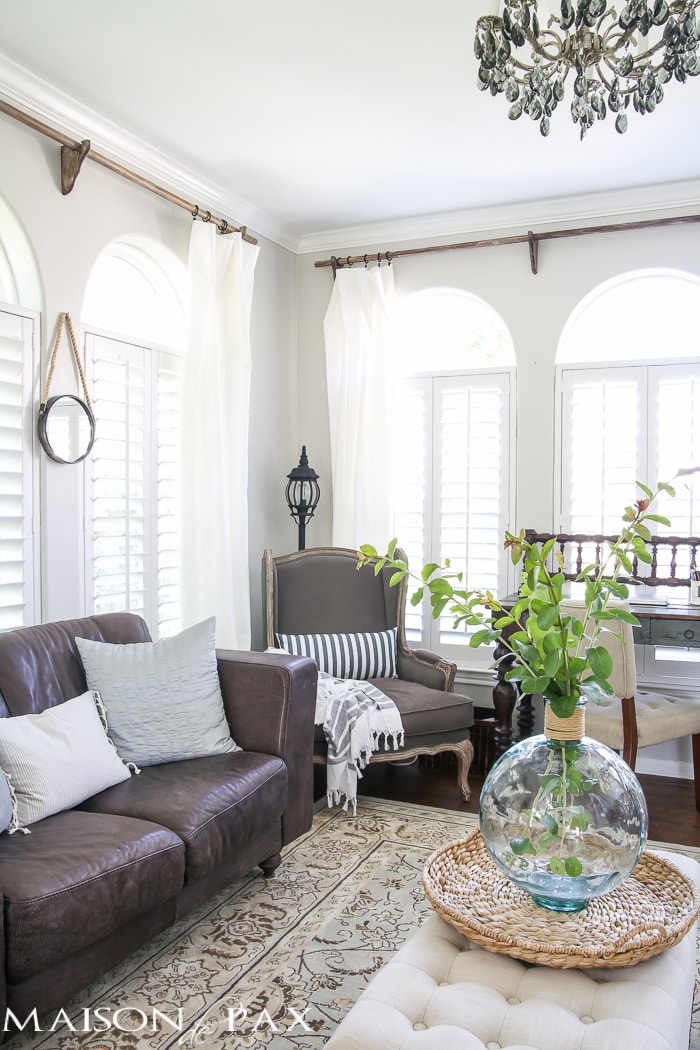
I love that they’re real wood and how the rich tones stand out against the light walls. Even if you didn’t want the Restoration Hardware look, I love how a hole saw can transform affordable wood brackets into curtain holders.
And you could stain or even spray paint with your color of choice. Perfect for your living room, dining room, bedroom, and more. So happy DIYing, friends.


This is the greatest idea since sliced bread! I love the look and will definitely be copying it in my living room soon. Actually, I will also be sharing a post soon about repairing wall damage and reinforcing around curtain rods. Would you mind if I linked back to your post to give you credit for the lovely rod and bracket idea?
You are so sweet, Sarah! I would be happy for you to link back. Thank you!
Hello Rachel
Do you do these online to order? or is it make it yourself? I love this as it is close to the door all others stick out too much.
Thankyou
Linda
I don’t, Linda! They can be DIY’d as mentioned in the blog.
Hi
I don’t have access to open the links on how to make the brackets. Please is there instructions on the brackets them selves.
Thanks
I’m sorry, Linda, but I’m not sure I’m understanding your question. Here is a direct link to the brackets. These wooden brackets already have a receiver on the back for a screw. If you put a screw into a stud on the wall and leave it hanging out just a bit, then you can slide the bracket onto the screw. The brackets do not, however, already have a cut out for the rod, so those instructions are included in the blog post. I hope that helps!
Amazing idea!!! What about the curtain panels? Are those bed sheets!
Hi! The curtains are from Ikea!
I’m looking for an equivalent to the bracket you used as the link now seems to be broken! Any ideas?
I’d love to replicate this look. Such a beautiful DIY! Thanks for sharing!
I’m sorry you’re having trouble; the link is working for me… maybe try this direct link here: https://rstyle.me/+dgRdz2JjLbCCWEKyawq3qA I hope this helps!
GORGEOUS! Love the look. Thanks for the DIY details.
Thank you so much, Kim! xx
I love it! I’m thinking I might try it in my living room. How did you actually attach the brackets to the wall?
Thanks! The brackets have a hole on the back for a screw. I used a large screw drilled into the studs around my windows and hung the brackets accordingly. 🙂
That was my question too…Thanks for the idea.
This idea is lovely! We are in the middle if hanging them ion up and William have to come back to staining shortly…
But we ran into a challenge. Just hanging the brackets from the one screw hole doesn’t seem to be strong enough, especially with rambunctious children around. Any ideas to make the brackets more secure without too much trouble? (Such as something towards the bottom of the brackets). Thanks so much!! ~Anna
The most important thing is that you find a stud in the wall. If you’ve got them installed into a stud, then one long screw should be enough. But if you want to add another contact point, you could consider a saw tooth or some other little hook at the bottom of the bracket. I’m sure there is a way to drill a hole similar to the top one that holds a screw, but I confess I don’t know how to do that other than drilling a hole and carving out some wood above by hand. Hope this helps!
I love your design and I’ve just returned curtain rails that I had purchased 2 days ago so that I can make these, they will be perfect for my linen curtains.
One thing I’d like to know is how or where do you screw the bracket onto the wall, sorry I’m not a carpenter although I wished I was lol. I can’t see any edges to use for the screws and can’t see how it’s done..
Thanks so much and thank you even more for sharing this fabulous post, Debbie
The brackets came with cut outs on the back that fit over a screw head. You can just install a screw into the wall (use a drywall anchor if there is no stud there) and leave it sticking out ~1/4 inch, then the bracket fits right onto it. I hope this helps!
What a great project! I love that finish. Congrats on the honor! You so deserve it.
Nancy
Thank you so much, sweet friend!
I liked so preauty
Great look! What did you use for your curtains??
Believe it or not, Ikea! I share about my favorite curtains here: https://www.maisondepax.com/classy-yet-affordable-white-curtains/
Where are the brown chairs from? I LOVE THEM!
Do you mean the wing back chairs? They are restoration hardware. Hope this helps!
What color are your walls please?
Agreeable Gray by Sherwin Williams. Hope this helps!
Where are you curtains from? Beautiful room! Thanks for the inspiration!
All the details here. Hope this helps!
I’m curious if using oak dowel would also be a cost effective option. And I think it would be fun to cut brackets out of some oak so that the grain is already there. Looks like a great project and one that I will take on myself with a few tweaks:) Thanks for sharing.
Great question, Debora! I have not priced oak in our area that would work for this project, but it would probably still be cheaper than the RH version. I hope you enjoy yours however you make them!
Hi! I can’t quite tell how you hung the curtains to the rod. Are those regular metal clip rings? Thanks. Great project idea!
Yep! Regular old ring clips. 🙂 I think they are 2″. So glad you like the project!
Hey Rachel! I’m so glad you posted this and the steps to accomplish this look. I’m definitely going to be doing it as I already have most of the material! I was wondering if you could share the paint color for your walls? I’ve been struggling to find the right neutral and I really like yours! Thank you!!!
Beth
I’m so glad you like the project! The wall color is Agreeable Gray by Sherwin Williams. You can get more sources from my home here if that’s helpful. 🙂
Great idea! I made these today, they are amazing. Funny enough, I used the same wooden brackets for dining room shelves 😄 thanks for sharing the idea!
I’m so glad to hear it, Tabatha! And yes, they are great as actual brackets, too, aren’t they?
Thank you for your idea! I saw a similar bracket in old cottedges. I’d like make these brackets in my living room)l hope my husband will make these…
You are so welcome, Agatha! I’m so glad you like it. 🙂
Where can you buy these wood brackets?
I bought mine at Home Depot. Click on the link in the list of materials for the exact ones I purchased!
How did you hang the brackets on the wall? I’m very new to doing things and I can’t quite see how you did it.
There is actually a hole on the back of these brackets made to hang on a screw. I simply put the screw into the studs surrounding the window (if you don’t have studs where you want to hang them, you’ll need to use a plastic wall anchor) and then hang the bracket on the screw. So easy! 🙂
I just bought everything that I need to give this a go. It’s so beautiful – – I am hoping this won’t be somewhere on the list of epic Pinterest fails….. Wish me luck!
Good luck, Bethany!! I hope you love them as much as I do. 🙂
Rachel!!! These are amazing and I need them! I have looked every where to try and find some to buy, any ideas? I’m in England 🙂 Thank you Nikki x
I’m so sorry, Nikki, but I have no idea where you could buy these in England. 🙁 I admit that I’m pretty spoiled having a Home Depot so close to home here. I’m so glad you like it, though, and I hope you can find something similar to use over there!
Great idea, my wife loves the look. However I think I’d paint 1st, sand, then stain in that order to get more grain to pop on the shelf bracket/rod holder. Just a personal preference, thanks for sharing!
So glad you like the project, Chuck! And I love your idea… There are so many fun ways to create that look of grain!
Hi Check, I love your idea of painting also, and I know it’s really personal preference however, what color would you suggest to match h with this look here? Thank you!
Beautiful job and thank you for sharing such a wonderful and affordable idea.
Thank you so much, Tammie! So glad you like it. 🙂
So pretty. How do you stop the dowels from sliding around when you move the curtains? Or is this not a problem.
Thank you, Janis! I actually haven’t had any problems with that. The rod is fairly heavy because it is so long, and it fits more snugly in the brackets than the rings fit on the pole. Make sure your rings are larger than your rod, and I don’t think you’ll have trouble. 🙂
Rachel, where did you get your rings from?
I picked mine up at IKEA years ago, but they’re just black plastic 1.5″ rings with clips. I hope this helps!
I love this idea! Check out my DIY curtain rod and let me know what you think! (I’m just starting out and would appreciate feedback)
http://www.whystayoneminded.com/diy-rustic-curtain-rod/
LOVING this look! 😍 Brilliant! Any suggestions on how this could work for a bay window???
Thank you, Jessica! It would be trickier with a bay window; you would need to join the rods at the same angle as the window and use a bracket/brace at each corner. It is do-able, but it will take carful measuring of those angles!
I want to make this for my sliding glass door. Do you think it would work?
As long as you have enough space above the door for clearance, I think it would work great! You’ll probably want to extend the rods beyond the door on the sides so that you can push the curtains clear of the doors when you have them open. Good luck!
Hi -came across your page on pinterest – love the look of these. Only question is – how do you get your curtain across to the middle window (past the brackets)? I have a wide 3 window arrangement similar and trying to figure out how to support the pole over such a distance but not stop the curtain sliding across…
thanks!
Good question! Since the brackets are open at the top, you can always lift the bar up to slide rings past the brackets. Truth is, I could have just done one bracket in the middle (which would have solved the problem), but I don’t really close the curtains much anyway because we have shutters, so I opted for the more balanced look of brackets between the windows. I hope this helps!
What are the measurements on marking the hole? I figured I should ask before I messed up!
I believe I centered the drill 3 inches from the part that will be against wall and just a touch below the top (you can see it in the image with the speed square and pencil). But it shouldn’t make too much of a difference as long as each one is the same. Hope this helps!
Thank you! I’m gathering my supplies now and can’t wait to start 🙂
My husband and I made these this weekend and they turned out so well. Thank you so much for sharing something so affordable and beautiful!
I am so glad to hear that! Thanks for sharing!
Just finished my rods and they look fab – can’t wait to hang them! Wondering where you got your mirrors hanging between the windows? Would totally love to copy that idea…
Wonderful! I am so glad they turned out well for you. You can find the mirrors here (affiliate link): https://paintedfoxhome.com/product/sea-breeze/?ref=102
When using the Annie Sloan chalk paint & dark wax do you think the 4 oz will be enough for two rods measuring 113″ each?
You might get buy with that little, especially if you prefer more woodgrain. You can thin it out a bit with water if that is helpful to make it stretch. You can even mix a bit of latex paint in the chalk paint.
I had been saving this pin for over a year waiting to do this in our new home. We finished our living room this weekend and we are in LOVE with it! We did keep it a little simple for our new to the DIY world selves and only stained and then hung, but they still look great. Thank you so much for this idea!!
I am so glad it was a design success for you!
So, I bought these brackets and put in my hole.. Mounted onto the wall but they spin :\ I have no idea how to fix it so they dont twist, since theres only one keyhole at the top…
Not sure what to do, but this wont work :\
It’s true the brackets have only one hole, but once the curtain rod is in place I’ve never had trouble with them spinning. Mine are so close to the ceiling that they don’t get bumped or moved once I set them straight. I hope you find the same is true for you! If not, you could always add a 3M strip below the one hole to act as a second place to secure.
ya mine twist 🙁 and how simple and obvious a solution! I use 3M stuff all over, and I have been racking my brain (and grumbling how I hadnt gotten a response online for help lol) and didnt even think of that!
Thank you! I havent cut my dowel or stained anything yet (finished building our kitchen table, and a ladder towel rack), and since theres a solution in mind I’ll finish this project up hopefully this weekend!
Thank you for replying with such a simple yet obviously useable solution lol
Lol. Sorry for the slow reply. I had a baby 8 weeks ago and I’m playing a lot of catch up these days.
You might also try tightening the screw it’s hanging on. It can be tricky to get the exact right depth, but if you can get the bracket to slide on really tightly, it might keep it from twisting and save you money on the 3M strips. 😉 Good luck!
I absolutely love this idea! We have a lot of windows in our house that need window treatments and I haven’t touched them because I’ve been a little panicked by the overall cost of curtain rods. This is a wonderful, affordable, and gorgeous alternative that goes really well with our overall design aesthetic! Will definitely be trying this soon!
Thank you so much Kristin!
I’m a little late to the party as I see this was posted last year. But we are in the process of making these for our new home- 1896 farmhouse. I do have a question: Are the wood curtain holders the smaller 6×8 ones? I see Home Depot has two sizes. Thank you very much and congratulations on the new little one. I find your blog to be amazing, I don’t know how you have time to make all this beauty!
You are so kind, thank you! And yes, they are approximately 6×8. 🙂
Beautiful look, sadly I was unable to replicate this look, like didn’t even come close and I followed each step
Love this DIY! Just have a question, how did you fasten the brackets to the wall?
There is a hole on the back of the bracket. You can simply put a screw into the wall (make sure you hit a stud and if not, use an anchor) and leave it sticking out about 1/4″. The bracket simply slides onto the screw. I hope this helps!
Do you have a photo of the holes on the back of the bracket? Thanks
I’m sorry, I don’t. But it’s basically smooth wood on the bottom 4/5 or so, and then there is an indentation with a little metal receiver to hold the head of a nail or screw. It’s the type of receiver that has a larger opening at the bottom and a narrower opening at the top… where you leave the nail or screw head sticking out of the wall ~1/4″ and then slide the receiver over it and down to secure in place. I hope this helps!
Hi! I was wondering if you had any tips on how to make the ends of the rod a little “dressier” and not just a bare end if this makes sense?! My husband and I are talking about tackling this!
Great question! I actually made some similar wooden curtain poles (though I finished them slightly differently) several years ago and used some wooden finials to finish them. You can see that project here. Check your local hardware store; they should have something similar! 🙂
I need to pull my curtains opened and closed. How is the dowel secured in the bracket so that when curtains are pulled dowel stays in place? Thanks.
The dowel is not actually secured, but I open and close my curtains frequently without any trouble. The weight of the long wooden dowel and the fact that the curtain holders are not tight on the curtains works for me. If you are having trouble, though, you could always use a 3M strip in the semicircle that you cut for the dowel. I hope this helps!
Love this so much! Thank you for posting an easy to follow, great idea! I can not wait to craft these!
I am so glad, Carmela! Thanks for stopping by!
How many 72” dowels did you use for your windows and did you connect them?? Our windows we are needing these for are 76” across. So we would have to use the 8ft dowel.
I actually can’t remember exactly, but I am pretty sure I used one connection for each long section. It’s important to put the seams where a brace would be, so I believe I have one long piece (2/3 of my window) and then a seam at the bracket and then a short piece (1/3 of the window). Our windows are almost 12′ wide. If you can find an 8′ dowel, go for it! If not, you’ll need to be sure to line up the seam with a bracket. Hope this helps!
Rachel, please help us out and tell us how you were able to connect the dowels together using dowel screws. Specifically, I am referring to the task of drilling the hole for the dowel screw perfectly down the center of the dowel, perfectly in line with the dowel so that, when screwed together, the dowels line up perfectly. I have attempted this multiple times without success. I have looked up many techniques from experienced woodworkers online and on youtube, all of whom recommend the use of a drill press or an intricate doweling jig for this specific purpose. Maybe you have a trick that I haven’t found yet? your blog post does not give detailed instructions with respect to this point. It just says to join dowels using dowel screws. Please provide any detail you can to help us complete this project. Thank you. -Mark
Hi Mark, I’m so sorry to hear you’re having trouble! We simply used a vice to hold the rod and eyeballed drilling down the center. It didn’t line up perfectly, but for stability we aligned the joint at a bracket anyway (which I would absolutely recommend), so I wasn’t worried about it not being perfect because you can’t see it at all (the bracket covers it completely). I hope this helps!
How do you connect the brackets to the wall?
The brackets have a hole for a screw. Be sure to screw into something secure (either find a stud or use a strong sheetrock anchor) and leave the screw out 1/4″ or so. The bracket should slide onto the screw and down a bit to secure in place. Hope this helps!
What is the 3M you are referring to to help keep from slipping?
Just something like these. 🙂
Hi! Could you please explain how the brackets are fixed to the wall? thank you!
The brackets come with a hole on the back meant to be mounted on a screw head. I just put screws (into studs) and left approximately 1/4 inch of the screw sticking out from the wall to hang the bracket on. Does that make sense? I hope this helps!
Hi!!!
I just completed mine and totally in love but I bought some of the curtain rod rings from Walmart and they do not fit on the dowel’s 🙁 Could you tell me what rings you used?
I’m so glad you like them! I think I got mine from IKEA, but that was several years ago, so I’m not sure if they still carry them. It depends on the size of your dowel, of course, but if you used a 1.25″ dowel like I did, then these curtain clips (affiliate link) should work. Hope this helps!
I’ve never worked with the dark wax before. What kind of residue does this leave? Does it stay slightly tacky at all?
The dark wax will eventually cure to a hard finish. You don’t want to leave too much excess though.
How is the wood dowel holding up? Is it dipping at all in the middle? I’m just curious what the longevity of the dowel would be with the weight of the curtains. Thanks for the amazing post!
Thank you so much! The wooden dowels haven’t shown any signs of bending yet. I did make sure to put seams at the brackets, of course, to provide extra support… but the wooden dowels seems to be holding up perfectly. Hope this helps!
Love this idea! How you suggest connecting the wood dowels?
I’m so glad you like it! You can connect dowels using something called dowel screws (linked in the post) that basically have two sharp ends. Be sure to line up the seam where you have a bracket, though, both to cover up any misalignment between the two dowels and the provide extra support for the joint. I hope this helps!
These are amazing!! I already finished staining, painting and applying the dark wax but forgot to apply polyurethane after I stained everything. Do I need to add the polyurethane or can I do without it?
No need to polyurethane! They aren’t getting any wear way up there on the wall, so wax is a perfect sealant. Hope this helps!
I can’t fine Annie Sloan paint or wax near me. If I use a different brand, do you think they will still come out looking like yours? I love the color of yours!
Hmmm… You could definitely achieve the same look with different brands of paint, but it may be tough to get it exact. The nice thing about layering the two colors (a cooler gray and a warmer white) is that you can add more or less of each to try to find a balance that you like. You might experiment on some scrap wood to start, though, until you get a look you like. I hope this helps!
Perfect perfect perfect! And just in time for my new apartment
I was lost moving to Europe and having no stores like RH to buy from
Thank you so much for this idea!
I’m so glad it inspired you, Mary!
Hi. Can you tell me what curtains are similar to the Ritva Ikea curtains and how far the curtain rods should be hung up above the window moulding and how many inches on either side?
Thanks!
I’m afraid I don’t understand your question about the curtains, but I’m happy to weigh in regarding where to hang curtain rods. I think hanging them about 6 inches below the ceiling is a great way to make your windows feel bigger, and I like to hang them at least 6-10″ outside of the windows so that there’s plenty of space for the curtains to be open and not blocking the light from the windows. However, if the length of your curtains or the placement of walls or furniture limits you in any way, you can be flexible! I would try to hang them at least 6″ above and outside the window if you can. Hope this helps!
love this idea! do the rods stay on place when opening and closing the curtains?
Thank you! Mine definitely stay put, especially because the rods are so long (and fairly heavy as a result) and the curtain rings are easy to slide. If you use the channel on fabric curtains, it may be harder to open and close the curtains without pulling the rod with it.
How did you stain and paint the poles? Did you have them laying down or standing up.
Just not sure how to best stain/paint them.
Thanks!
If you can suspend them vertically, that will help so much! If you have to do them on the ground, you can always put the most ‘aesthetically’ pleasing part face forward.
THANK YOU for publishing this tutorial. I’ve had this link saved for a couple of years, and this weekend I’ve finally found the time to do this. If I had know how quick this project was, I would have tackled it sooner! I wish I were able to post a picture – I followed your tutorial and my brackets and rods look PHENOMENAL! I’m taking a short break after buffing the wax before I shift gears to installing… I’m excited for the final result. Thanks again, from the bottom of my heart. I love your style and wish I had 1/10 of your talent!
Angie, I am so glad to hear your DIY turned out great! Thanks for following me. 😉
What a great idea! And I love how you answered all these questions.
I’d like to adapt this idea to use for a pot rack, i.e. S-hooks hanging from the curtain rod and pots hanging from the S-hooks. Any advice in terms of dimensions for best weight handling?
I love your idea! I’m afraid I don’t know for sure as I’ve only used the dowels for curtains, but you could definitely use a thicker dowel (I think you can find 1.25″ at most big box stores) and you could always add additional brackets if it starts to sag. I hope this helps!
I would recommend a different bracket for hanging pots – there is only one plate on the back, for one screw. This means the lower end of the bracket is free to rotate easily. This isn’t a problem for a curtain rod, but I could see it being an issue when hanging and removing heavy pots and pans. You may also want to secure the rod onto the bracket with a screw so that the rod doesn’t shift left-to-right on the bracket.
Great point, Angela! It’s true that these brackets have only one receiver for a screw. If these are really the ones you want, though, you could drill a new one or use a command strip vertically below the receiver to hold them in place. It would only need to keep the bracket from sliding, not actually support the weight of the rack. The long verticals of these brackets actually provide good leverage against the single screw bracket for support. Just be sure you secure the brackets into a stud! 🙂
Hi Rachel! I just want to tell you how much i enjoy your furniture makeovers. You really think outside of the box. I need to get out of my box. This was brilliant! Thank you.
Thank you, Cheryl! I’m glad you love them. 🙂
I am so excited right now after reading this! Thank you!
Of course! I hope you love them!
I love this idea!! Where did you get your curtains?
Hi Robin, The curtains are from Ikea! I share about my favorite curtains here: https://www.maisondepax.com/classy-yet-affordable-white-curtains/
My daughter wanted these for her new house. Christmas present😁. You were spot on with directions and where to find items needed. They turned out amazing. I actually burnt some of the wood using a torch to help distress them even more. Also used the drop cloth bleached curtains . Amazing finished project. Thx for the tip🤣🤣
Perfect! I am so glad you made them and found the perfect gift for her, Mary!
This is one of my favorite DIYs ever! I’ve done this for every single window in my house! 😄
I’m so glad you love it, Amanda!
What size bracket did you use? 6×8 or 10×12? I will be working on this project this weekend! Can’t wait thank you for posting this project, it’s exactly what I’ve been wanting for my living room.
I’m so glad you like it, Terri! I used the 6×8 brackets. Best of luck this weekend!
Love this tutorial. However, the only dark wax I could find near me was behr. It came out a bit muddy and green looking. I did apply a clear wax layer first so it wouldn’t stain too much, not sure if I let it sit long enough. How are you getting yours to look like they did? In the photo, where you did the stages, the last corbel looks nothing like the ones with the curtains. What did you do after you waxed it? Thanks so much.
Waxing truly was the last step, though I may have layered on more dark wax in some of the distressed areas to bring out the distressing… I can see how the image with the stages is a little misleading; it was taken in my garage with sunlight streaming in, making the waxed one look much lighter than it probably was in reality. I was trying to show the “grain” of the wood more than the color in that image. Also, each corbel ends up looking pretty unique – some have more distressing, some more “grain,” some are more brown, and some are more gray. I like the variety; it’s a part of real wood. You may want to try some more dark wax, especially in the distressed areas. I hope this helps!
#10 states “Hang the brackets.” How? What did you use to attach the bracket to the wall? I have a full set of drapes that I want to hang and I like the idea of creating the rods, but do not have any of the power tools nor do I feel safe to use them. I do know I could find some corbels or brackets and the wood rods. I can probably check with the local schools to see if they have a woodworking program that could use a project. But my curiosity is dumbfounded by the magic of how those brackets are attached to the wall. Please let me know. Thank you!
The brackets have little built in nail or screw head holders on the back. I don’t have a picture of it, but when a nail or screw is installed securely into the wall with ~1/4″ sticking out (preferably into a stud or at least a plastic anchor if there is no stud there), then the bracket will slide right on. I hope this helps!
Thanks, that answers the puzzle. I am moving and have drapes that I want to use, but I don’t want the rod to run all the way across the length, when I am only hanging them on either end of the window. I like the idea of the corbels and rods and I think I can make that work.
Great! So glad that helped. 🙂
Hi! I have a room where I have to windows adjacent to each other on a corner wall in our bedroom about 34” high. I need the beautiful curtain rods and curtains on my previous house, but now I was wondering if I could do the same thing but on a corner of the bedroom. I can definitely send you a picture if it would help. 🙂
I love these curtain rod DIY and can’t wait to get started! My gray ability is not up to par (I go too dark when choosing a gray) and your link says, “No Product Found”. Do you by any chance have another suggestion? Thank you for sharing your talents!
I used Annie Sloan’s Cream and Paris Gray paint colors, but I bet Google would offer some dupe colors for both of those to use. You only need a small can for this project.
I have 15 foot of connected windows that I would like to cover with curtains. Will this rod idea be strong enough for that large of a space? In order to open and close I could only have one middle support bracket. ??? Love the look!
I can’t really answer that, but it’s worth a try! If you feel like it’s not strong enough for the span, then you can try a different option.