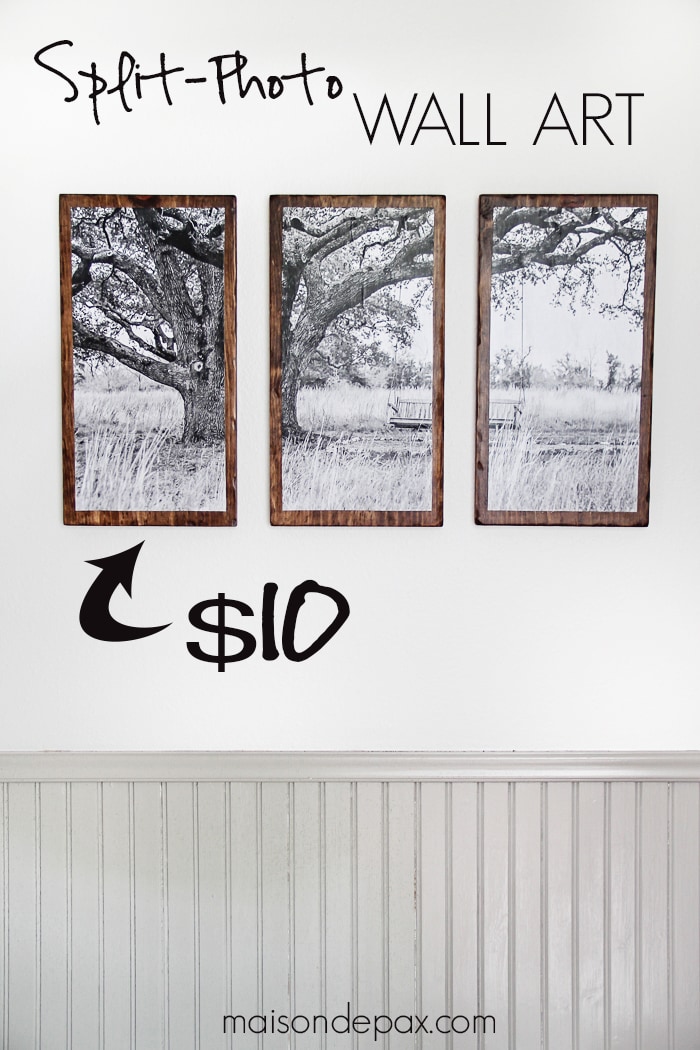
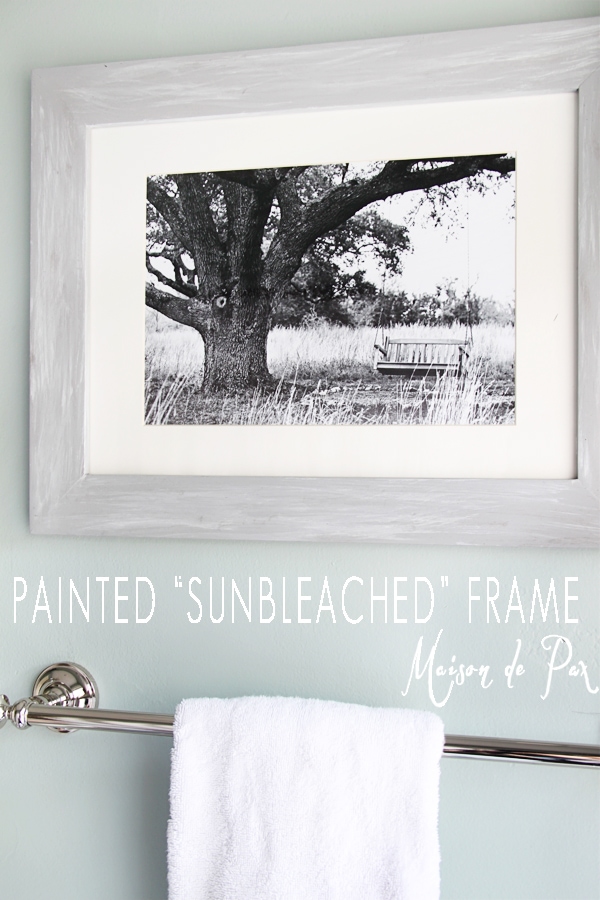
Split Photo Wall Art (DIY Triptych)
Need some affordable wall art? This tutorial will teach you how to make a DIY triptych: gorgeous, split photo wall art for any space!
________________
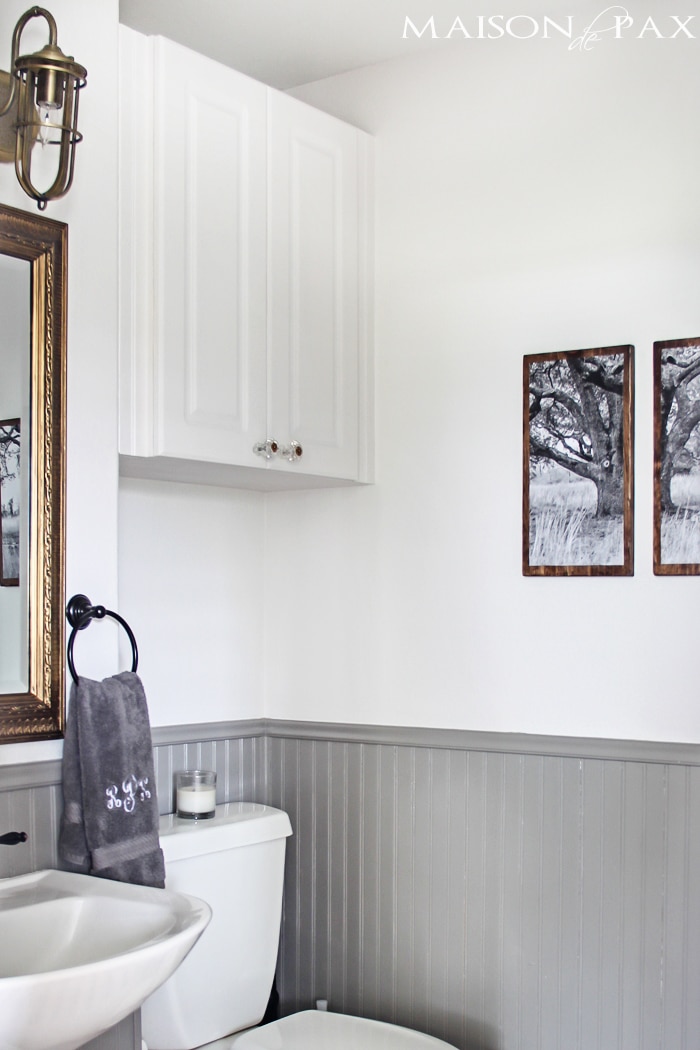
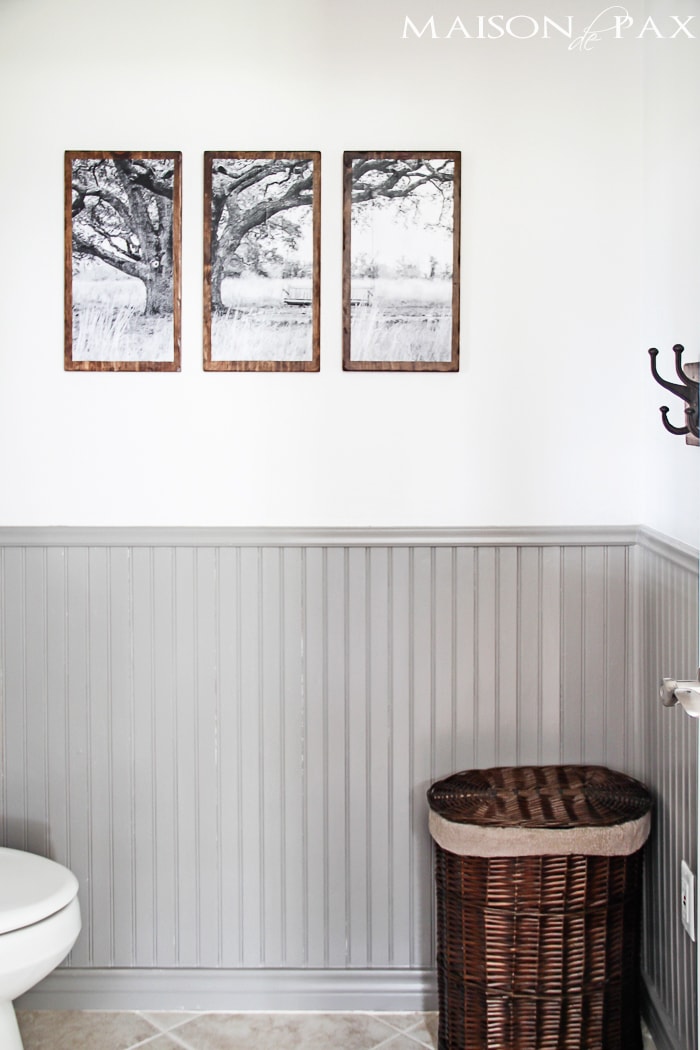
Remember the half bath we started months ago? I got a little distracted, I confess… Part of my problem was that the bathroom was coming together beautifully – a bit too elegantly, though, for the feel I wanted in the whole house. The gilded mirror and the crystal knobs were gorgeous, but they needed a complement that incorporated the warm oak floors and the more rustic touches of my style.
So I waited until inspiration struck…
And I waited some more.
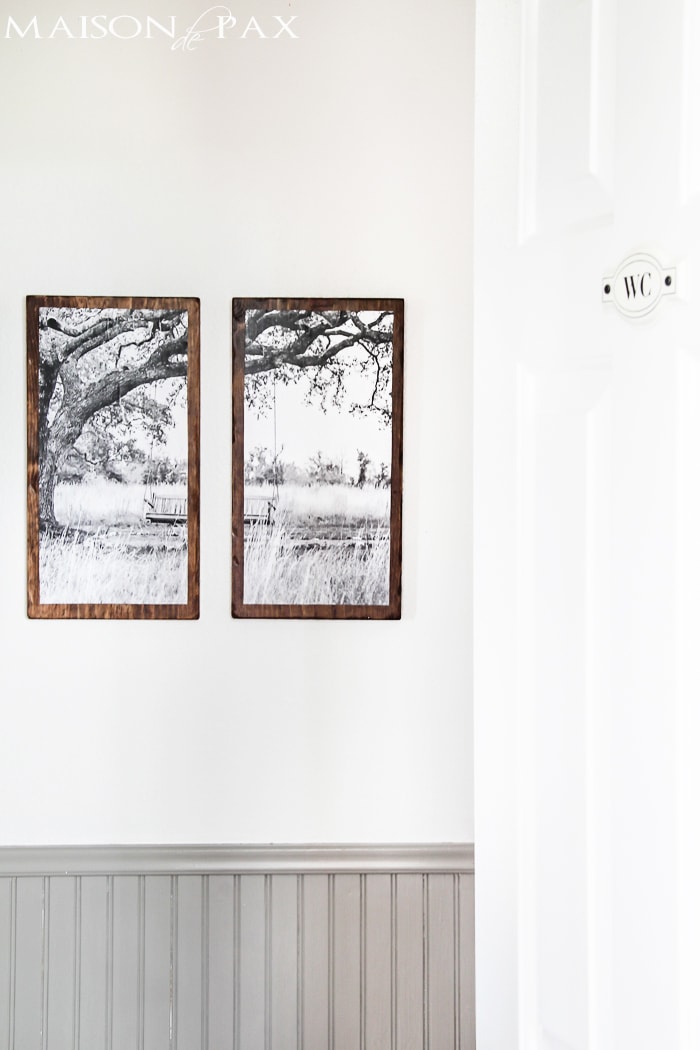
And finally it came to me: artwork (black and white photography, in this case) decoupaged onto wood stained to match our wide plank rustic floors. But, because simple doesn’t have to mean boring, I decided to split it into three pieces.
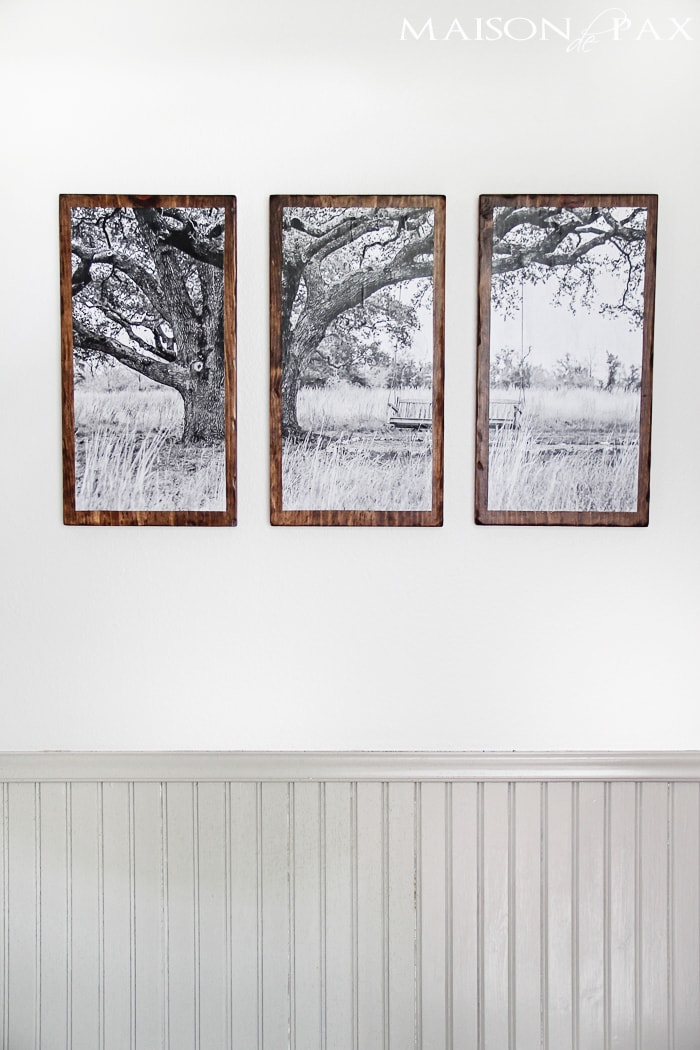
It’s just the rustic element the half bath needed.
And it was SO affordable. Here’s what you need to make one:
- 18×24″ engineer print of your photo of choice (I got mine from Staples for $2)
- scissors and ruler
- 6ft 1×10 piece of wood
- saw (or have your local hardware store cut it for you)
- stain of your choice (I used a mixture of Dark Walnut and Special Walnut)
- Modge Podge
- saw tooth hangers
And here’s how:
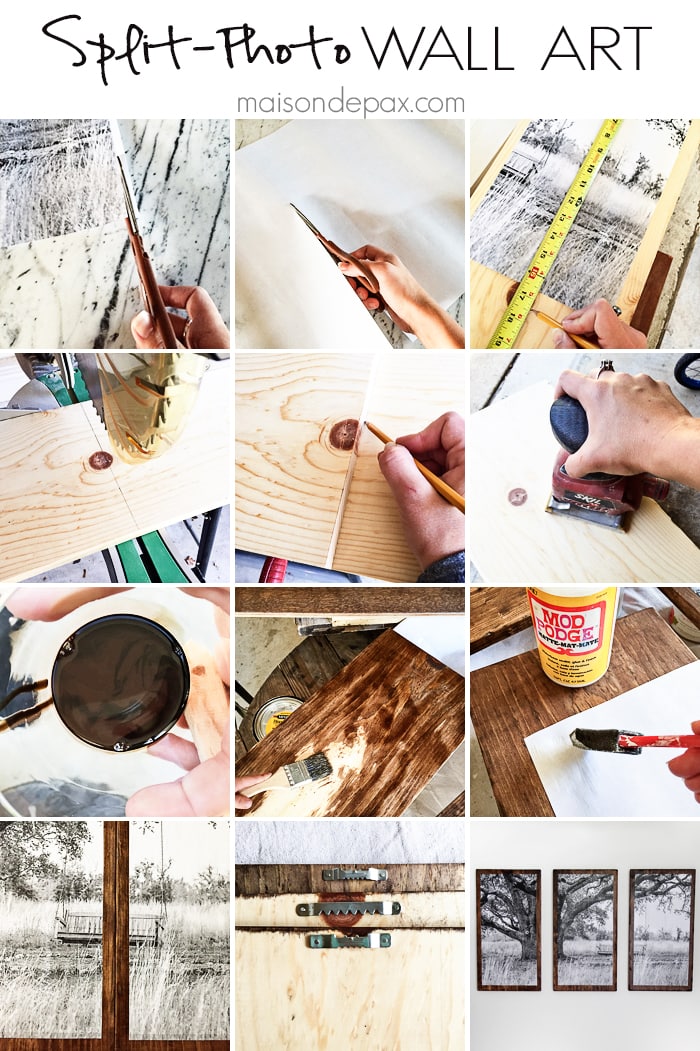
- Trim excess from your print.
- Divide into three even pieces (use a ruler and draw a straight edge to cut).
- Measure your boards (I made mine so that there would be an even edge around the picture).
- Cut your board.
- Measure and cut the remaining two (I placed #1 on top to measure #2 and #3 to ensure a perfect match).
- Sand all three boards until nice and smooth.
- Mix (or choose) your stain. I made a combo stain to try to match our wood floors.
- Hire a handsome 3 year old to stain for you (he’ll think he’s hit the jackpot and you’ll keep your nails clean 😉 ).
- Once stain is dry (I waited 24 hours), put a VERY light coat of Modge Podge all over the back of one print, then turn it over. Line it up carefully, and starting at the top, press down gently to remove all air bubbles. Repeat for other two.
- Put 1-2 more coats of Modge Podge on top of the print.
- Attach hangers to the back of your pieces.
- Hang evenly on the wall.
A word of warning: be careful applying the Modge Podge. The paper is pretty thin, so it can bubble easily if you get it too wet. Also, you could easily make a larger piece of art using a larger size of engineer print and a 1×12 board.
Other than looking awesome (if I do say so myself), I love the versatility and personalization options of this piece. Stain it any color you like. Use any image you like. The possibilities are endless… (Shameless plug: if you are looking for high quality black and white photography at affordable prices, check out my Etsy shop here.)
Now all that’s left is to share that other little beauty poking out from behind the door (tutorial coming soon!), and this baby is finished!

What do you think?

Sources:
wall color | trim color | hamper (in store several years ago)
floor mat | mirror | light | cabinet hardware
MORE DIY PROJECTS:


Absolutely divine! I love tree pictures and making it into three separate
panels is very creative.
Great way to make a hanging for a wall and i love your choice Rachel. Nothing like good help.
Thanks, Marlene. And yes, I’ve got a lot of “good help” around here! 😉
I love it! I am going to have to try this in our bathroom. Farm house art can get a little barnyard carried away sometimes. This is so much nicer. It speaks to me. Can’t wait to see the final reveal.
So so glad to hear it, Peggy. Thank you!
I think I LOVE it … actually KNOW I love it. May be just what I need for my remodeled Mast Bath. I was thinking of a stencil, but this would be better. Love the print.
Blessings,
Audrey Z. @ Timeless Treasures
I’m so glad you like it, Audrey! xx
Rach,
I love it! Classy, creative and affordable…just your style!
Thanks for sharing…might make a similar one 🙂
Shara
Awww… Thanks, Shara. Miss you, friend!! xx
that was a great idea.i have to make one myself.
Thanks, Miriam!
I love the combination of rustic wood with a crisp black and white print! I’ll have to go through some of my photos and see if any of them would work for this.
Thank you so much. So glad you like it!
Is the photo you used with the tree available? I didn’t see it on your site.
It’s there now. 🙂 Sorry for the delay!
I love the pic. And the way you did them. I had to go back and look again because I thought they were framed, then read your instructions…I can’t tell if your photo has been altered because your bathroom looks like a black and white photo with just the mirror and wood colored in. Oh and that lovely wicker basket! Love your taste. Thanks for sharing!
I’m so glad you like it, Ann! And thank you. That’s funny about the picture; it really is what my bathroom looks like… I hadn’t realized before, but you’re right!
Will you be offering the tree swing photo in your etsy shop?
It’s there now. 🙂 Sorry for the delay!
Hi – I just discovered your site and subscribed! Is this print still available? If so, could you direct me to it? I couldn’t find an ETSY shop –
Thank you!
Joy
I’m so glad you found me, Joy! Apologies about the missing print; I had forgotten to renew the listing last time someone purchased it. It’s available in the shop now, though! Hope this helps. 🙂