Instagram Display Frame
This was one of those came-to-me-one-afternoon-and-was-done-before-dinner projects.
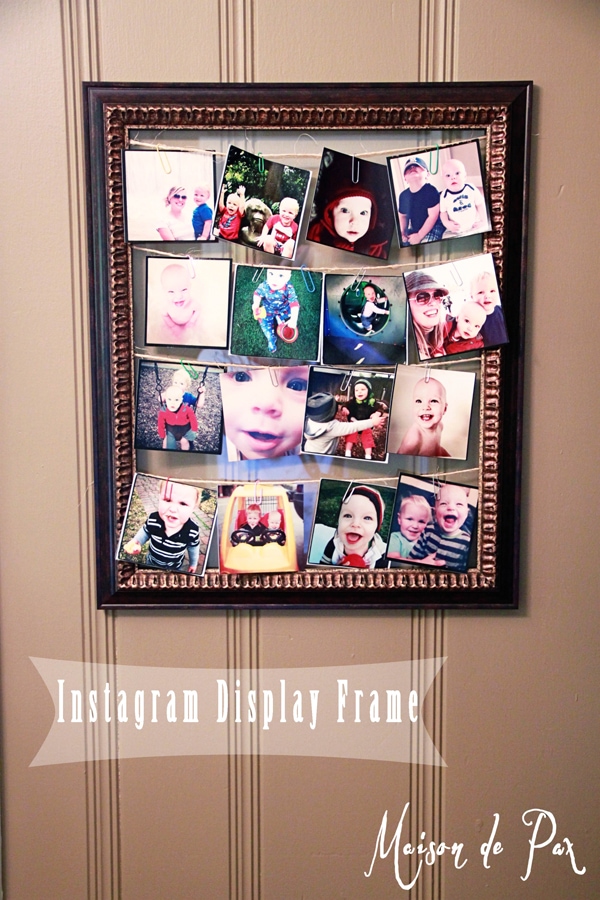
All you need is a frame of any size, twine, tape, paper clips, and photos.

The process:
- Have cute kids (or dogs, or friends, or grandkids, or whatever…).
- Take lots of instagram photos (actually, regular photos would work, too).
- Remove backing and glass from frame.
- Tape twine fairly loosely across the back of the frame (leaving enough slack that you can still slide the glass back into place).
- Reinsert glass on top of twine (so that when you turn the frame over, the twine will be in the front) . I chose not to insert anything behind the glass because I like the look of the paneled wall… but you could always put cool paper or fabric behind the glass if you don’t want to be able to see the wall through the frame.
- Use paperclips to attach your photos.
Here is what the back looks like: I made four evenly spaced “rows”:

And here you can see how the twine runs in front of the glass and then secures behind the frame:

It was easy and perfect for all those fun photos that might not be officially frame worthy (and let’s be honest, how often do you really want to change out all your pictures in frames?) but you’d still like to enjoy for a bit.

This is so super cute! I need something like this to hang up my pictures on, I love how easily I could change out the pictures with this!
I’m so glad you like it, Stephanie!
Where do you print your photos?? I’ve been looking forever to find a place that prints little squares!
I do mine through the Postal Pics app. The app is free, and the prints are pretty reasonable, especially if you order enough at a time so that your shipping costs don’t hit you. Hope you enjoy!